
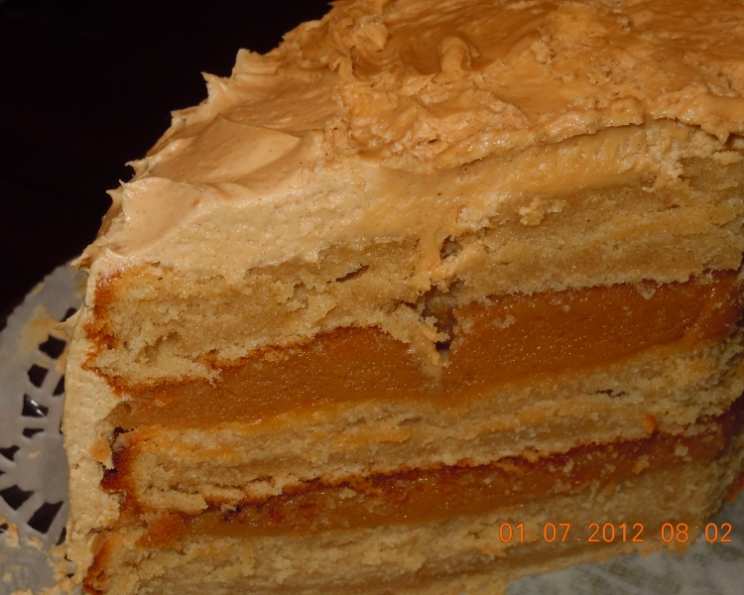
Addictive Peanut Butter Cake: A Southern Classic
The scent of peanut butter always transports me back to my childhood summers. My grandmother, a true Southern matriarch, would always have a peanut butter cake cooling on her counter, its sweet aroma wafting through the house. It wasn’t just a cake; it was a symbol of her love, a comforting presence that made every day feel like a celebration. This recipe, shared by a friend whose own grandmother perfected it, captures that same nostalgic magic.
Recipe Overview
- Prep Time: 20 minutes
- Cook Time: 20-25 minutes
- Total Time: 45 minutes
- Servings: 12-16
- Yield: 1 three-layer cake
- Dietary Type: Not Gluten-Free
Ingredients
For the Cake:
- 1 cup butter, softened
- 1 1/2 cups sugar
- 1 cup creamy peanut butter (or crunchy, if you prefer the added texture)
- 3 eggs
- 2 1/2 cups all-purpose flour
- 1 1/2 teaspoons baking powder
- 2 teaspoons baking soda
- 2 cups buttermilk
For the Icing:
- 2 cups sugar
- 1 cup milk
- 1 1/2 cups creamy peanut butter (or crunchy, if you prefer)
- 2 tablespoons butter
- 1 teaspoon vanilla extract
Equipment Needed
- 3 9-inch round cake pans
- Electric mixer (stand or hand-held)
- Mixing bowls
- Measuring cups and spoons
- Rubber spatula
- Wire rack
Instructions
-
Preheat your oven to 350°F (175°C). Grease and flour three 9-inch round cake pans. This ensures the cakes release easily after baking. A light dusting of flour after greasing prevents sticking.
-
In a large mixing bowl, cream together the softened butter and sugar until light and fluffy. This step is crucial for creating a tender cake. Don’t rush it!
-
Add the peanut butter to the creamed butter and sugar. Cream well until fully incorporated. This ensures even peanut butter flavor throughout the cake.
-
Add the eggs one at a time, mixing well after each addition. This allows each egg to emulsify properly, contributing to the cake’s structure.
-
In a separate bowl, whisk together the flour, baking powder, and baking soda. This ensures even distribution of the leavening agents.
-
Gradually add the combined dry ingredients to the wet ingredients alternately with the buttermilk, beginning and ending with the dry ingredients. Mix until just combined. Be careful not to overmix, as this can result in a tough cake. Overmixing develops gluten, leading to a less tender crumb. The batter should be smooth but not overworked.
-
Divide the batter evenly among the prepared cake pans.
-
Bake for 20 to 25 minutes, or until a wooden skewer inserted into the center comes out clean. Ovens vary, so start checking for doneness around 20 minutes. The cake should be golden brown and spring back lightly when touched.
-
Let the cakes cool in the pans for 10 minutes before inverting them onto a wire rack to cool completely. This prevents the cakes from sticking and allows them to cool evenly.
-
While the cakes are cooling, prepare the icing. In a medium saucepan, bring the sugar and milk to a boil over medium heat.
-
Boil for about 7 minutes, stirring constantly, until the mixture thickens slightly. Use a candy thermometer for accuracy; the mixture should reach the soft-ball stage (235-240°F or 112-115°C), but this is not strictly necessary. Keep a close eye and ensure constant stirring to prevent burning.
-
Remove the saucepan from the heat and add the peanut butter, butter, and vanilla extract.
-
Beat with an electric mixer (or whisk vigorously by hand) until smooth and reaches a spreading consistency. The icing should be thick enough to hold its shape but still easy to spread.
-
Once the cakes are completely cool, frost the first layer of cake with a generous amount of icing. Place the second layer on top and frost. Repeat with the final layer. Frost the top and sides of the cake.
Expert Tips & Tricks
- For an extra moist cake, brush the cooled cake layers with a simple syrup (equal parts sugar and water, simmered until the sugar dissolves) before frosting.
- If your icing becomes too thick, add a tablespoon of milk at a time until you reach the desired consistency.
- To prevent the cake layers from sliding, place small strips of parchment paper under the edges of the bottom layer before frosting. Once the icing has set, gently slide the parchment paper out.
- For a more intense peanut butter flavor, use natural peanut butter (the kind you have to stir) in both the cake and the icing. Be sure to stir it well before measuring.
- To easily remove the cake from the pans, you can also line the bottom of each pan with a circle of parchment paper.
Serving & Storage Suggestions
This Addictive Peanut Butter Cake is best served at room temperature. It’s perfect with a cold glass of milk or a scoop of vanilla ice cream.
Leftovers can be stored in an airtight container at room temperature for up to 3 days, in the refrigerator for up to a week, or in the freezer for up to 2 months. To freeze, wrap the cake tightly in plastic wrap and then in aluminum foil. Thaw in the refrigerator overnight before serving.
Nutritional Information
Note: Nutritional information is an estimate and may vary based on specific ingredients and serving size.
| Nutrient | Amount per Serving | % Daily Value |
|---|---|---|
| Calories | 650 kcal | 33% |
| Total Fat | 35g | 54% |
| Saturated Fat | 15g | 75% |
| Cholesterol | 80mg | 27% |
| Sodium | 450mg | 19% |
| Total Carbohydrate | 80g | 27% |
| Dietary Fiber | 2g | 8% |
| Sugars | 50g | N/A |
| Protein | 10g | 20% |
Variations & Substitutions
- Gluten-Free: Substitute the all-purpose flour with a gluten-free all-purpose flour blend. Be sure to add a teaspoon of xanthan gum for improved texture.
- Dairy-Free: Replace the butter with a vegan butter substitute, the buttermilk with a dairy-free buttermilk (mix dairy-free milk with lemon juice or vinegar), and the milk in the icing with dairy-free milk.
- Chocolate Peanut Butter: Add 1/2 cup of cocoa powder to the dry ingredients for a chocolatey twist. You can also add chocolate chips to the batter.
- Maple Peanut Butter: Substitute the sugar in the cake with maple syrup for a richer, more complex flavor. Reduce the amount of liquid slightly.
FAQs (Frequently Asked Questions)
Q: Can I use crunchy peanut butter instead of creamy?
A: Absolutely! Using crunchy peanut butter will add a delightful texture to both the cake and the icing. It’s a matter of personal preference.
Q: My cake is sinking in the middle. What did I do wrong?
A: This could be due to a few factors, such as using expired baking powder or baking soda, not preheating the oven properly, or opening the oven door too frequently during baking. Make sure your ingredients are fresh and avoid opening the oven unnecessarily.
Q: Can I make the cake layers ahead of time?
A: Yes! The cake layers can be baked, cooled, and wrapped tightly in plastic wrap, then stored in the refrigerator for up to 3 days or in the freezer for up to 2 months.
Q: My icing is too runny. How can I fix it?
A: Gradually add powdered sugar, one tablespoon at a time, until the icing reaches the desired consistency.
Q: Can I halve the recipe?
A: Yes, simply halve all the ingredients and bake in one or two smaller cake pans. Reduce the baking time accordingly, checking for doneness after about 15 minutes.
Final Thoughts
This Addictive Peanut Butter Cake is more than just a recipe; it’s a taste of home, a reminder of simpler times. I encourage you to try it and experience the joy of sharing this delicious cake with your loved ones. Don’t be afraid to experiment with variations and make it your own. And please, share your creations and feedback – I’d love to hear about your peanut butter cake adventures! Pair this with a robust coffee or a light dessert wine for a truly memorable experience.