
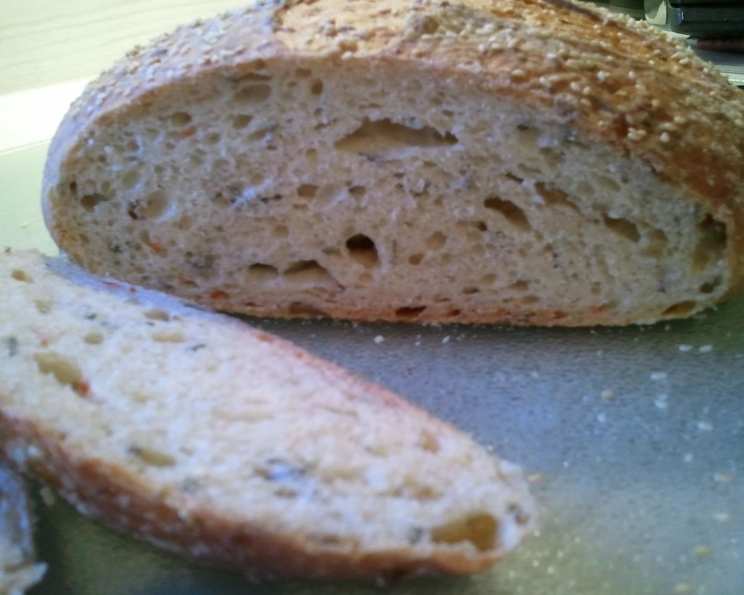
Almost No-Knead Bread With Olives, Rosemary, and Parmesan
I still remember the first time I baked bread. It was with my grandmother, and the aroma of yeast and warm dough filled her tiny kitchen. She let me punch down the dough, a task I took with utmost seriousness, giggling as the air rushed out. While that first loaf was a bit lopsided and dense, the sheer joy of creating something so fundamental from scratch has stayed with me. This Almost No-Knead Bread, with its salty olives, fragrant rosemary, and savory Parmesan, evokes that same sense of wonder, only it’s far easier to achieve a perfect loaf!
Recipe Overview
- Prep Time: 18 hours 10 minutes
- Cook Time: 50-60 minutes
- Total Time: 18 hours 70 minutes
- Yields: 1 round loaf
- Dietary Type: Vegetarian
Ingredients
- 3 cups unbleached all-purpose flour, plus additional for dusting work surface (15 ounces)
- 1/4 teaspoon fast rise yeast
- 1 1/2 teaspoons table salt
- 4 ounces finely grated Parmesan cheese
- 1 tablespoon minced fresh rosemary
- 3/4 cup water, plus 2 tablespoons water, at room temperature
- 1/2 cup chopped green olives (pitted)
- 1/4 cup mild-flavored lager beer, plus 2 tablespoons mild-flavored lager beer
- 1 tablespoon white vinegar
- Nonstick cooking spray
- Parchment Paper
Equipment Needed
- Large Bowl
- Rubber Spatula
- Plastic Wrap
- 10-inch Skillet
- 12- by 18-inch sheet of Parchment paper
- Large heavy-bottomed Dutch oven (with lid)
- Razor blade or sharp knife
- Wire rack
- Instant-read thermometer
Instructions
-
In a large bowl, whisk together the flour, yeast, salt, Parmesan, and rosemary.
-
Add the water (3/4 cup + 2 tablespoons), olives, beer (1/4 cup + 2 tablespoons), and vinegar.
-
Using a rubber spatula, fold the mixture, scraping up any dry flour from the bottom of the bowl, until a shaggy ball forms. The dough will be very wet; don’t worry!
-
Cover the bowl tightly with plastic wrap and let it sit at room temperature for 8 to 18 hours. This long fermentation process is what develops the incredible flavor.
-
Line the inside of a 10-inch skillet with a 12- by 18-inch sheet of parchment paper. Be sure to leave an overhang that you can use to easily lift the bread later.
-
Spray the parchment paper generously with nonstick cooking spray. This will prevent the bread from sticking to the paper.
-
Transfer the dough to a lightly floured work surface and knead it 10 to 15 times. It will still be sticky, but resist the urge to add too much flour.
-
Shape the dough into a ball by pulling the edges into the middle.
-
Transfer the dough, seam-side down, to the parchment-lined skillet and spray the surface of the dough with nonstick cooking spray.
-
Cover the skillet loosely with plastic wrap and let it rise at room temperature until the dough has doubled in size and does not readily spring back when poked with a finger, about 2 hours. You can also retard the rising by placing the dough in the refrigerator for up to 12 hours.
-
About 30 minutes before baking, adjust an oven rack to the lowest position, place a large heavy-bottomed Dutch oven (with a lid) on the rack, and heat the oven to 500 degrees Fahrenheit. It is absolutely crucial that your Dutch oven can handle this high temperature. Some enamel coatings can be damaged by prolonged exposure to 500°F.
-
Lightly flour the top of the dough. Using a razor blade or sharp knife, make one 6-inch-long, 1/2-inch-deep slit along the top of the dough. This will allow the bread to expand evenly as it bakes.
-
Carefully remove the pot from the oven and remove the lid. Use oven mitts – the pot will be extremely hot!
-
Pick up the dough by lifting the parchment overhang and lower it carefully into the pot, letting any excess parchment hang over the pot edge.
-
Cover the pot with the lid and place it back in the oven.
-
Immediately reduce the oven temperature to 425 degrees Fahrenheit and bake the bread, covered, for approximately 30 minutes.
-
Remove the lid and continue to bake until the loaf is a deep brown color and an instant-read thermometer inserted into the center registers 210 degrees Fahrenheit. This should take another 20 to 30 minutes.
-
Carefully remove the bread from the pot using the parchment paper overhang. Transfer it to a wire rack and cool to room temperature, about 2 hours, before slicing and serving. Resist the temptation to cut into it while it’s still hot!
Expert Tips & Tricks
- Don’t over-knead: The beauty of this recipe is in its simplicity. Over-kneading will result in a tough loaf.
- Patience is key: The long fermentation and rise times are crucial for developing the bread’s complex flavor and airy texture.
- The Dutch oven is your friend: A heavy Dutch oven is essential for creating a crusty exterior and a soft, chewy interior. If you don’t have a Dutch oven, you can try using a heavy stockpot with a lid, but the results may vary.
- Scoring the dough: Scoring the top of the dough allows it to expand evenly during baking, preventing unsightly cracks.
- Listen to your bread: The baking time may vary depending on your oven. The best way to tell if the bread is done is to check the internal temperature with an instant-read thermometer.
Serving & Storage Suggestions
This bread is fantastic served warm with a drizzle of good olive oil or alongside a bowl of hearty soup. It also makes excellent sandwiches or toast. To store, wrap the cooled loaf in plastic wrap or place it in a bread bag at room temperature for up to 3 days. For longer storage, you can freeze the bread for up to 2 months. To reheat, thaw the bread completely and then warm it in a 350-degree Fahrenheit oven for 10-15 minutes, or until heated through.
Nutritional Information
| Nutrient | Amount per Serving | % Daily Value |
|---|---|---|
| Calories | 2136.5 kcal | N/A |
| Calories from Fat | 419 g | 20% |
| Total Fat | 46.6 g | 71% |
| Saturated Fat | 21.6 g | 108% |
| Cholesterol | 99.8 mg | 33% |
| Sodium | 6297.5 mg | 262% |
| Total Carbohydrate | 308.8 g | 102% |
| Dietary Fiber | 12.8 g | 51% |
| Sugars | 2.5 g | 9% |
| Protein | 85.4 g | 170% |
Note: Nutritional information is an estimate and may vary based on specific ingredients and preparation methods.
Variations & Substitutions
- Cheese Variations: Try using different types of cheese, such as Asiago, Pecorino Romano, or even a smoked Gouda.
- Herb Variations: Experiment with other herbs, such as thyme, oregano, or sage.
- Olive Variations: Use a mix of different types of olives, such as Kalamata, Cerignola, or Nicoise.
- Spicy Kick: Add a pinch of red pepper flakes to the dough for a little heat.
- Sweet & Savory: Add a handful of dried cranberries or apricots for a touch of sweetness.
- Gluten-Free Option: While this recipe uses all-purpose flour, you can try substituting a gluten-free all-purpose blend. Note that the texture may be slightly different.
FAQs (Frequently Asked Questions)
Q: Why is my dough so sticky?
A: This dough is meant to be quite wet. Resist the urge to add too much extra flour, as this can make the bread tough. A wet dough results in a more open crumb structure.
Q: Can I use active dry yeast instead of fast-rise yeast?
A: Yes, you can. If using active dry yeast, dissolve it in a small amount of warm water before adding it to the dough.
Q: My Dutch oven doesn’t go up to 500 degrees. Can I still make this bread?
A: Yes. You can reduce the temperature to the maximum your Dutch oven can safely handle. Be sure to preheat it thoroughly, and the baking time may need to be adjusted.
Q: Can I make the dough ahead of time and bake it later?
A: Yes! You can let the dough rise in the refrigerator for up to 12 hours. This will also develop the flavor further. Just be sure to bring it to room temperature before baking.
Q: What if I don’t have parchment paper?
A: Parchment paper makes it easy to transfer the dough to and from the Dutch oven. If you don’t have any, you can grease the bottom of the Dutch oven very well with butter or oil, and sprinkle it with cornmeal to prevent sticking.
Final Thoughts
This Almost No-Knead Bread with Olives, Rosemary, and Parmesan is more than just a recipe; it’s an experience. From the initial mixing of ingredients to the final, satisfying crackle as you slice into the golden-brown crust, every step is a testament to the magic of simple ingredients transformed into something truly special. So, gather your ingredients, preheat your oven, and prepare to be amazed by the incredible aroma and flavor of this homemade masterpiece. Don’t hesitate to experiment with variations and make it your own! And most importantly, share your delicious creation with friends and family. They’ll thank you for it!