
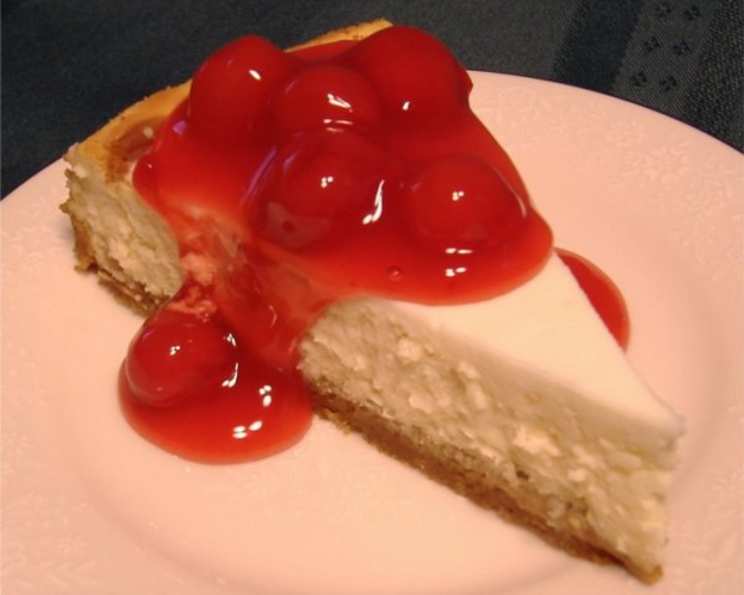
The Quintessential Baked Cheesecake: A Slice of Nostalgia
I can almost smell it now: the gentle tang of cream cheese, the whisper of vanilla, the satisfying weight of a perfect slice on my grandmother’s floral china. My earliest memories of baking involve hovering around her kitchen, mesmerized by the transformation of simple ingredients into that golden, creamy cloud. Every holiday, every birthday, every reason to celebrate, there it was: her signature baked cheesecake, a testament to love, patience, and the unparalleled joy of a homemade dessert. It’s a tradition I’ve carried on, and I’m thrilled to share a recipe that captures that same magic.
Recipe Overview
- Prep Time: 25 minutes
- Cook Time: 1 hour 20 minutes
- Total Time: 4 hours (includes chilling)
- Servings: 16
- Yield: 1 cheesecake
- Dietary Type: Not specified
Ingredients
- For the Crust:
- 1 1/4 cups graham cracker crumbs
- 1/4 cup sugar
- 1/3 cup butter, melted
- For the Filling:
- 3 (8 ounce) packages cream cheese, softened
- 1 cup sugar
- 3 large eggs
- 1/2 cup sour cream
- 2 tablespoons lemon juice
- 1 tablespoon vanilla extract (or 2 teaspoons vanilla and 1 teaspoon almond extract)
- For the Topping:
- 1 cup sour cream
- 3 tablespoons sugar
- For Garnish:
- 2 cups fresh berries (or your favorite topping)
Equipment Needed
- 10-inch springform pan
- Mixing bowl or food processor
- Electric mixer (handheld or stand)
- Aluminum foil
- Wire rack
Instructions
- Prepare the Crust: In a medium bowl, combine the graham cracker crumbs, sugar, and melted butter. Mix well until evenly moistened.
- Press the Crust: Press the mixture firmly into the bottom of a 10-inch springform pan. Ensure the crust is even and compacted for a sturdy base. Don’t be afraid to use the bottom of a measuring cup to help flatten it. Then, set aside.
- Make the Filling: In a large mixing bowl or food processor, blend the softened cream cheese and sugar together until completely smooth and creamy. This step is crucial to prevent lumps in your final cheesecake.
- Incorporate the Eggs: Add the eggs one at a time, blending well after each addition. Be careful not to overmix at this stage, as this can incorporate too much air and cause the cheesecake to crack during baking.
- Add Remaining Filling Ingredients: Add the sour cream, lemon juice, and vanilla extract (or vanilla and almond extract). Blend until just combined and smooth.
- Pour and Spread: Pour the filling over the prepared crust in the springform pan. Spread evenly to ensure a uniform thickness.
- Create a Foil Tent: Lay a sheet of aluminum foil over the top of the pan, bending it slightly to form a “foil tent” that does not touch the cheesecake. This will prevent the top from browning too quickly.
- Bake the Cheesecake: Bake in a preheated oven at 350°F (175°C) for 1 hour and 15 minutes. Remove the foil tent after 50-55 minutes, or until the top of the cheesecake is set. The center should still have a slight jiggle.
- Prepare the Sour Cream Topping: While the cheesecake is baking, combine the sour cream and sugar in a small bowl. Mix well until the sugar is dissolved.
- Add the Topping: Remove the cheesecake from the oven and immediately spread the sour cream mixture evenly over the top.
- Set the Topping: Return the cheesecake to the oven for another 5 minutes to set the topping.
- Cool and Chill: Remove the cheesecake from the oven and cool on a wire rack to room temperature. Once cooled, cover and refrigerate for at least 3 hours, or preferably overnight, to chill thoroughly. This chilling period is vital for the cheesecake to fully set and develop its signature creamy texture.
- Garnish and Serve: Just before serving, remove the sides of the springform pan. Transfer the cheesecake to a serving platter. Garnish with fresh berries or your favorite topping.
Optional Crust Tip: Just before pressing the graham crust into the bottom of the springform pan, spray the pan’s inner sides with a little no-stick cooking spray, sprinkle a spoonful of combined graham cracker crumbs and sugar into the pan, then tilt and spread that mixture around so that it sticks to the coated sides and later adds to the visual appeal of your finished cheesecake.
Expert Tips & Tricks
- Water Bath (Optional): For an even creamier cheesecake and to minimize cracks, consider baking the cheesecake in a water bath. Wrap the bottom of the springform pan in aluminum foil and place it inside a larger pan. Fill the outer pan with hot water, reaching halfway up the sides of the springform pan. This creates a humid environment that promotes even baking.
- Preventing Cracks: Avoid opening the oven door frequently during baking, as temperature fluctuations can cause cracks. Let the cheesecake cool gradually in the oven with the door slightly ajar for about an hour before transferring it to a wire rack.
- Checking for Doneness: The cheesecake is done when the edges are set, but the center still has a slight jiggle. It will continue to set as it cools.
- Softened Cream Cheese is Key: Make sure your cream cheese is fully softened before blending it. This ensures a smooth, lump-free filling.
- Don’t Overmix: Overmixing the filling can incorporate too much air, which can cause the cheesecake to puff up and then collapse, leading to cracks.
Serving & Storage Suggestions
Serve the cheesecake chilled. For an elegant presentation, arrange fresh berries around the base of the cheesecake or create a decorative pattern on top. Other delicious toppings include chocolate sauce, caramel sauce, fruit compote, or whipped cream.
Leftover cheesecake should be stored in an airtight container in the refrigerator for up to 5 days. For longer storage, cheesecake can be frozen. Wrap individual slices tightly in plastic wrap and then in foil, or store them in a freezer-safe container. Frozen cheesecake can be thawed in the refrigerator overnight.
Nutritional Information
| Nutrient | Amount per Serving | % Daily Value |
|---|---|---|
| Calories | 334.7 kcal | N/A |
| Calories from Fat | 218 g | 65% |
| Total Fat | 24.2 g | 37% |
| Saturated Fat | 13.5 g | 67% |
| Cholesterol | 103.1 mg | 34% |
| Sodium | 232.6 mg | 9% |
| Total Carbohydrate | 25.7 g | 8% |
| Dietary Fiber | 0.2 g | 0% |
| Sugars | 22.3 g | 89% |
| Protein | 4.7 g | 9% |
Variations & Substitutions
- Gluten-Free Crust: Substitute the graham cracker crumbs with gluten-free graham crackers or a blend of almond flour and gluten-free oats.
- Chocolate Cheesecake: Add 1/4 cup of cocoa powder to the filling for a rich chocolate flavor.
- Lemon Cheesecake: Increase the lemon juice to 1/4 cup and add the zest of one lemon to the filling for a brighter, more citrusy flavor.
- Seasonal Fruit: Top the cheesecake with seasonal fruits such as peaches, blueberries, or raspberries for a delightful twist.
- Different Extracts: Experiment with different extracts like almond, coconut, or orange to customize the flavor of the cheesecake.
- Dairy-Free Cheesecake: Substitute the cream cheese and sour cream with plant-based alternatives. Be sure to find brands that are specifically designed for baking, as their texture and performance will be more similar to dairy-based products.
FAQs (Frequently Asked Questions)
Q: Why did my cheesecake crack?
A: Cheesecake cracks can be caused by overbaking, rapid temperature changes, or overmixing the batter. To prevent cracks, avoid opening the oven door frequently, let the cheesecake cool gradually, and don’t overmix the filling.
Q: Can I make this cheesecake ahead of time?
A: Yes, cheesecake is a great make-ahead dessert. It needs to chill for several hours anyway, so making it a day or two in advance is perfectly fine. Just store it covered in the refrigerator.
Q: How do I get the cheesecake out of the springform pan cleanly?
A: Run a thin knife or spatula around the edge of the cheesecake before releasing the springform pan. This will help to loosen it and prevent tearing.
Q: Can I freeze this cheesecake?
A: Yes, you can freeze cheesecake. Wrap it tightly in plastic wrap and then in foil to prevent freezer burn. Thaw it in the refrigerator overnight before serving.
Q: Why is my cheesecake grainy?
A: Grainy cheesecake is often caused by using cream cheese that wasn’t fully softened or by overbaking. Make sure your cream cheese is soft and avoid overbaking by checking for doneness after about an hour.
Final Thoughts
Baking this cheesecake isn’t just about following a recipe; it’s about creating an experience. From the comforting aroma that fills your kitchen to the satisfied smiles of those who share it with you, every step is a celebration. Whether you’re a seasoned baker or just starting out, I encourage you to try this recipe and make it your own. Add your favorite toppings, experiment with different flavors, and most importantly, savor every delicious bite. And if you decide to try this recipe, please let me know how it turned out in the comments below! I’d love to hear about your cheesecake creations.