
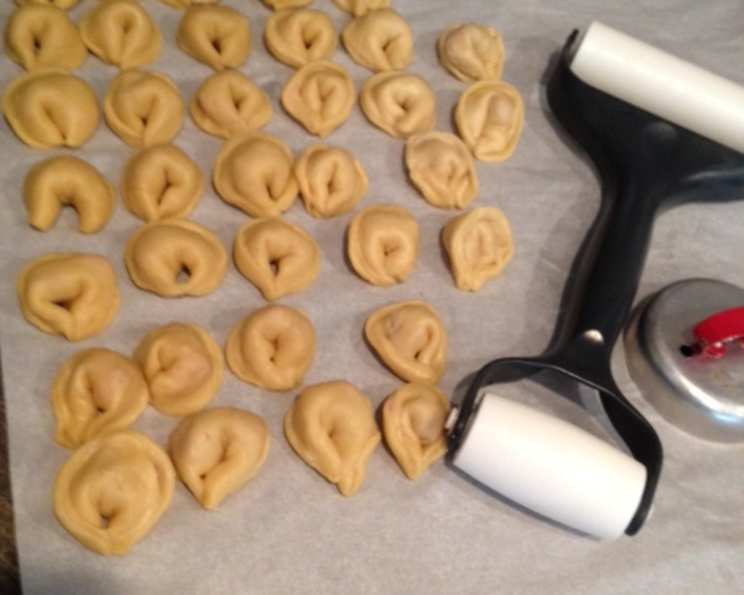
Mastering the Art of Homemade Tortellini
The aroma of freshly made pasta always transports me back to my grandmother’s sun-drenched kitchen in Bologna. As a child, I would perch on a stool, mesmerized as she effortlessly transformed simple ingredients into delicate masterpieces. One memory stands out: the endless patience she poured into crafting tortellini, each tiny ring a testament to her love. Her wrinkled hands moved with a grace that only decades of pasta-making could bestow, the secrets passed down through generations. Today, I try to emulate that same dedication in my own kitchen.
Recipe Overview
- Prep Time: 1 hour
- Cook Time: 6 minutes
- Total Time: 1 hour 6 minutes
- Servings: 6
- Yield: Approximately 72 tortellini
- Dietary Type: Vegetarian (can be adapted to vegan depending on filling)
Ingredients
- 2 cups flour
- 1 pinch salt
- 3 eggs
- 1 tablespoon oil
- 1 tablespoon water
Equipment Needed
- Large mixing bowl
- Whisk
- Clean, lightly floured work surface
- Rolling pin or pasta machine
- Small round cookie cutter or knife (approximately 2 inches in diameter)
- Large pot
- Slotted spoon or spider strainer
Instructions
- In a large mixing bowl, mix together the flour and salt. This ensures the salt is evenly distributed throughout the dough.
- Create a well in the center of the flour mixture. This well will act as a reservoir for the wet ingredients.
- In a separate bowl, thoroughly whisk together the three eggs, oil, and water. Ensure the mixture is homogenous.
- Gradually add the wet ingredients to the center of the flour well, mixing little by little. Use a fork or your fingers to incorporate the flour from the inner walls of the well. Continue until the dough starts to come together.
- Once the dough begins to form a ball, turn it out onto a lightly floured surface.
- Knead the dough until it becomes smooth and elastic. This may take 5-7 minutes. The dough should be pliable but not sticky. If the dough is too dry, add a tiny amount of water (a teaspoon at a time) until it reaches the desired consistency. Conversely, if it’s too sticky, add a little flour.
- Place the dough in a lightly oiled bowl, cover it with plastic wrap, and allow it to rest for thirty minutes. This resting period allows the gluten to relax, making the dough easier to roll out.
- After thirty minutes, cut the dough into smaller portions (about the size of a tennis ball). This makes it easier to handle and roll out thinly.
- On a lightly floured surface, roll out each portion of dough very thinly using a rolling pin or a pasta machine. Aim for a thickness similar to that of a playing card. If using a pasta machine, start with the widest setting and gradually decrease the thickness.
- Cut the rolled-out dough into circles that are approximately 2 inches in diameter using a cookie cutter or knife. These circles will form the basis of your tortellini.
- Place approximately ½ to ¾ teaspoon of your desired filling in the center of each dough circle. (See my recipes for various tortellini fillings—these are what I’ve used to fill this pasta.)
- To shape the tortellini, fold the circle over into a half-moon shape, pressing firmly along the edges to seal and remove any air pockets.
- Join the two points of the half-moon around your finger, forming a ring shape. Press firmly to secure the ends. This step requires a bit of practice, but the result is a beautiful and distinctive tortellini shape.
- In a large pot, bring a generous amount of salted water to a rolling boil. The water should be salty enough to taste like the sea.
- Cook the tortellini in 2-3 batches to avoid overcrowding the pot. Overcrowding can lower the water temperature and result in soggy pasta.
- Cook the tortellini for approximately 6 minutes, or until they are firm to the touch and float to the surface. The exact cooking time will depend on the thickness of the dough and the type of filling.
- Using a slotted spoon or spider strainer, remove the cooked tortellini from the water and drain them well.
- Add the cooked tortellini to your favorite sauce and serve immediately.
Expert Tips & Tricks
- Dough Consistency is Key: The perfect tortellini dough should be smooth, elastic, and not too sticky. Adjust the flour and water accordingly.
- Roll it Thin: The thinner the dough, the more delicate the tortellini will be. Aim for near-transparency.
- Seal it Right: Ensure the tortellini are properly sealed to prevent the filling from escaping during cooking.
- Don’t Overcook: Overcooked tortellini will be mushy. Cook just until they are firm to the bite.
- Freeze for Later: Freshly made tortellini can be frozen for later use. Spread them out on a baking sheet lined with parchment paper and freeze until solid. Then, transfer them to a freezer bag. Cook directly from frozen, adding a minute or two to the cooking time.
- Use Semolina Flour: Consider using a blend of all-purpose flour and semolina flour for a slightly coarser texture and a more authentic Italian flavor.
Serving & Storage Suggestions
Serve your homemade tortellini immediately after cooking, tossed in your favorite sauce. Classic pairings include a simple butter and sage sauce, a creamy tomato sauce, or a rich meat ragu. For an elegant presentation, garnish with freshly grated Parmesan cheese and a sprig of parsley.
Leftover cooked tortellini can be stored in an airtight container in the refrigerator for up to 2 days. Reheat gently in a saucepan with a little sauce or broth.
Uncooked, filled tortellini can be frozen for up to 2 months. Cook directly from frozen.
Nutritional Information
(Note: This is an estimate and will vary depending on the filling used.)
| Nutrient | Amount per Serving | % Daily Value |
|---|---|---|
| Calories | 380 kcal | 19% |
| Total Fat | 12g | 18% |
| Saturated Fat | 4g | 20% |
| Cholesterol | 190mg | 63% |
| Sodium | 150mg | 7% |
| Total Carbohydrate | 55g | 18% |
| Dietary Fiber | 3g | 12% |
| Sugars | 2g | 4% |
| Protein | 15g | 30% |
Variations & Substitutions
- Gluten-Free Tortellini: Use a gluten-free flour blend specifically designed for pasta making. You may need to adjust the liquid content to achieve the right dough consistency.
- Vegan Tortellini: Substitute the eggs with a mixture of aquafaba (chickpea brine) and olive oil. Ensure you also use a vegan filling.
- Spinach Tortellini: Add pureed spinach to the dough for a vibrant green color and extra nutrients.
- Whole Wheat Tortellini: Substitute some of the all-purpose flour with whole wheat flour for a nuttier flavor and increased fiber content.
- Different Fillings: Get creative with your fillings! Experiment with ricotta and spinach, butternut squash, mushroom duxelles, or even a spicy sausage filling.
FAQs (Frequently Asked Questions)
Q: Why is my tortellini dough so sticky?
A: The dough might be too wet. Try adding a little flour, one tablespoon at a time, until the dough is smooth and elastic.
Q: How do I prevent the tortellini from sticking together during cooking?
A: Cook the tortellini in batches and ensure the water is at a rolling boil. Adding a tablespoon of oil to the cooking water can also help prevent sticking.
Q: Can I use store-bought pasta dough for this recipe?
A: While homemade dough is preferred for its superior texture and flavor, you can use store-bought fresh pasta sheets as a shortcut.
Q: How long can I freeze uncooked tortellini?
A: Properly frozen tortellini can be stored for up to 2 months without significant loss of quality.
Q: My tortellini filling is too wet. What should I do?
A: If your filling is too wet, try adding a binding agent like breadcrumbs or grated Parmesan cheese to absorb the excess moisture. Ensure the filling is well-drained before using.
Final Thoughts
Making homemade tortellini is a labor of love, but the reward is a dish that is far superior to anything you can buy in a store. The delicate texture of the pasta, combined with the flavorful filling, creates a truly unforgettable culinary experience. Gather your family or friends, put on some Italian music, and embark on this pasta-making adventure together. Don’t be afraid to experiment with different fillings and sauces to create your own signature tortellini dish. Buon appetito!