
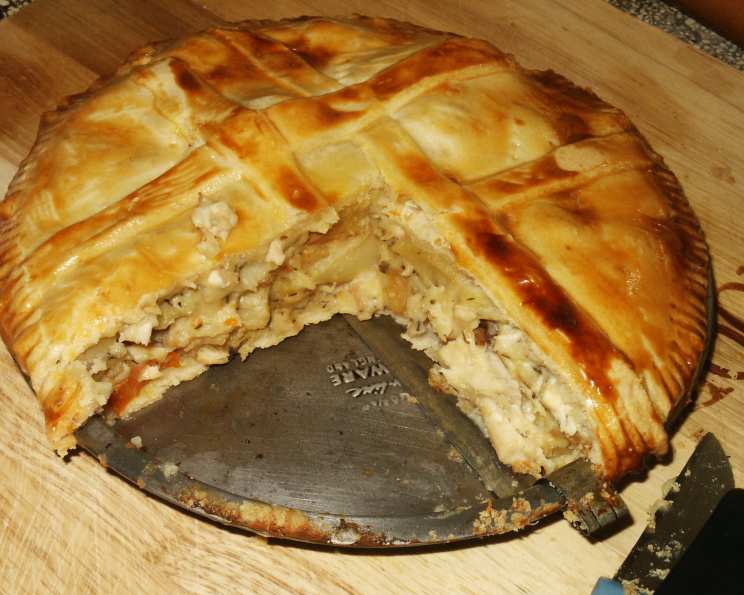
Roasted Chicken Pot Pie: A Culinary Hug
There’s something truly magical about the aroma of a bubbling pot pie filling a kitchen. For me, it instantly transports me back to my grandmother’s cozy farmhouse. I can almost smell the wood-burning stove and feel the warmth of her loving embrace as she’d pull a golden-brown pot pie from the oven. The flaky crust, the savory filling—it was pure comfort on a plate. This Roasted Chicken Pot Pie is my tribute to those cherished memories.
Recipe Overview
- Prep Time: 45 minutes
- Cook Time: 1 hour 15 minutes
- Total Time: 2 hours
- Servings: 4
- Yield: 1 large pot pie or 4 individual pot pies
- Dietary Type: Not specified; contains meat and gluten
Ingredients
- 1 (3 lb) chicken
- 3 tablespoons olive oil
- Salt and pepper
- 2 medium potatoes, cut into 1/2 inch chunks (Yukon Gold)
- 3 medium carrots, cut into 1/2 inch chunks
- 24 white pearl onions, peeled & left whole
- 1 clove garlic, minced
- 8 mushrooms, halved or quartered if large
- 2 tablespoons chopped parsley
- 2 tablespoons chopped rosemary
- 2 tablespoons chopped thyme
- 1 cup peas, defrosted if frozen
SAUCE
- 4 cups chicken stock
- 6 tablespoons butter (or less)
- 6 tablespoons flour
- Salt and pepper
CRUST
- 1 package puff pastry (homemade or purchased)
EGG WASH
- 1/2 egg yolk, beaten
- 1/4 cup cream
Equipment Needed
- Large flameproof roasting pan
- Measuring cups
- Slotted spoon
- Whisk
- Pastry brush
- Ovenproof bowls (18 oz each) or 2-qt casserole dish
- Baking sheet
- Circle template (foil or paper)
Instructions
-
Preheat your oven to 375ºF (190ºC).
-
Prepare the Chicken: Rub the chicken with 1 tablespoon of olive oil, then sprinkle generously, both inside and out, with salt and pepper.
-
Prepare the Vegetables: In a large bowl, toss the potatoes, carrots, onions, garlic, mushrooms, and herbs (parsley, rosemary, thyme) with the remaining 2 tablespoons of olive oil. Season with salt and pepper.
-
Roast the Chicken and Vegetables: Place the chicken breast-side down in a large flameproof roasting pan. Scatter the prepared vegetables around the chicken.
-
Roast for 1 hour and 15 minutes, stirring the vegetables several times during cooking to ensure even browning.
-
Remove the chicken from the pan and allow it to cool slightly.
-
Use a slotted spoon to remove the vegetables from the roasting pan. Place them in a bowl with the peas and set aside.
-
Do not clean out the roasting pan; the flavorful bits stuck to the bottom are essential for the sauce.
-
Once the chicken has cooled enough to handle (at least 15 minutes), pull the meat from the bones, discarding the skin and bones. Cut the meat into small chunks (approximately 1/2″ to 1″) and set aside. Ideally, do this after the sauce is made or while someone else is preparing the sauce to keep the chicken moist.
-
Make the Sauce: Assess the roasting pan. If there aren’t many pan juices and fat, skip to step 15. If there are a good amount of juices, pour the fat and juices into a measuring cup or gravy separator. Separate the fat from the juice.
-
Add the collected juices to the chicken stock. Then, add enough butter to the separated fat to make a total of 6 tablespoons of fat and butter combined.
-
Place the roasting pan (with the caramelized bits still in it) on the stove over medium heat.
-
Pour in the 6 tablespoons of fat + butter. Once melted and bubbling, add the flour. Stir constantly to create a smooth roux, scraping up any caramelized bits from the bottom of the pan.
-
Cook the roux, stirring constantly, until lightly browned, approximately 5 minutes. This step is crucial for developing a rich, nutty flavor in the sauce.
-
Gradually add the chicken stock to the roux, bringing the mixture to a boil and then reducing it to a simmer.
-
Continue to stir and scrape the bottom of the pan to prevent sticking. Cook the sauce for at least 15 minutes, whisking occasionally, until it thickens to the consistency of heavy cream.
-
Season the sauce with salt, pepper, and more herbs to taste. Don’t be shy; this is where you can really personalize the flavor.
-
Make the Egg Wash: In a small bowl, whisk together the egg yolk and cream. Set aside.
-
Assemble the Pot Pie(s): Preheat the oven to 400ºF (200ºC).
-
Choose either four ovenproof bowls (approximately 18 oz each) or one 2-quart casserole dish.
-
Cut out a circle template from foil or paper that is slightly larger than the rim of each bowl or the casserole dish. This template will guide the size of your pastry crust.
-
Divide the chicken, vegetables, and sauce evenly among the chosen dishes.
-
Place the filled dishes on a baking sheet to catch any potential drips in the oven.
-
For Individual Pies: On a lightly floured surface, divide the puff pastry into four equal pieces. Quickly roll out each piece into a circle that is larger than the circle template. The extra dough will drape down the sides of the bowls. Remember to work quickly to prevent the butter in the pastry from melting; sprinkle the dough with flour as needed to prevent sticking.
-
As each pastry circle is rolled out, place it on top of a filled bowl, gently pressing along the edges to seal.
-
For One Large Pie: Lay the puff pastry on a floured surface and roll it out into a shape that is slightly larger than the casserole template. The extra dough will drape down the sides. Work quickly to prevent the butter in the pastry from melting; sprinkle the dough with flour as needed to prevent sticking.
-
Carefully lay the dough on top of the filled casserole dish, pressing along the edges to seal.
-
Brush the egg wash evenly onto the pastry using a pastry brush.
-
There is no need to make any vent holes in the crust; steam will naturally escape along the edges of the pastry.
-
Bake for 30 to 55 minutes, or until the crust is thoroughly browned and puffed. The exact baking time will depend on your oven and whether you are making individual pies or one large pie.
Expert Tips & Tricks
- For a richer flavor, consider using bone-in chicken thighs in addition to, or instead of, a whole chicken.
- If you don’t have time to make your own puff pastry, high-quality store-bought pastry works perfectly well. Just be sure to thaw it according to the package directions.
- To prevent the bottom crust from becoming soggy, blind bake it for about 10 minutes before adding the filling.
- Adding a splash of dry sherry or white wine to the sauce adds depth and complexity.
- If the crust is browning too quickly, tent it with foil during the last 15-20 minutes of baking.
- Get creative with your herb selection. Fresh tarragon or chives would be lovely additions.
- If your sauce is too thin, whisk a tablespoon of cornstarch with a tablespoon of cold water, then whisk the slurry into the simmering sauce.
Serving & Storage Suggestions
Serve your Roasted Chicken Pot Pie hot from the oven. Garnish with a sprinkle of fresh parsley for a pop of color. Leftovers can be stored in the refrigerator for up to 3 days. To reheat, cover the pot pie with foil and bake in a preheated oven at 350°F (175°C) until heated through. You can also reheat individual portions in the microwave. Freezing is also an option; wrap tightly in plastic wrap and then foil. Thaw completely in the refrigerator before reheating.
Nutritional Information
| Nutrient | Amount per Serving | % Daily Value |
|---|---|---|
| Calories | 650 kcal | 33% |
| Total Fat | 35g | 54% |
| Saturated Fat | 20g | 100% |
| Cholesterol | 150mg | 50% |
| Sodium | 500mg | 21% |
| Total Carbohydrate | 50g | 17% |
| Dietary Fiber | 5g | 20% |
| Sugars | 10g | N/A |
| Protein | 30g | 60% |
Note: Nutritional information is an estimate and may vary based on specific ingredients and portion sizes.
Variations & Substitutions
- For a vegetarian option, substitute the chicken with roasted root vegetables like parsnips, sweet potatoes, and butternut squash.
- Use gluten-free puff pastry for a gluten-free version.
- Add different vegetables, such as green beans, celery, or corn.
- Substitute the cream in the egg wash with milk or a plant-based alternative.
- Add a touch of spice with a pinch of red pepper flakes or a dash of hot sauce to the filling.
FAQs (Frequently Asked Questions)
Q: Can I make this pot pie ahead of time?
A: Yes, you can prepare the filling and assemble the pot pie(s) a day in advance. Store them in the refrigerator, and bake just before serving.
Q: Can I use a different type of pastry for the crust?
A: While puff pastry provides the best flaky texture, you can also use pie crust or even biscuit dough.
Q: My crust is browning too quickly. What should I do?
A: Tent the pot pie with aluminum foil to shield the crust from direct heat.
Q: How do I prevent the bottom crust from becoming soggy?
A: Blind bake the bottom crust before adding the filling, or use a pie shield to protect the edges.
Q: Can I freeze leftover pot pie?
A: Yes, wrap tightly in plastic wrap and then foil. Thaw completely in the refrigerator before reheating.
Final Thoughts
I truly hope this Roasted Chicken Pot Pie brings as much joy and comfort to your table as it has to mine for generations. Don’t hesitate to make it your own, experimenting with different herbs, vegetables, or spices to create a truly unique culinary experience. And please, share your creations and feedback with me – I’d love to hear how it turns out! Consider pairing it with a crisp green salad and a glass of chilled white wine for a complete and satisfying meal.