
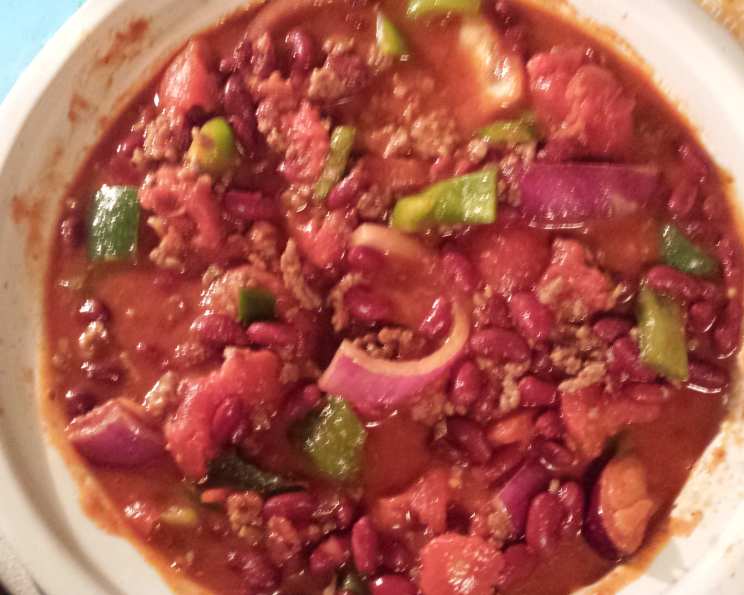
Brew & Beef: The Ultimate Beer Chili Recipe
The first time I tasted truly exceptional chili was at a family gathering, much like the ones I grew up with. My uncle, usually a man of few words, beamed with pride as he ladled out bowls of his “secret recipe.” It was unlike anything I’d had before – rich, complex, and with a subtle depth that lingered on the palate. Only later did I learn his secret ingredient: a bottle of his favorite dark ale. From that moment on, I knew that beer and chili were a match made in culinary heaven, a combination that elevates this classic comfort food to something truly special.
Recipe Overview
- Prep Time: 15 minutes
- Cook Time: 35 minutes
- Total Time: 50 minutes
- Servings: 8-10
- Yield: About 3 quarts
- Dietary Type: Varies (can be gluten-free with appropriate beer and chips)
Ingredients
- 1 (12 ounce) can beer, of your choice (stouts and amber ales work well)
- 1 (46 ounce) can V8 vegetable juice
- 1 (8 ounce) can kidney beans (mild or hot)
- 1 (8 ounce) can chili beans (mild or hot)
- 1 (8 ounce) can diced tomatoes
- 1 lb ground beef (browned and drained)
- 1 medium chopped onion
- 1 chopped green pepper (optional, amount to desired preference)
- 1 (8 ounce) package chili seasoning mix (Carol Shelby brand recommended for thickness)
- Saltines or Fritos corn chips, for serving
Equipment Needed
- Large stock pot
- Large skillet or pan
- Spoon for stirring
- Can opener
- Colander (for draining beef)
Instructions
-
Begin by browning 1 lb of ground beef in a large skillet or pan over medium-high heat. As the beef cooks, break it up with a spoon. Once the beef is fully browned, drain off any excess fat using a colander. This step is crucial for preventing a greasy final product.
-
While the beef is browning, prepare the base of the chili. In a large stock pot, combine 1 (46 ounce) can of V8 vegetable juice and 1 (12 ounce) can of beer of your choice. Bring the mixture to a boil over medium-high heat. The type of beer you choose will significantly impact the flavor profile of the chili. Stouts and amber ales tend to add rich, robust notes, while lighter lagers contribute a more subtle sweetness.
-
Once the V8 and beer mixture reaches a boil, reduce the heat to a simmer. This gentle simmering is key for allowing the flavors to meld together beautifully.
-
Add the browned and drained ground beef, 1 (8 ounce) can of kidney beans, 1 (8 ounce) can of chili beans, 1 (8 ounce) can of diced tomatoes, 1 medium chopped onion, and chopped green pepper (if using) to the stock pot. Stir well to combine all the ingredients.
-
Now for the heart of the chili’s flavor: the seasoning. Open the chili seasoning mix package. If using the recommended Carol Shelby brand, you will find 4 separate packets of different spices inside.
-
Add the larger package of chili spices to the pot and stir thoroughly to ensure it is evenly distributed.
-
Next, add the salt packet to taste. It’s important to add the salt gradually and taste as you go, as the amount of salt needed can vary depending on personal preference and the sodium content of the other ingredients. Generally, you can start by adding half the packet and adjust from there. In many cases, the entire packet is appropriate, but taste as you go!
-
The small cayenne pepper packet is where you control the heat level of your chili. This is entirely optional, but if you enjoy a spicy kick, add a portion of the cayenne pepper to taste. Be warned: adding the entire packet will result in an extremely hot and spicy chili! Start with about 1/4 to 1/2 of the packet, stir well, and taste before adding more.
-
If you prefer a thicker chili, you can use masa flour as a thickening agent. Follow the directions on the chili seasoning mix package for proper usage. Typically, this involves mixing the masa flour with a small amount of water to create a slurry before adding it to the chili.
-
Continue to simmer and stir the chili frequently. It’s ready to eat once it’s heated all the way through. The longer it simmers, the more the flavors will meld and deepen, and the spicier it will become. For a richer flavor, simmer for at least 20 minutes. If you decide to simmer for longer than 20 minutes, reduce the heat to low after adding the last ingredient to prevent scorching. Simmering for an hour or more, as my mom used to do, is a great way to develop a truly exceptional flavor.
-
Serve hot, garnished with your favorite toppings such as sour cream, crackers, shredded cheese, and/or Fritos corn chips. At a recent chili party, I noticed that some people even added spaghetti noodles to their chili!
Expert Tips & Tricks
- Beer Selection: Don’t underestimate the power of beer. Experiment with different beer styles to find your favorite flavor profile. Stouts provide rich, chocolatey notes, while amber ales offer a malty sweetness. Even a hoppy IPA can add a unique complexity, just be mindful of the bitterness.
- Spice Control: The cayenne pepper is your friend, but treat it with respect. Start with a small amount and gradually increase it until you reach your desired heat level. Remember, you can always add more, but you can’t take it away!
- Masa Magic: If you want a really thick chili, don’t skip the masa flour. It adds a subtle corn flavor and creates a satisfyingly hearty texture.
- Make it Ahead: This chili is even better the next day, so feel free to make it a day or two in advance. The flavors will have more time to meld together, resulting in a richer, more complex chili.
Serving & Storage Suggestions
Serve your beer chili hot, garnished with your favorite toppings. Sour cream, shredded cheese, chopped onions, green onions, and a sprinkle of cilantro are all great choices. Serve with saltines or Fritos corn chips for dipping.
Leftover chili can be stored in an airtight container in the refrigerator for up to 3-4 days. For longer storage, freeze the chili in freezer-safe containers for up to 2-3 months. To reheat, simply thaw the chili in the refrigerator overnight and then heat it in a saucepan over medium heat until heated through. You can also reheat it in the microwave, stirring occasionally.
Nutritional Information
(Note: Nutritional information is an estimate and can vary based on specific ingredients and portion sizes.)
| Nutrient | Amount per Serving | % Daily Value |
|---|---|---|
| Calories | 320 kcal | 16% |
| Total Fat | 18g | 28% |
| Saturated Fat | 7g | 35% |
| Cholesterol | 60mg | 20% |
| Sodium | 800mg | 35% |
| Total Carbohydrate | 25g | 8% |
| Dietary Fiber | 5g | 20% |
| Sugars | 8g | N/A |
| Protein | 20g | 40% |
Variations & Substitutions
- Vegetarian Beer Chili: Substitute the ground beef with plant-based ground meat or extra beans.
- Spicy Beer Chili: Add more cayenne pepper or a pinch of chili flakes for extra heat. You can also use hot chili beans.
- Smoked Beer Chili: Add a teaspoon of smoked paprika for a smoky flavor.
- Gluten-Free Beer Chili: Ensure the beer is gluten-free, and serve with gluten-free crackers or corn chips. Many craft breweries now offer excellent gluten-free beer options.
- Different Beans: Experiment with different types of beans, such as black beans or pinto beans, for a different flavor and texture.
- Sweet Potato Addition: Dice and add one medium sweet potato when adding the beans for a hint of sweetness and added nutrients.
FAQs (Frequently Asked Questions)
Q: Can I use a different type of beer?
A: Absolutely! Experiment with different beer styles to find your favorite flavor profile. Stouts and amber ales are classic choices, but even a lighter lager can work well.
Q: Can I make this chili in a slow cooker?
A: Yes, you can adapt this recipe for a slow cooker. Brown the ground beef as instructed, then combine all ingredients in the slow cooker. Cook on low for 6-8 hours or on high for 3-4 hours.
Q: How can I make the chili thicker?
A: If you didn’t use the Carol Shelby chili seasoning mix, which contains masa flour, you can add a slurry of cornstarch and water (1 tablespoon of cornstarch mixed with 2 tablespoons of cold water) to the chili during the last 30 minutes of simmering.
Q: Can I freeze this chili?
A: Yes, this chili freezes well. Allow it to cool completely before transferring it to freezer-safe containers. It can be frozen for up to 2-3 months.
Q: What other toppings can I use?
A: The possibilities are endless! Some popular toppings include avocado, pickled jalapeños, chopped tomatoes, shredded lettuce, and a dollop of Greek yogurt.
Final Thoughts
So, grab your favorite brew, gather your ingredients, and get ready to create a pot of beer chili that will warm your soul and tantalize your taste buds. Don’t be afraid to experiment with different variations and substitutions to make it your own signature dish. And most importantly, share it with the people you love. Good food is always best enjoyed in good company. I encourage you to try this recipe and share your feedback. Perhaps pair it with some warm cornbread and a side salad for a complete and satisfying meal. Cheers to a delicious culinary adventure!