
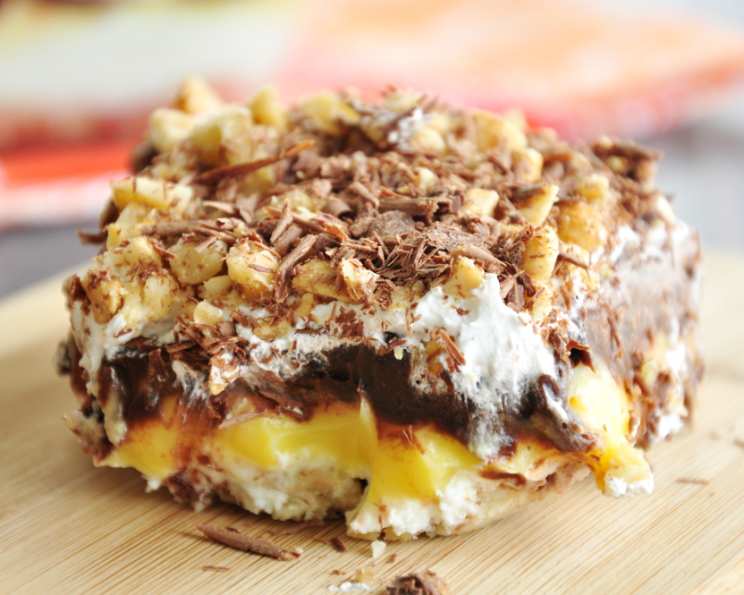
Better Than Robert Redford Dessert
There’s a dessert that lives in my mind, a nostalgic flavor bomb from family gatherings past. It always appeared on my Aunt Carol’s dessert table. It wasn’t just any dessert; it was a multi-layered masterpiece, always dubbed “Better Than Robert Redford.” The layers, the textures, the sheer decadence – it was a showstopper. It was always the first to disappear, leaving behind a trail of crumbs and satisfied smiles. This recipe captures that exact memory, and I’m excited to share it with you.
Recipe Overview
- Prep Time: 20 minutes
- Cook Time: 15 minutes
- Total Time: 35 minutes + 2 hours chilling
- Servings: 16-20
- Yield: 1 (9×13 inch) pan
- Dietary Type: Not Gluten-Free
Ingredients
- For the Crust:
- 1 cup all-purpose flour
- 1 cup coarsely chopped walnuts
- ½ cup (1 stick) unsalted butter, melted
- For the First Layer:
- 1 (8 ounce) package cream cheese, softened
- 1 cup confectioners’ sugar
- ½ (8 ounce) container frozen whipped topping, thawed (reserve remaining for later)
- For the Second Layer:
- 4 cups milk
- 2 (3.5 ounce) boxes instant vanilla pudding mix
- For the Third Layer:
- 4 cups milk
- 2 (4 ounce) boxes instant chocolate pudding mix
- For the Topping:
- Remaining ½ (8 ounce) container frozen whipped topping, thawed
- Chopped nuts, for garnish
- Chocolate curls, for garnish
Equipment Needed
- 13 x 9 x 2 inch baking dish
- Medium-size mixing bowl
- Electric mixer (handheld or stand mixer)
- Spatula
- Measuring cups and spoons
Instructions
- Preheat your oven to 350 degrees Fahrenheit (175 degrees Celsius).
- Prepare your baking dish by coating it generously with nonstick cooking spray. This ensures the crust doesn’t stick and makes serving easier.
- Make the Crust: In a medium-size bowl, combine the all-purpose flour, coarsely chopped walnuts, and melted butter. Mix until well combined and the mixture resembles coarse crumbs.
- Press the mixture evenly into the prepared baking dish. Use the bottom of a measuring cup or your fingers to create a firm, even crust.
- Bake the crust at 350 degrees Fahrenheit for 15 minutes. The crust should be lightly golden brown.
- Cool the crust completely before adding the subsequent layers. This is crucial to prevent the cream cheese layer from melting.
- Prepare the Cream Cheese Layer: In a mixing bowl, beat the softened cream cheese and confectioners’ sugar together until smooth and creamy. Ensure there are no lumps of cream cheese remaining.
- Fold in half of the thawed whipped topping (approximately 4 ounces) into the cream cheese mixture. Gently fold until just combined, being careful not to overmix, which can deflate the whipped topping.
- Spread the cream cheese mixture evenly over the cooled crust. Use a spatula to create a smooth, even layer.
- Prepare the Vanilla Pudding Layer: In a clean bowl, whisk together the vanilla pudding mix and 2 cups of milk. Whisk vigorously until the pudding thickens. This should only take a minute or two.
- Spread the vanilla pudding evenly over the cream cheese layer. Use the back of a spoon or an offset spatula for easy spreading.
- Prepare the Chocolate Pudding Layer: In another clean bowl, whisk together the chocolate pudding mix and the remaining 2 cups of milk. Whisk until the pudding thickens.
- Spread the chocolate pudding evenly over the vanilla pudding layer. Again, use the back of a spoon or an offset spatula for easy spreading.
- Top with Whipped Topping: Spread the remaining whipped topping evenly over the chocolate pudding layer. Create swirls or peaks for a more decorative finish.
- Garnish: Sprinkle the top with chopped nuts and chocolate curls. Feel free to get creative with your garnish!
- Refrigerate: Refrigerate the dessert for at least 2 hours, or preferably overnight, to allow the layers to set properly.
- Cut into squares and serve chilled.
Expert Tips & Tricks
- Softening the Cream Cheese: Ensure the cream cheese is fully softened before beating it with the confectioners’ sugar. This will prevent lumps and create a smoother texture. If you’re short on time, you can microwave the cream cheese for a few seconds, but be careful not to melt it.
- Chilling Time: Don’t skimp on the chilling time! This is crucial for the layers to set properly and for the flavors to meld together. Overnight chilling is ideal.
- Crust Variations: Feel free to experiment with different nuts in the crust. Pecans or almonds would also work well. You can also add a pinch of salt to the crust mixture to enhance the flavors.
- Pudding Consistency: If you find the pudding is too thick, you can add a splash more milk to thin it out slightly. Conversely, if it’s too thin, let it sit for a few minutes to thicken before spreading it on the layers.
- Whipped Topping Tip: For the whipped topping layer, consider using freshly whipped cream instead of the frozen variety. While it requires more effort, the taste and texture are undeniably superior. Sweeten it lightly with powdered sugar and a touch of vanilla extract.
Serving & Storage Suggestions
To serve, cut the dessert into squares using a sharp knife. For a cleaner cut, run the knife under warm water between slices. Arrange the squares on a serving platter and garnish with extra chopped nuts or chocolate curls, if desired.
Store any leftover dessert in the refrigerator, covered tightly, for up to 3-4 days. The crust may soften slightly over time, but the flavor will still be delicious.
This dessert is best enjoyed cold and is not suitable for freezing due to the pudding and whipped topping layers.
Nutritional Information
Note: Nutritional information is an estimate and may vary based on specific ingredients used.
| Nutrient | Amount per Serving | % Daily Value |
|---|---|---|
| Calories | 387 kcal | 19% |
| Total Fat | 22g | 33% |
| Saturated Fat | 12g | 57% |
| Cholesterol | 39mg | 13% |
| Sodium | 451mg | 18% |
| Carbohydrate | 45g | 14% |
| Fiber | 1g | 4% |
| Sugar | 32g | 127% |
| Protein | 5g | 10% |
Variations & Substitutions
- Gluten-Free: To make this dessert gluten-free, substitute the all-purpose flour in the crust with a gluten-free all-purpose flour blend.
- Nut-Free: If you have a nut allergy, you can omit the walnuts from the crust and substitute them with crushed graham crackers or gluten-free graham crackers for a gluten-free option. Be sure to also omit the chopped nuts topping.
- Dairy-Free: While more involved, you can make this dessert dairy-free. Use a dairy-free cream cheese alternative, dairy-free whipped topping, and prepare the pudding layers with dairy-free milk alternatives like almond milk or soy milk. Be aware that the taste and texture will be affected.
- Seasonal Twist: Add a layer of fresh berries or sliced fruit between the vanilla and chocolate pudding layers for a seasonal twist.
FAQs (Frequently Asked Questions)
Q: Can I use regular pudding instead of instant pudding?
A: No, this recipe relies on instant pudding to set quickly and easily. Regular pudding requires cooking and will change the texture of the dessert.
Q: Can I make this dessert ahead of time?
A: Absolutely! In fact, it’s best to make this dessert at least a few hours in advance, or even the day before, to allow the layers to set properly.
Q: Can I use a different size baking dish?
A: A 13×9 inch baking dish is ideal, but you can use a slightly smaller dish if needed. The layers will be thicker, so you may need to adjust the chilling time accordingly.
Q: The crust is too hard, what did I do wrong?
A: Make sure you are using melted butter, not hot butter. Also, ensure that the crust is only baked for 15 minutes. Overbaking will result in a hard crust.
Q: My whipped topping layer is melting, what happened?
A: Ensure that the pudding layers are fully set before adding the whipped topping. Also, make sure the dessert is well-chilled before serving.
Final Thoughts
This Better Than Robert Redford Dessert is more than just a recipe; it’s a trip down memory lane, a connection to cherished family traditions, and a guaranteed crowd-pleaser. It’s a show-stopping layered dessert that is far easier to create than you might think! I hope you enjoy sharing this dessert with your loved ones and creating your own sweet memories. I encourage you to give this recipe a try and let me know what you think! What are some twists you tried? What were the results?