
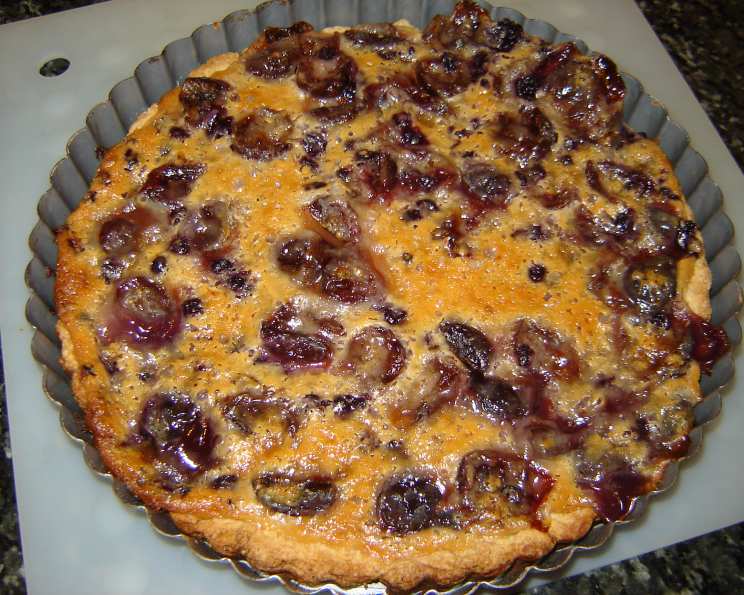
The Quintessential Cherry Tart: A Slice of Summer Nostalgia
The first time I tasted a cherry tart was at my grandmother’s farm. I remember her kitchen, perpetually filled with the comforting aroma of baking. Sunbeams streamed through the window, illuminating dust motes dancing in the air as she pulled a glistening cherry tart from the oven. The bright red cherries, nestled in a creamy filling and a buttery crust, seemed to sing of summer’s bounty. That first bite – the burst of sweet-tart cherry juice, the rich creaminess, the flaky, golden crust – was pure magic. This recipe, while not hers exactly, strives to recapture that memory, that perfect slice of summer.
Recipe Overview
- Prep Time: 45 minutes
- Cook Time: 55-60 minutes
- Total Time: 1 hour 45 minutes
- Servings: 12
- Yield: 2 tarts
- Dietary Type: Not specified
Ingredients
For the Pastry:
- 2 ½ cups flour
- ½ cup sugar
- ½ teaspoon salt
- 10 tablespoons (1 ¼ sticks) butter, softened
- 2 large egg yolks
- 2 tablespoons lemon juice
- 3 tablespoons water
For the Cherry Topping:
- 4 tablespoons flour
- 1 cup sugar
- 1 cup sour cream
- 2 teaspoons orange juice
- 2 cups tart cherries, pitted and sliced
Equipment Needed
- Large bowl
- Medium bowl
- Fork or pastry blender
- Two 9-inch pie pans or two 9-inch springform pans
Instructions
- Prepare the Pastry: In a large bowl, combine the flour, sugar, and salt.
- Incorporate the Butter: Add the softened butter to the dry ingredients. Use a fork or your fingers to mix the butter into the flour mixture until it resembles coarse crumbs. The goal is to have small pieces of butter distributed throughout the flour, which will create a flaky crust. Avoid overmixing, as this will develop the gluten in the flour and result in a tough crust.
- Mix the Wet Ingredients: In a separate bowl, whisk together the egg yolks and lemon juice. The lemon juice adds a subtle tang and helps to tenderize the dough.
- Combine Wet and Dry: Stir the egg yolk mixture and water into the crumbly flour mixture. Gradually incorporate the wet ingredients until the dough just comes together.
- Form the Dough: Use your hands to form the dough into a ball. Avoid overworking the dough. If it’s too dry, add a tiny bit more water, a teaspoon at a time. If it’s too wet, add a little more flour.
- Shape the Crusts: Press the dough into the bottom only of two 9-inch pie pans or two 9-inch springform pans to about a 3/8 inch thickness. Springform pans will make for a cleaner release and presentation. Be sure to press evenly to avoid thin spots that could break during baking.
- Chill the Crusts: Refrigerate the crusts for about 15 minutes. This allows the gluten in the dough to relax, which will help prevent the crust from shrinking during baking. Chilling also helps the butter solidify, resulting in a flakier crust.
- Prepare the Cherry Topping: In a medium bowl, combine the flour, sugar, sour cream, and orange juice. Mix well until smooth. The sour cream adds a wonderful tang and richness to the filling.
- Fold in the Cherries: Gently fold in the pitted and sliced cherries to the sour cream mixture. Be careful not to crush the cherries.
- Assemble the Tarts: Spread the cherry mixture to about 1/2 inch thickness on top of each chilled crust, leaving a 1/4 inch margin uncovered at the edge. This margin will allow the crust to brown nicely.
- Bake the Tarts: Bake the tarts at 425°F (220°C) for 15 minutes. The high initial temperature helps to set the crust and prevent it from becoming soggy.
- Reduce Heat and Continue Baking: Reduce the oven temperature to 350°F (175°C) and bake for another 40-45 minutes, or until the crust is golden brown and the filling is set. A slight jiggle in the center is okay; it will firm up as it cools.
- Cool and Serve: Cool the tarts completely on a wire rack before slicing and serving. Cooling allows the filling to set completely and makes for easier slicing.
Expert Tips & Tricks
- Use cold butter: For the flakiest crust, use very cold butter. You can even freeze the butter for 15 minutes before grating it into the flour mixture.
- Don’t overmix the dough: Overmixing develops the gluten in the flour, resulting in a tough crust. Mix just until the dough comes together.
- Blind bake the crust: For an extra-crisp crust, you can blind bake it before adding the filling. To do this, prick the bottom of the crust with a fork, line it with parchment paper, and fill it with pie weights or dried beans. Bake at 350°F (175°C) for 15-20 minutes, then remove the weights and parchment paper and bake for another 5-10 minutes, or until golden brown.
- Use a pizza stone: Baking the tarts on a preheated pizza stone helps to ensure a crisp crust.
- Prevent the crust from burning: If the crust starts to brown too quickly, you can cover it loosely with foil.
Serving & Storage Suggestions
Serve the cherry tart slightly warm or at room temperature. A dollop of whipped cream or a scoop of vanilla ice cream makes a delightful accompaniment.
To store leftovers, cover the tart tightly with plastic wrap or place it in an airtight container. It will keep at room temperature for up to 2 days, in the refrigerator for up to 4 days, or in the freezer for up to 2 months. To reheat, bake in a preheated oven at 350°F (175°C) for 10-15 minutes, or until warmed through.
Nutritional Information
Nutritional information is an estimate and may vary based on specific ingredients and portion sizes.
| Nutrient | Amount per Serving | % Daily Value |
|---|---|---|
| Calories | 352 kcal | 18% |
| Total Fat | 14.7g | 22% |
| Saturated Fat | 8.9g | 44% |
| Cholesterol | 68.8mg | 22% |
| Sodium | 180.1mg | 7% |
| Total Carbohydrate | 51.7g | 17% |
| Dietary Fiber | 1.2g | 4% |
| Sugars | 28.3g | 113% |
| Protein | 4.4g | 8% |
Variations & Substitutions
- Gluten-Free Crust: Use a gluten-free flour blend to make the crust gluten-free. You may need to add a binder such as xanthan gum.
- Dairy-Free Filling: Substitute the sour cream with a plant-based sour cream alternative, such as cashew cream or coconut cream.
- Different Fruit: While this recipe is for cherry tart, you can easily adapt it to other fruits such as blueberries, raspberries, or peaches. Adjust the amount of sugar as needed depending on the sweetness of the fruit.
- Almond Extract: Add a few drops of almond extract to the cherry filling for an extra layer of flavor.
FAQs (Frequently Asked Questions)
Q: Can I use frozen cherries?
A: Yes, you can use frozen cherries. Be sure to thaw them completely and drain off any excess liquid before using them in the filling.
Q: Can I make the dough ahead of time?
A: Absolutely! The dough can be made up to 2 days in advance and stored in the refrigerator. Just wrap it tightly in plastic wrap.
Q: My crust is shrinking during baking. What am I doing wrong?
A: This is usually caused by overworking the dough or not chilling it sufficiently. Make sure to mix the dough just until it comes together and chill it for at least 15 minutes before baking.
Q: The filling is too runny. How can I fix it?
A: If the filling is too runny, you can try adding a tablespoon of cornstarch or tapioca starch to the cherry mixture before baking.
Q: Can I freeze the baked tart?
A: Yes, you can freeze the baked tart. Let it cool completely, then wrap it tightly in plastic wrap and aluminum foil. It will keep in the freezer for up to 2 months. Thaw overnight in the refrigerator before serving.
Final Thoughts
This cherry tart recipe is more than just a set of instructions; it’s an invitation to create a memory, to bake something that will evoke feelings of warmth and comfort. Whether you’re a seasoned baker or just starting out, I encourage you to give this recipe a try. The combination of sweet-tart cherries, creamy filling, and buttery crust is simply irresistible. And don’t be afraid to experiment with variations – add a touch of almond extract, use a different fruit, or try a gluten-free crust. Most importantly, have fun and enjoy the process! Share your creations and feedback; I’d love to hear how it turns out for you. Perhaps pair it with a light, crisp white wine like a Riesling for the perfect summer treat. Happy baking!