
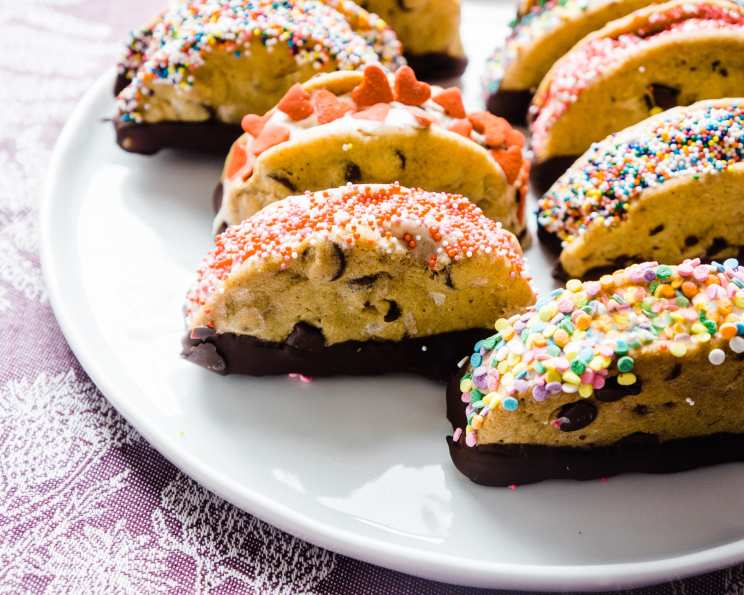
Chocolate Chip Tacos: A Culinary Adventure
My first taste of a Choco Taco was pure summer bliss. The ice cream truck’s arrival was always a siren call, and the Choco Taco, with its waffle cone shell and chocolate-dipped, peanut-studded glory, was the ultimate prize. It was a messy, melty race against the sun, and every bite was pure, unadulterated joy. That simple treat sparked a lifelong love of culinary invention, and today, I’m thrilled to share my elevated, homemade take on that classic – the Chocolate Chip Taco!
Recipe Overview
- Prep Time: 45 minutes
- Cook Time: 7-10 minutes
- Total Time: 3 hours 10 minutes (including freezing time)
- Yields: 24 tacos
- Dietary Type: Can be adapted to gluten-free with gluten-free flour.
Ingredients
For the Mexican Cinnamon Ice Cream:
- 1 (14 ounce) can sweetened condensed milk
- 2 cups heavy cream
- 1 tablespoon Mexican cinnamon
- ½ teaspoon kosher salt
For the Chocolate Chip Cookies:
- 10 tablespoons unsalted butter (at room temperature)
- ½ cup granulated sugar
- ¾ cup light brown sugar
- 1 large egg
- ½ tablespoon vanilla extract
- 1 ¾ cups all-purpose flour
- ¾ teaspoon baking powder
- ¾ teaspoon baking soda
- ¾ teaspoon kosher salt
- 10 ounces Valrhona dark chocolate, roughly chopped
- 2 tablespoons coarse sea salt, such as Maldon
To Assemble:
- 4 ounces Valrhona dark chocolate
- 1 teaspoon vegetable oil
- Assorted festive decor like candy sprinkles
Equipment Needed
- Medium bowl
- Stand mixer with whisk and paddle attachments
- Rubber spatula
- Loaf pan or shallow baking dish
- Parchment paper
- Cookie sheets
- Heat-proof bowl
- Microwave
- Sharp knife
- Sheet, dish, or plate that will fit in freezer
Instructions
-
Prepare the Mexican Cinnamon Ice Cream: Empty the contents of the sweetened condensed milk into a medium bowl. Add the cinnamon and salt and stir to combine until well mixed.
-
Whip the Cream: Pour the heavy cream into the bowl of a stand mixer fitted with the whisk attachment, and whip on medium-high speed until soft peaks form. The cream should hold its shape and form soft ribbons upon itself. This step is crucial for a light and airy ice cream.
-
Temper the Mixture: Remove about one third of the whipped cream and gently stir it into the sweetened condensed milk mixture to “lighten” it. This prevents the formation of ice crystals and ensures a smoother texture.
-
Combine the Mixtures: Scrape the rest of the whipped cream into the bowl and gently fold with a rubber spatula until the mixture is uniform. Be careful not to overmix, as this can deflate the cream.
-
Freeze the Ice Cream Base: Pour the ice cream base into a loaf pan or other shallow but wide baking dish or bowl. Cover tightly and freeze overnight, or for at least 8 hours, to allow the ice cream to fully set.
-
Preheat the Oven: When you’re ready to bake the cookies, preheat your oven to 350 degrees Fahrenheit (175 degrees Celsius). Make sure your oven is properly calibrated for best results.
-
Combine Dry Ingredients: In a large bowl, whisk together the flour, baking soda, baking powder, and salt. Whisking ensures the ingredients are evenly distributed, which is important for consistent baking.
-
Cream Butter and Sugar: In a stand mixer fitted with the paddle attachment, cream the butter and sugars on medium speed until light and fluffy. This step incorporates air into the batter, resulting in a tender cookie.
-
Add Egg and Vanilla: Add the egg and vanilla to the creamed butter and sugar mixture and scrape down the bowl. Ensure the egg is fully incorporated before moving on to the next step.
-
Incorporate Dry Ingredients: On low speed, add the flour mixture in two installments and mix until just incorporated. Be careful not to overmix, as this can develop the gluten in the flour and result in a tough cookie.
-
Add Chocolate: Add the chopped chocolate and mix until evenly distributed throughout the cookie dough. Feel free to experiment with different types of chocolate, such as milk chocolate or white chocolate, depending on your preference.
-
Shape the Cookies: Scoop the dough by rounded tablespoons onto two parchment-lined cookie sheets. Press the balls of dough down slightly with your hands to make a 2-inch disk. This helps the cookies bake evenly.
-
Sprinkle with Sea Salt: Sprinkle the tops of each cookie with a few flakes of the Maldon salt. The salt enhances the sweetness of the chocolate and adds a delightful contrast of flavors.
-
Bake the Cookies: Bake for 7 to 10 minutes until the edges are just slightly brown but the centers of the cookies are still a little loose. This will ensure the cookies will still be soft when frozen.
-
Cool the Cookies: Let the cookies cool completely on the pan before handling them. This prevents them from breaking apart.
-
Prepare for Assembly: Once the cookies are completely cooled, place half of them bottom side up on a sheet or dish that will fit in your freezer.
-
Assemble the Tacos: Remove the ice cream from the freezer and scoop a large mound onto one cookie (about a 3-ounce scoop). Working quickly, place the remaining cookies on top of the ice cream and place back in the freezer. If you feel safer, do this in small batches so the ice cream doesn’t melt too quickly.
-
Freeze the Sandwiches: Let the sandwiches freeze at least 4 hours, if not overnight, to ensure they are firm enough to cut and dip.
-
Melt the Chocolate: To finish, gently melt the chocolate in a heat-proof bowl in the microwave in 30-second intervals, stirring in between, until smooth.
-
Add Oil: Stir in the vegetable oil to the melted chocolate. This helps to thin the chocolate and create a smoother coating.
-
Prepare Dipping Station: Line a sheet, dish, or plate (that will fit in your freezer) with parchment or wax paper.
-
Cut and Dip: Working with a few cookies at a time, cut the cookies in half. It is best to do this with the cookie standing up to prevent the ice cream from smooshing out. Dip or smear the cut side of the sandwich in the melted chocolate; let the excess drip off or wipe it on the side of the bowl.
-
Freeze Again: Place the taco, chocolate side down, on the prepared pan and place in the freezer. Repeat until all the tacos are done, keeping an eye on the ice cream to make sure it’s not melting!
-
Final Freeze: Let the chocolate-dipped tacos firm up in the freezer for at least 2 hours.
-
Garnish: Garnish your tacos as you see fit with your favorite toppings.
Expert Tips & Tricks
- Room Temperature Butter is Key: Ensuring your butter is truly at room temperature (soft but not melted) is essential for creaming it properly with the sugars. This creates air pockets that contribute to a light and tender cookie.
- Don’t Overmix the Dough: Overmixing develops gluten, leading to tough cookies. Mix until just combined.
- Salt Enhances Flavor: Don’t skip the coarse sea salt on top of the cookies. It balances the sweetness and adds a delightful crunch.
- Work Quickly When Assembling: The ice cream will melt fast, so have everything prepared before you start assembling.
- Freeze in Stages: Freezing the ice cream base overnight and then freezing the assembled tacos ensures the best texture and prevents melting.
Serving & Storage Suggestions
Serve these Chocolate Chip Tacos straight from the freezer for the best texture and prevent melting. Arrange them attractively on a platter for a fun and festive presentation. Store any leftovers in an airtight container in the freezer for up to a month. The cookies will soften slightly over time, but they will still be delicious. These are best served immediately and are not recommended for room temperature or refrigerator storage.
Nutritional Information
| Nutrient | Amount per Serving | % Daily Value |
|---|---|---|
| Calories | 328.5 kcal | N/A |
| Calories from Fat | 204 g | 62% |
| Total Fat | 22.7 g | 34% |
| Saturated Fat | 14 g | 69% |
| Cholesterol | 53.3 mg | 17% |
| Sodium | 791.5 mg | 32% |
| Total Carbohydrate | 32.7 g | 10% |
| Dietary Fiber | 3.2 g | 12% |
| Sugars | 20.1 g | 80% |
| Protein | 5.1 g | 10% |
Variations & Substitutions
- Gluten-Free: Substitute the all-purpose flour with a gluten-free blend. Be sure to choose a blend that contains xanthan gum for the best texture.
- Dairy-Free: Use coconut cream or another non-dairy alternative in place of the heavy cream. Look for sweetened condensed coconut milk as well.
- Different Flavors: Experiment with different ice cream flavors! Coffee, strawberry, or even a spicy chili chocolate ice cream would be fantastic.
- Nutty Delight: Add chopped nuts, such as peanuts, almonds, or pecans, to the melted chocolate for extra crunch and flavor.
- Cookie Swap: Use your favorite homemade cookie recipe as the base! Oatmeal raisin, peanut butter, or even snickerdoodle cookies would be delicious.
FAQs (Frequently Asked Questions)
Q: Can I use store-bought ice cream?
A: Absolutely! If you’re short on time, using your favorite store-bought ice cream is a great shortcut. Just let it soften slightly before assembling the tacos.
Q: What if my cookies are too hard to cut in half?
A: If the cookies are too hard to cut cleanly, let them sit at room temperature for a few minutes to soften slightly. A sharp, serrated knife will also help.
Q: Can I make the ice cream ahead of time?
A: Yes, the ice cream base can be made several days in advance and stored in the freezer. Just make sure to cover it tightly to prevent freezer burn.
Q: What’s the best way to melt the chocolate?
A: Melting the chocolate in the microwave in short intervals, stirring in between, is the easiest method. You can also use a double boiler for a more controlled melting process.
Q: Can I use different toppings?
A: Of course! Feel free to get creative with your toppings. Crushed cookies, chopped nuts, sprinkles, toasted coconut, or even a drizzle of caramel would all be delicious.
Final Thoughts
These Chocolate Chip Tacos are more than just a dessert; they’re a nostalgic trip down memory lane with a gourmet twist. The combination of creamy Mexican cinnamon ice cream, soft chocolate chip cookies, and a decadent chocolate coating is simply irresistible. So gather your ingredients, put on some music, and get ready to create a batch of these delightful treats. Share them with friends and family, and watch their faces light up with joy. Don’t be afraid to experiment with different flavors and toppings to create your own signature version. And most importantly, have fun! I’d love to hear your feedback and see your creations – so be sure to share your photos and comments below!