
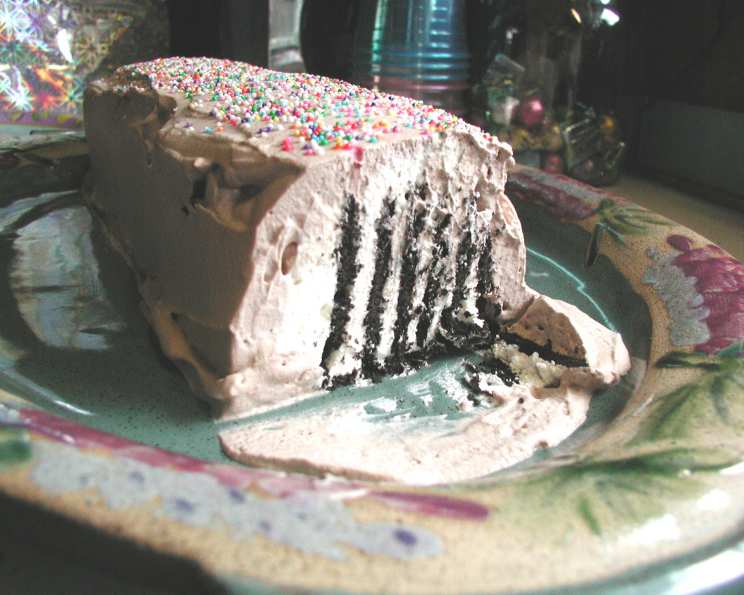
Chocolate Wafer Ice Box Cake: A Nostalgic Delight
The first time I tasted a chocolate wafer ice box cake, I was probably eight years old, at my grandmother’s house. It was summer, thick with humidity, and the cake, pulled straight from the freezer, was a revelation. The wafers had softened just enough, the whipped cream was ethereally light, and the whole thing tasted like pure, unadulterated chocolate bliss. That cake wasn’t just dessert; it was a tangible expression of love, a cool, sweet antidote to a sweltering summer day, and a memory I still cherish. Now, I share that love with you.
Recipe Overview
- Prep Time: 20 minutes
- Freeze Time: 6 hours
- Total Time: 6 hours 20 minutes
- Servings: 14
- Yield: 1 log
- Dietary Type: Not specified
Ingredients
- 2 3/4 cups heavy cream (chilled)
- 1/2 cup confectioners’ sugar
- 1 teaspoon vanilla
- 36 Nabisco Famous Chocolate Wafer Cookies
- 2 tablespoons unsweetened cocoa powder (sifted)
- 2 tablespoons rainbow multicolored sugar nonpareils or 2 tablespoons candy sprinkles
Equipment Needed
- Large bowl
- Electric mixer
- Rimmed baking sheet
- Plastic wrap
- Medium bowl
- Wide spatula
- Long serving platter
Instructions
- In a large bowl, combine 1 1/2 cups of the chilled heavy cream, 1/4 cup of the confectioners’ sugar, and the vanilla.
- Using an electric mixer, whip the ingredients together until soft peaks form. Be careful not to overwhip, or the cream will turn grainy.
- To assemble the stacks, begin by placing 6 chocolate wafer cookies on a flat surface.
- Spread approximately 1 tablespoon of the whipped cream evenly over the top of each wafer.
- Stack the cookies one on top of the other, creating a neat column. Top the final wafer in the stack with a dollop of whipped cream.
- Repeat this process until you have created 6 individual stacks of 6 wafers each. This is the foundation of your icebox cake.
- Carefully lay the cookie stacks on their sides, next to each other, on a rimmed baking sheet. Arrange them so that they form a 14-inch log.
- Wrap the entire log securely in plastic wrap. Ensure there are no gaps to prevent freezer burn.
- Place the baking sheet in the freezer and freeze the log until it is firm, which should take at least 6 hours. This allows the wafers to soften and the flavors to meld together beautifully.
- Once the log is firm, prepare the cocoa whipped cream. In a medium bowl, combine the remaining 1 1/4 cups of heavy cream, the remaining 1/4 cup of confectioners’ sugar, and the 2 tablespoons of sifted cocoa powder. Sifting the cocoa powder is crucial to prevent lumps.
- Using the electric mixer, whip the ingredients until stiff peaks form. Be careful not to overwhip at this stage, as the cocoa powder can make the cream thicken quickly.
- Remove the frozen log from the freezer and unwrap it.
- Using a spatula, evenly spread the cocoa whipped cream over the entire surface of the log, covering it completely. This creates a rich, chocolatey coating.
- Gently loosen the cake from the baking sheet using a wide spatula. Be patient and work carefully to avoid breaking the log.
- Carefully transfer the coated log to a long serving platter. This is best done with two spatulas for support.
- Allow the cake to stand at room temperature for 15-20 minutes before slicing and serving. This softens the wafers slightly, making it easier to cut.
- Just before serving, sprinkle the rainbow multicolored sugar nonpareils or candy sprinkles evenly over the top of the cake. This adds a festive touch and a burst of color. Sprinkling them at the last minute prevents the colors from bleeding into the cream.
Expert Tips & Tricks
- For an even richer flavor, use dark chocolate wafer cookies.
- If you’re short on time, you can freeze the log for a shorter period, but be aware that the wafers might not soften completely.
- To prevent the wafers from becoming soggy, make sure the whipped cream is stiff enough.
- For a cleaner cut, use a serrated knife and wipe it clean between slices.
- Don’t skip sifting the cocoa powder! It makes a huge difference in the final texture of the whipped cream.
- You can add a tablespoon of coffee liqueur to the whipped cream for an extra layer of flavor.
- If you don’t have nonpareils or sprinkles, grated chocolate or cocoa powder also work well as a topping.
Serving & Storage Suggestions
Serve the Chocolate Wafer Ice Box Cake chilled, sliced into individual portions. It pairs perfectly with a glass of cold milk, a cup of coffee, or even a scoop of vanilla ice cream.
Leftovers should be stored in the freezer, tightly wrapped in plastic wrap or in an airtight container. It can last for up to a week in the freezer. When ready to serve again, let it thaw for a few minutes before slicing. It is not recommended to store at room temperature due to the whipped cream.
Nutritional Information
| Nutrient | Amount per Serving | % Daily Value |
|---|---|---|
| Calories | 3463.5 | N/A |
| Calories from Fat | 2469 g | 71% |
| Total Fat | 274.4 g | 422% |
| Saturated Fat | 160.8 g | 803% |
| Cholesterol | 901 mg | 300% |
| Sodium | 1504.8 mg | 62% |
| Total Carbohydrate | 240.8 g | 80% |
| Dietary Fiber | 10.9 g | 43% |
| Sugars | 124.2 g | 497% |
| Protein | 29.8 g | 59% |
Note: These values are estimates and may vary based on specific ingredient brands and portion sizes.
Variations & Substitutions
- Gluten-Free: While traditionally made with Nabisco Famous Chocolate Wafers, explore gluten-free chocolate wafer options. Several brands offer delicious alternatives that work beautifully in this recipe.
- Dairy-Free: Substitute the heavy cream with full-fat coconut cream. Chill the can overnight, then scoop out the solid cream, leaving the watery liquid behind. Whip as directed. Note that the flavor will be slightly coconutty.
- Peanut Butter Variation: Add a layer of peanut butter between the wafers and the whipped cream for a delightful twist.
- Mint Chocolate: Add a teaspoon of peppermint extract to the whipped cream for a refreshing mint chocolate flavor.
FAQs (Frequently Asked Questions)
Q: Can I use a different type of cookie?
A: While Nabisco Famous Chocolate Wafers are traditional, you can experiment with other thin, crisp chocolate cookies, but the texture might be slightly different.
Q: Can I make this cake ahead of time?
A: Absolutely! In fact, it’s recommended to freeze it for at least 6 hours, so making it a day or two in advance is perfectly fine.
Q: How do I prevent the sprinkles from bleeding?
A: Add the sprinkles just before serving to prevent the moisture from the whipped cream from causing them to bleed.
Q: Can I use pre-made whipped cream?
A: While it’s possible, freshly whipped cream provides the best texture and flavor. Pre-made whipped cream might not hold its shape as well.
Q: My whipped cream is too soft. What can I do?
A: Place the bowl and beaters in the freezer for 10-15 minutes, then try whipping again. Be careful not to overwhip.
Final Thoughts
This Chocolate Wafer Ice Box Cake is more than just a dessert; it’s a trip down memory lane, a simple pleasure, and a guaranteed crowd-pleaser. Don’t be intimidated by the simplicity of the recipe; the magic lies in the combination of textures and flavors. I encourage you to try it, experiment with variations, and share it with the people you love. Let me know what you think and if you make any creative changes! This cake pairs wonderfully with a scoop of vanilla ice cream and a strong cup of coffee. Happy baking!