
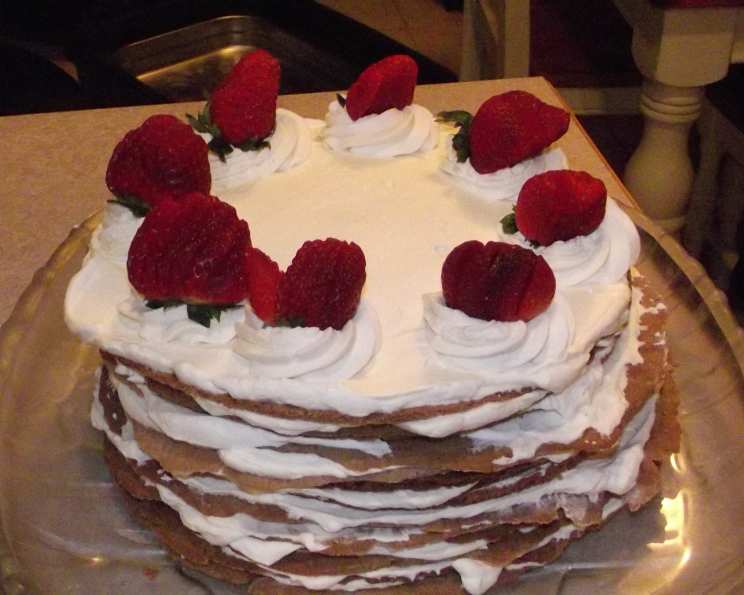
Cinnamon Torte: A Culinary Masterpiece
My grandmother, bless her heart, had a way of making every occasion feel like a grand celebration. And no celebration was complete without her signature Cinnamon Torte. I remember being a small child, perched on a stool in her warm, flour-dusted kitchen, mesmerized as she delicately layered the crisp, fragrant cookies with billows of sweetened cream. The aroma of cinnamon always filled the air, a promise of the delightful indulgence to come. It wasn’t just a dessert; it was a labor of love, a symbol of family, and a taste of pure, unadulterated joy. Now, I continue this tradition, bringing that same joy to my table with this unforgettable recipe.
Recipe Overview
- Prep Time: 2 hours
- Cook Time: 8-12 minutes per layer
- Total Time: 3 hours 30 minutes (including chilling time)
- Servings: 20
- Yield: 1 Torte
- Dietary Type: Not specified
Ingredients
For the Cookies:
- 2 3/4 cups flour
- 2 tablespoons cinnamon
- 1 1/2 cups butter, softened
- 2 cups sugar
- 2 eggs
For the Filling:
- 6 cups whipping cream
- 2 tablespoons icing sugar
- 1 tablespoon vanilla extract
- 8 maraschino cherries, with stems
- 3/4 cup chocolate curls
Equipment Needed
- 9-inch layer cake pans (multiple preferred, or parchment paper)
- Mixer (stand or hand mixer)
- Piping bag (optional)
- Cake plate
- Whisk
- Measuring cups and spoons
Instructions
- Begin by preparing your baking pans. Grease as many 9-inch layer cake pans as you have available. Alternatively, you can line them with parchment paper for easier removal of the delicate cookie layers.
- Preheat your oven to 375°F (190°C). This temperature is crucial for achieving the perfect crispness in the cookie layers.
- In a large mixing bowl, beat together the softened butter and sugar until the mixture is light and fluffy. This process incorporates air, resulting in a tender cookie. Use a stand mixer or a hand mixer for best results.
- With the mixer running on medium speed, add the eggs one at a time, ensuring each egg is fully incorporated before adding the next.
- Gradually add the flour and cinnamon to the butter mixture, mixing well after each addition. Be careful not to overmix; just combine until the dough comes together.
- Let the dough rest for 15 minutes. This allows the gluten in the flour to relax, making the dough easier to handle.
- Divide the dough into 15 equal portions. This step is important for ensuring uniformity in your cookie layers.
- Pat one portion of dough at a time into a prepared cake pan. The dough layer should be very thin; this is what gives the torte its characteristic delicate layers. Evenly distribute the dough to the edges of the pan.
- Bake each layer for 8-12 minutes, or until it starts to brown around the edges. Keep a close watch, as the thin layers can burn easily.
- Once baked, immediately dump the cookie layer out of the cake pan and onto a cooling rack. Repeat the process with the remaining dough portions until all layers are made.
- Allow the cookie layers to cool completely before assembling the torte.
- At this point, you can wrap the cookie layers tightly and store them at room temperature for several days until you are ready to assemble the torte. This make-ahead option simplifies the process.
- To prepare the filling, whip the whipping cream, icing sugar, and vanilla extract together in a large bowl until stiff peaks form. Be careful not to overwhip, or the cream will turn grainy.
- Set aside about 1 1/2 cups of the whipped cream for decorating the top of the torte.
- To assemble the torte, place a small amount of whipped cream on the bottom of a cake plate. This will act as an anchor for the first cookie layer.
- Place the first cookie layer on top of the whipped cream base.
- Spread a generous layer of whipped cream over the cookie layer.
- Continue layering the cookie layers and whipped cream until all the cookies and cream are used.
- Transfer the remaining whipped cream to a piping bag fitted with a decorative tip (optional). Pipe 8 rosettes of whipped cream on the top of the torte.
- Place a maraschino cherry on top of each whipped cream rosette.
- Sprinkle the top of the torte with chocolate curls.
- Refrigerate the assembled torte for at least 4 hours, or preferably overnight, to allow the flavors to meld and the cookie layers to soften slightly. This chilling time is essential for the best texture and taste.
Expert Tips & Tricks
- For Extra Cinnamon Flavor: Add a teaspoon of cinnamon extract to the whipped cream for an even more intense cinnamon experience.
- Preventing Soggy Layers: Ensure the cookie layers are completely cool before assembling the torte. If they are still warm, they can cause the whipped cream to melt and the layers to become soggy.
- Even Cookie Layers: Use a kitchen scale to ensure each portion of dough is the same weight. This will result in uniform cookie layers.
- Adjust Sweetness: Taste the whipped cream before adding the icing sugar and adjust the amount to your preference.
- Emergency Fix: If a cookie layer breaks, don’t worry! Simply piece it together as you assemble the torte; the whipped cream will help hold it in place.
Serving & Storage Suggestions
To serve, slice the Cinnamon Torte carefully with a sharp knife. Serve chilled for the best flavor and texture. Leftovers should be stored in an airtight container in the refrigerator. The torte will stay fresh for up to 3 days. Freezing is not recommended, as the whipped cream can lose its texture upon thawing. This torte is best enjoyed with a cup of hot coffee or tea. It also pairs well with a glass of dessert wine.
Nutritional Information
| Nutrient | Amount per Serving | % Daily Value |
|---|---|---|
| Calories | 532 kcal | N/A |
| Calories from Fat | 368 kcal | 69% |
| Total Fat | 40.9 g | 62% |
| Saturated Fat | 25.4 g | 126% |
| Cholesterol | 155.6 mg | 51% |
| Sodium | 132.9 mg | 5% |
| Total Carbohydrate | 39 g | 13% |
| Dietary Fiber | 0.9 g | 3% |
| Sugars | 23.4 g | 93% |
| Protein | 4 g | 8% |
Note: Nutritional information is an estimate and may vary based on specific ingredients and portion sizes.
Variations & Substitutions
- Gluten-Free: Substitute the all-purpose flour with a gluten-free flour blend. Be sure to add a binder like xanthan gum for the best texture.
- Dairy-Free: Use coconut cream instead of whipping cream for a dairy-free version. Make sure to refrigerate the can of coconut cream overnight and only use the thick solid part.
- Spice it Up: Add a pinch of nutmeg or cardamom to the cookie dough for a more complex flavor profile.
- Chocolate Lover’s Dream: Incorporate cocoa powder into the cookie dough for a chocolate cinnamon torte.
- Nutty Delight: Add chopped pecans or walnuts to the whipped cream filling for added texture and flavor.
FAQs (Frequently Asked Questions)
Q: Can I make the cookie layers ahead of time?
A: Yes, the cookie layers can be made several days in advance and stored in an airtight container at room temperature. This is a great way to break up the workload.
Q: Why is my whipped cream not stiffening?
A: Make sure your whipping cream and mixing bowl are cold. Also, avoid over-whipping, as this can cause the cream to separate.
Q: Can I use store-bought cookies instead of making my own?
A: While homemade cookies are recommended for the best flavor and texture, you can use store-bought cinnamon cookies in a pinch. Choose cookies that are thin and crisp.
Q: How do I prevent the torte from becoming soggy?
A: Ensure the cookie layers are completely cool before assembling the torte and refrigerate it for at least 4 hours to allow the flavors to meld.
Q: Can I add other fruits besides maraschino cherries?
A: Absolutely! Fresh raspberries, blueberries, or sliced strawberries would also be delicious additions.
Final Thoughts
I hope this Cinnamon Torte recipe brings as much joy to your kitchen as it has to mine. It’s a show-stopping dessert that’s sure to impress your guests and create lasting memories. Don’t be intimidated by the number of steps; each one is simple, and the result is well worth the effort. So gather your ingredients, preheat your oven, and get ready to create a masterpiece. And if you try it, please let me know how it turns out! I’d love to hear your feedback and any variations you might add. Enjoy!