
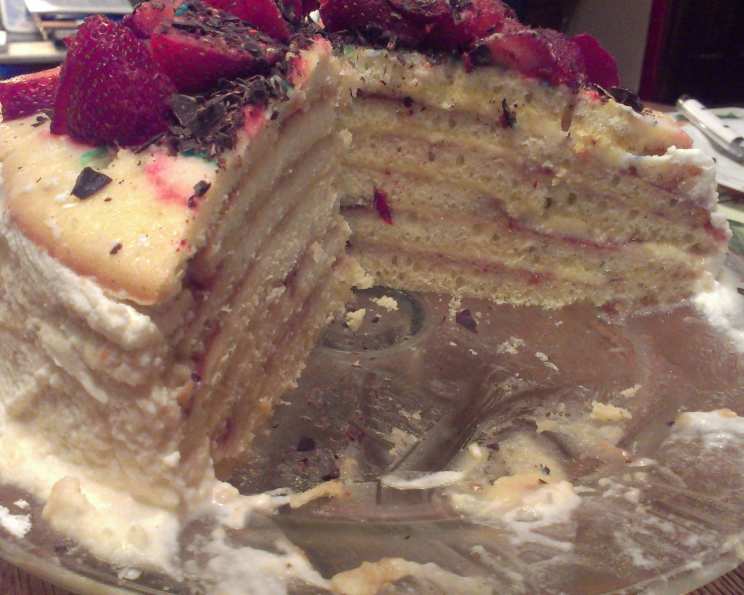
Danish Layer Cake (Dansk Lagkage): A Celebration in Every Slice
My earliest memories of birthdays aren’t complete without the towering presence of a lagkage, a Danish layer cake. It wasn’t just dessert; it was a symbol of celebration, family, and the warmth of my grandmother’s kitchen. She emigrated from Denmark many years ago, and her heritage filled our family life with many new experiences. The layers of delicate cake, raspberry jam, and creamy pudding were always topped with a colorful assortment of candies and fresh berries, a personalized masterpiece reflecting the birthday person’s favorites. Recreating this cake brings back the happy chaos of those celebrations, the laughter, and the pure joy of sharing something so delicious and deeply personal.
Recipe Overview
- Prep Time: 30 minutes
- Cook Time: 10 minutes
- Total Time: 1 hour 15 minutes
- Servings: 4-7
- Yield: 1 cake
- Dietary Type: Not specified
Ingredients
For the Cake:
- 2/3 cup butter, softened
- 1 cup sugar
- 5 eggs
- 2 cups flour
- 1 teaspoon vanilla extract
- 1 teaspoon baking powder
For the Cake Assembly:
- 1 (8 ounce) jar raspberry jam
- 1 (3 ounce) cooked package instant vanilla pudding (prepared with whole milk if possible)
- 1/2 pint whipping cream
For the Icing:
- 1 tablespoon butter
- 1 drop cream
- 1 drop flavoring (vanilla or almond extract work well)
- 1 tablespoon powdered sugar
For Decoration (Optional):
- Danish flags
- Candy (Kit Kats, Gummy Worms, etc.)
- Fresh Berries
- Chocolate Chips
Equipment Needed
- Mixing bowl
- Electric mixer
- Wax paper
- Large cookie sheet or jelly roll pan
- Cake platter
- Spatula or knife for spreading
- Measuring cups and spoons
Instructions
- Begin by preparing your baking surfaces. Cut 5 or 6 pieces of wax paper and draw an 8-inch circle on each. You can use a cake pan or a plate as a template. Ensure you have a large cookie sheet or jelly roll pan that can accommodate two wax paper sheets at a time.
- Preheat your oven to 350 degrees F (175 degrees C).
- In a mixing bowl, cream the softened butter and sugar together using an electric mixer until the mixture is light and fluffy. This step is crucial for creating a tender cake.
- Blend in the eggs, one at a time, and the vanilla extract. Ensure each egg is fully incorporated before adding the next.
- In a separate bowl, whisk together the flour and baking powder. This ensures the baking powder is evenly distributed throughout the flour.
- Gradually mix the dry ingredients into the wet ingredients, beating until just well blended. Be careful not to overbeat the batter, as this can result in a tough cake.
- Divide the cake batter evenly among the 5 or 6 wax paper sheets. Spread the batter thinly and evenly within the drawn circles. Aim for a consistent thickness to ensure even baking.
- Place two wax paper sheets with the batter on the prepared cookie sheet or jelly roll pan.
- Bake in the preheated oven for approximately 9 to 10 minutes, or until the edges are golden brown and the cake springs back lightly when touched. Keep a close eye on the cakes, as they can burn quickly.
- Remove the baked cake layers from the cookie sheet and let them cool completely on the wax paper. Repeat the baking process for the remaining batter.
- Once the cake layers have completely cooled, you can begin the assembly. Place the first cake layer on a cake platter.
- Spread a generous layer of raspberry jam evenly over the top of the first cake layer.
- Next, spread a layer of the prepared vanilla pudding over the raspberry jam.
- Repeat the process of layering with the remaining cake layers, raspberry jam, and vanilla pudding.
- Place the final cake layer on top. If you are making a 6-layer cake, this will be the sixth layer.
- To prepare the icing, in a small bowl, cream together the butter, cream, flavoring, and powdered sugar until smooth and creamy.
- Frost the top layer of the cake with a thin layer of the prepared icing (omit icing one layer if making only a 5-layer cake).
- In a separate bowl, beat the whipping cream until stiff peaks form. This can be done with a whisk or an electric mixer.
- Frost the sides of the cake with the whipped cream.
- Decorate the cake according to the occasion and your personal preferences. Use Danish flags, candles for a birthday, cake sprinkles, candy, fresh berries, or chocolate chips. Get creative and have fun with it!
Expert Tips & Tricks
- Even Layers: For perfectly even cake layers, weigh each portion of batter before spreading it on the wax paper. This ensures that each layer bakes uniformly.
- Prevent Sticking: To prevent the cake layers from sticking to the wax paper, lightly grease the wax paper circles with butter or cooking spray before spreading the batter.
- Make Ahead: The cake layers can be baked a day in advance and stored in an airtight container at room temperature. This can save you time on the day you plan to assemble the cake.
- Flavor Enhancement: Add a tablespoon of rum or other liqueur to the raspberry jam or vanilla pudding for a more complex flavor.
- Stabilized Whipped Cream: To prevent the whipped cream from weeping, add a teaspoon of powdered sugar or cornstarch while whipping. This will help stabilize the cream and keep it firm for longer.
Serving & Storage Suggestions
Serve the Danish Layer Cake chilled or at room temperature. To serve attractively, slice the cake into even wedges, showcasing the beautiful layers of cake, jam, and pudding. Garnish each slice with fresh berries or a sprig of mint.
Leftover cake should be stored in an airtight container in the refrigerator. It will last for up to 3 days. The cake is best served within the first 24 hours, as the whipped cream can soften over time. Freezing the cake is not recommended, as the whipped cream and pudding can change texture upon thawing.
Nutritional Information
Note: This is an estimate and can vary based on specific ingredients used.
| Nutrient | Amount per Serving | % Daily Value |
|---|---|---|
| Calories | 450 kcal | 23% |
| Total Fat | 25g | 38% |
| Saturated Fat | 15g | 75% |
| Cholesterol | 150mg | 50% |
| Sodium | 200mg | 9% |
| Total Carbohydrate | 50g | 17% |
| Dietary Fiber | 1g | 4% |
| Sugars | 30g | N/A |
| Protein | 5g | 10% |
Variations & Substitutions
- Gluten-Free: Substitute the all-purpose flour with a gluten-free blend for a gluten-free version of the cake. Be sure to use a 1-to-1 gluten-free flour substitute for best results.
- Dairy-Free: Use a dairy-free butter substitute, non-dairy milk to prepare the vanilla pudding, and a dairy-free whipped topping for a dairy-free version of the cake.
- Different Flavors: Experiment with different flavors of jam and pudding. Try apricot jam, strawberry jam, or chocolate pudding for a unique twist.
- Seasonal Fruits: Incorporate seasonal fruits into the cake assembly. Add sliced strawberries, blueberries, or peaches between the layers for a burst of fresh flavor.
- Citrus Zest: Add a teaspoon of lemon or orange zest to the cake batter for a bright and zesty flavor.
FAQs (Frequently Asked Questions)
Q: Can I make the cake layers ahead of time?
A: Yes, you can bake the cake layers up to a day in advance. Store them in an airtight container at room temperature until you’re ready to assemble the cake.
Q: Can I use store-bought cake mix instead of making the cake from scratch?
A: While it’s possible, the texture and flavor won’t be quite the same. The homemade cake layers are lighter and more delicate, which contributes to the overall quality of the cake.
Q: What can I use if I don’t have raspberry jam?
A: You can substitute raspberry jam with another fruit jam, such as strawberry, apricot, or blackberry. Choose a jam that complements the vanilla pudding.
Q: How do I prevent the whipped cream from becoming watery?
A: To prevent the whipped cream from weeping, ensure your bowl and beaters are chilled before whipping. Adding a teaspoon of powdered sugar or cornstarch can also help stabilize the cream.
Q: Can I freeze the assembled cake?
A: Freezing the assembled cake is not recommended, as the whipped cream and pudding can change texture upon thawing. It’s best to assemble the cake shortly before serving.
Final Thoughts
The Danish Layer Cake is more than just a dessert; it’s a celebration of tradition, family, and the joy of sharing something delicious. Whether you’re celebrating a birthday, holiday, or special occasion, this cake is sure to impress. Don’t be afraid to get creative with the decorations and personalize it to your liking. I encourage you to try this recipe and experience the magic of lagkage for yourself. Share your creations and feedback, and perhaps even pair it with a cup of strong coffee or a glass of dessert wine for the ultimate indulgence. Skål!