
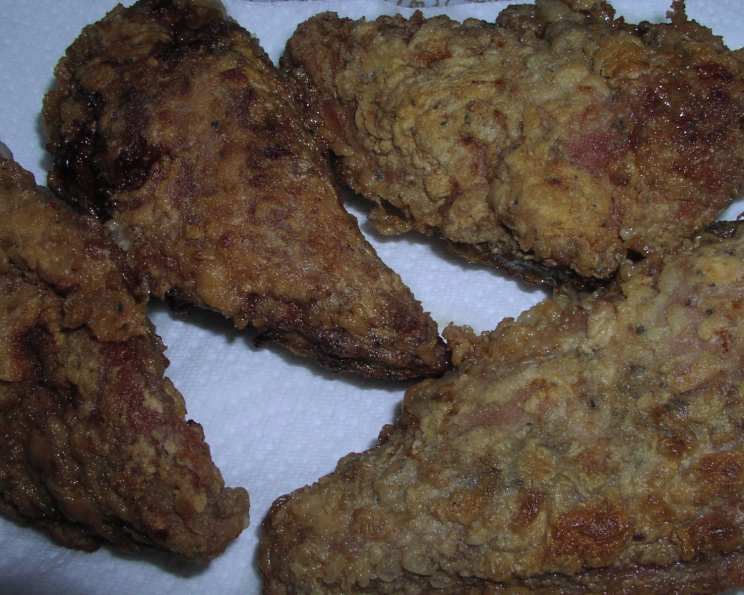
The Crispiest, Most Delicious Fried Pheasant You’ll Ever Make
I’ll never forget the day my Uncle Joe, a man whose life revolved around the outdoors, showed up at my culinary school graduation with a cooler in tow. It wasn’t filled with celebratory champagne, as I’d hoped, but rather a bounty of freshly hunted pheasant. At first, I was a little perplexed. Here I was, a freshly minted chef ready to tackle haute cuisine, and he was handing me…game birds? He just grinned, winked, and said, “Fry ’em up, kid. You’ll see.” That initial skepticism quickly turned to pure delight. The simple, crispy fried pheasant he taught me to make that day remains one of my all-time favorite comfort foods, a delicious reminder of family, tradition, and the simple pleasures in life.
Recipe Overview
- Prep Time: 4 hours 15 minutes
- Cook Time: Approximately 15-20 minutes per batch
- Total Time: 4 hours 30 minutes (includes marinating)
- Servings: 4
- Yield: Varies depending on pheasant size
- Dietary Type: Can be gluten-free with gluten-free flour
Ingredients
- 3 pheasants, dressed and cleaned (and preferably footless!)
- Salt, to taste
- Pepper, to taste
- Nature Seasoning Brand Seasoning, to taste (or your preferred all-purpose seasoning)
- 3 eggs
- 2-3 cups flour (all-purpose, or gluten-free blend)
- 2 cups cooking oil (vegetable, canola, or peanut oil recommended)
Equipment Needed
- Large bowl
- Cover for bowl (plastic wrap or lid)
- Large heavy skillet (cast iron highly recommended)
- Shallow bowls or plates
- Tongs
- Paper towels
Instructions
-
Begin by cutting the pheasant meat from the carcass. Focus on the breast and thigh meat. You can save the carcass for stock if desired, or discard it.
-
Rinse the pheasant pieces thoroughly under cold water. This helps remove any remaining blood or bone fragments. Place the rinsed meat in a large bowl.
-
Season the pheasant generously with salt, pepper, and Nature Seasoning Brand Seasoning. Be sure to turn the meat over, ensuring all surfaces are well-coated with the seasonings.
-
Cover the bowl tightly with plastic wrap or a lid. Place the bowl in the refrigerator and marinate for at least 4 hours, or even overnight for enhanced flavor. This marinating process is crucial for tenderizing the meat and infusing it with flavor.
-
When ready to cook, pour the cooking oil into a large, heavy skillet. A cast iron skillet is ideal for even heat distribution and a crispy crust. Heat the oil over high heat until it shimmers and a small piece of flour sizzles immediately when dropped in.
-
Retrieve the marinated pheasant from the refrigerator.
-
In a shallow bowl, scramble the eggs thoroughly.
-
In another shallow bowl or plate, place the flour in an even layer.
-
Dip each piece of pheasant first into the scrambled egg, ensuring it is fully coated. Then, transfer the egg-coated pheasant to the flour and coat completely, pressing gently to help the flour adhere.
-
Carefully place the breaded pheasant pieces into the hot oil. Avoid overcrowding the skillet, as this will lower the oil temperature and result in soggy, unevenly cooked pheasant. Cook in batches if necessary.
-
Brown the pheasant on both sides. Once browned, reduce the heat to medium to prevent burning the oil and allow the pheasant to cook through.
-
The pheasant cooks remarkably quickly, so keep a close eye on it. It’s done when the internal temperature reaches 165°F (74°C) and the juices run clear when pierced with a fork. This usually takes about 6-8 minutes per side, depending on the thickness of the pieces.
-
Remove the cooked pheasant from the skillet and place it on a plate lined with paper towels to drain any excess oil.
-
Serve immediately and enjoy.
Expert Tips & Tricks
- Don’t overcook the pheasant! It’s naturally lean meat and can become dry if cooked for too long. The internal temperature is key to ensuring a moist and tender result.
- Use a meat thermometer to guarantee the pheasant reaches the safe internal temperature of 165°F (74°C).
- If the flour coating isn’t sticking well, try chilling the pheasant pieces for 15-20 minutes after breading. This helps the coating adhere better during frying.
- For extra crispy skin, try a double dredging method: egg, flour, egg, flour.
- Adjust the seasoning to your liking. Experiment with different herbs and spices in the flour mixture, such as paprika, garlic powder, or cayenne pepper for a bit of heat.
- Don’t discard the leftover oil immediately. Once cooled, you can strain it through a cheesecloth-lined sieve and store it in an airtight container in the refrigerator for future frying (use within a few days).
- To keep the fried pheasant warm while cooking multiple batches, place the cooked pieces on a wire rack in a preheated oven at 200°F (93°C).
- If your oil starts to smoke, it’s too hot. Remove the pan from the heat immediately and let it cool slightly before continuing to fry.
- Pound the pheasant breasts to an even thickness before breading for consistent cooking.
Serving & Storage Suggestions
Serve your crispy fried pheasant immediately while it’s hot and juicy. It pairs perfectly with classic sides like mashed potatoes, creamy gravy, green beans, coleslaw, or a simple green salad. Consider serving with a dollop of your favorite hot sauce for added heat.
To store leftovers, let the pheasant cool completely before placing it in an airtight container. Store in the refrigerator for up to 3 days. For longer storage, freeze for up to 2 months.
To reheat, bake in a preheated oven at 350°F (175°C) until heated through, about 15-20 minutes. You can also reheat in a skillet with a little oil over medium heat, turning occasionally, until crispy. Reheating in a microwave is not recommended as it can make the pheasant soggy.
Nutritional Information
Please note that these values are approximate and can vary based on specific ingredients and portion sizes.
| Nutrient | Amount per Serving | % Daily Value |
|---|---|---|
| Calories | 583 kcal | 29% |
| Total Fat | 45g | 69% |
| Saturated Fat | 8g | 40% |
| Cholesterol | 146mg | 49% |
| Sodium | 73mg | 3% |
| Total Carbohydrate | 12g | 4% |
| Dietary Fiber | 0.4g | 2% |
| Sugars | 0.13g | 0% |
| Protein | 37g | 74% |
Variations & Substitutions
- Gluten-Free Fried Pheasant: Use a gluten-free flour blend in place of all-purpose flour. A blend of rice flour, tapioca starch, and potato starch works well.
- Spicy Fried Pheasant: Add a pinch of cayenne pepper or a dash of hot sauce to the flour mixture.
- Herb-Crusted Fried Pheasant: Mix dried herbs like thyme, rosemary, and oregano into the flour for an aromatic twist.
- Buttermilk Fried Pheasant: Marinate the pheasant in buttermilk for a few hours before breading for extra tender and tangy meat.
- Air Fryer Fried Pheasant: For a healthier option, try air frying the pheasant. Preheat your air fryer to 375°F (190°C). Spray the breaded pheasant with cooking oil and cook for 12-15 minutes, flipping halfway through, until golden brown and cooked through.
FAQs (Frequently Asked Questions)
Q: Can I use chicken instead of pheasant?
A: Yes, you can substitute chicken for pheasant in this recipe. Adjust cooking times accordingly, as chicken may take slightly longer to cook through.
Q: How do I know when the oil is hot enough?
A: The oil is ready when it shimmers and a small piece of flour dropped into the oil sizzles immediately. Using a deep-fry thermometer is the most accurate way to ensure the oil reaches the correct temperature (around 350°F or 175°C).
Q: Can I use a different type of oil?
A: Yes, you can use other oils with a high smoke point, such as canola oil, peanut oil, or sunflower oil. Avoid using olive oil, as it has a lower smoke point and can impart a bitter flavor.
Q: What if I don’t have Nature Seasoning Brand Seasoning?
A: You can substitute with your favorite all-purpose seasoning blend, or create your own by combining salt, pepper, garlic powder, onion powder, and paprika.
Q: My fried pheasant is soggy. What did I do wrong?
A: Soggy fried pheasant can be caused by overcrowding the skillet, not using hot enough oil, or not draining the cooked pheasant on paper towels. Make sure to fry in batches, maintain the oil temperature, and drain thoroughly.
Final Thoughts
This fried pheasant recipe is a testament to the fact that sometimes the simplest preparations yield the most rewarding results. The crispy, golden-brown crust gives way to tender, flavorful meat, making each bite an absolute delight. Whether you’re a seasoned hunter or simply curious to try something new, I encourage you to give this recipe a try. Don’t be afraid to experiment with different seasonings and variations to create your own signature fried pheasant. And most importantly, don’t forget to share your creations with friends and family! Pair it with a crisp, dry white wine or a refreshing craft beer, and savor the moment. Enjoy!