
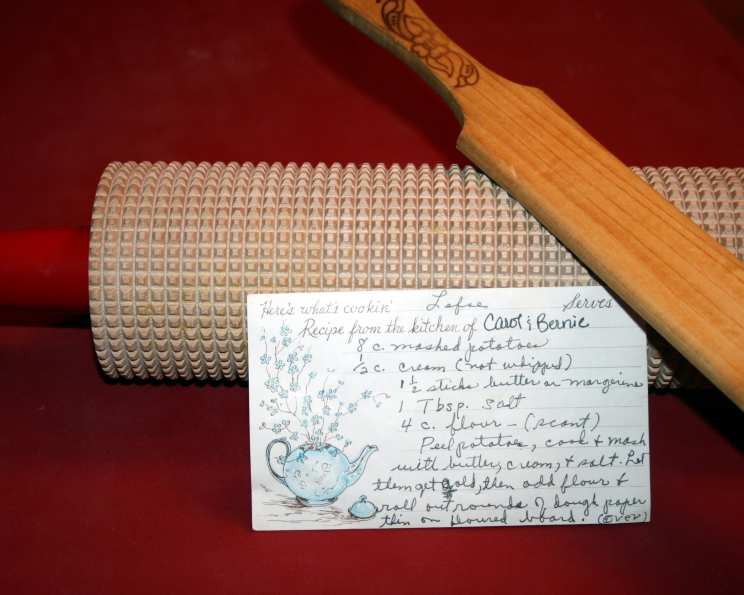
Gramma & Grampa Fjerstad’s Lefse: A Taste of Norwegian Heritage
My grandmother, a fierce defender of all things Scandinavian, always spoke of lefse with a reverence usually reserved for religious artifacts. As a child, I imagined these mysterious potato pancakes were some sort of ancient Viking sustenance, fueling warriors on long sea voyages. Years later, finally tasting my first bite of tender, buttery lefse made by Gramma & Grampa Fjerstad, I understood: it wasn’t just food, it was a legacy, a story whispered across generations with every soft, starchy bite.
Recipe Overview
- Prep Time: 4 hours
- Cook Time: 30 minutes
- Total Time: 4 hours 30 minutes
- Servings: 16-20
- Yield: Variable, depending on size of rounds
- Dietary Type: Vegetarian (easily adaptable to vegan – see variations below)
Ingredients
- 5 lbs potatoes (about 8 cups mashed)
- ½ cup heavy cream (not whipped)
- ¾ cup butter (or margarine)
- 1 tablespoon salt
- 4 cups flour (scant)
Equipment Needed
- Large pot for boiling potatoes
- Potato masher or ricer
- Large mixing bowl
- Plastic wrap
- Floured surface for rolling
- Rolling pin (a lefse rolling pin is ideal, but a regular one works)
- Hot, dry griddle or large frying pan
- Lefse stick/spatula or thin spatula
Instructions
-
Begin by preparing the potatoes. Peel them thoroughly, then cut them into quarters or smaller pieces. This ensures they cook evenly.
-
Place the potatoes in a large pot and cover them generously with cold water. Bring the water to a rolling boil and cook until the potatoes are tender enough to be easily pierced with a fork. This usually takes about 15-20 minutes.
-
Drain the cooked potatoes thoroughly, allowing them to steam dry for a few minutes in the colander. This helps to remove excess moisture and prevents the lefse from becoming sticky.
-
Return the drained potatoes to the pot. Add the ½ cup of heavy cream, ¾ cup of butter (or margarine), and 1 tablespoon of salt.
-
Mash the potatoes thoroughly until they are smooth and creamy. A potato ricer will give you the smoothest texture, but a standard potato masher works just fine. Ensure there are no lumps remaining.
-
Transfer the mashed potatoes to a large mixing bowl. Cover the bowl tightly with plastic wrap and place it in the refrigerator to cool completely. This step is absolutely crucial! The mashed potatoes must be completely cold before you add the flour. If they are even slightly warm, the mixture will turn into a gummy, unworkable paste. Ideally, make the mashed potatoes the night before and refrigerate them overnight.
-
Once the mashed potatoes are thoroughly chilled, begin incorporating the flour. Add the 4 cups of flour gradually, about a cup or so at a time, stirring well after each addition. You may not need the full 4 cups, or you might need a bit more, depending on the moisture content of your potatoes. The dough should be soft, smooth, and easy to handle, but not sticky.
-
Once the dough comes together, divide it into small balls, about 1-2 inches in diameter. The size will depend on how large you want your lefse to be.
-
Lightly flour a large, clean surface. Roll each ball of dough out into paper-thin rounds. A lefse rolling pin, with its deep, checkerboard grooves, is traditional for this step, but a regular rolling pin works just as well. Roll from the center outwards, rotating the dough frequently to maintain a circular shape and prevent sticking. Aim for a very thin, almost translucent consistency.
-
Preheat a dry griddle or a large frying pan over medium-high heat. It’s crucial that the griddle is hot and dry, with no oil or butter.
-
Carefully transfer the rolled-out lefse to the hot griddle.
-
Cook the lefse for about 1-2 minutes per side, or until lightly browned. Use a lefse stick/spatula or a thin spatula to carefully flip the pancake. Watch closely, as they can burn easily.
-
As the lefse are cooked, stack them on a plate and cover them with a clean kitchen towel or plastic wrap to keep them soft and pliable.
-
Wrap stacks of lefse in plastic wrap or store them in airtight containers in the refrigerator or freezer.
Expert Tips & Tricks
- Potato Choice: Russet potatoes are a great choice for lefse because they are high in starch and low in moisture. This helps create a tender, pliable dough.
- Cooling is Key: I can’t stress enough how important it is for the mashed potatoes to be completely cold before adding the flour. Rushing this step is the most common mistake people make.
- Rolling Technique: Don’t be afraid to use plenty of flour when rolling out the lefse. This will prevent them from sticking to the surface and tearing.
- Griddle Temperature: Experiment with the griddle temperature to find the sweet spot. Too hot, and the lefse will burn before they cook through. Too low, and they will be tough and dry.
- Storing Lefse: To prevent the lefse from sticking together after cooking, place a sheet of parchment paper between each one when stacking them.
Serving & Storage Suggestions
Lefse is incredibly versatile. It can be served warm at dinner instead of rolls, slathered with butter and enjoyed on its own. For a traditional Norwegian treat, spread it with butter, sprinkle with cinnamon and sugar, and roll it up. Jam, lingonberry sauce, or even a smear of cream cheese are also delicious options.
Store cooked lefse in the refrigerator for up to a week or in the freezer for up to 3 months. To reheat, simply warm them in a dry skillet or microwave them briefly.
Nutritional Information
| Nutrient | Amount per Serving | % Daily Value |
|---|---|---|
| Calories | 325 kcal | 16% |
| Total Fat | 12g | 18% |
| Saturated Fat | 7g | 35% |
| Cholesterol | 33mg | 11% |
| Sodium | 509mg | 21% |
| Total Carbohydrate | 49g | 16% |
| Dietary Fiber | 4g | 15% |
| Sugars | 1g | 2% |
| Protein | 6g | 12% |
Note: Nutritional information is an estimate and may vary based on specific ingredients and portion sizes.
Variations & Substitutions
- Vegan Lefse: Substitute the heavy cream with a plant-based cream alternative, such as oat cream or cashew cream. Replace the butter with a vegan butter substitute or margarine.
- Gluten-Free Lefse: Use a gluten-free all-purpose flour blend designed for baking. You may need to adjust the amount of flour slightly to achieve the desired dough consistency.
- Sweet Potato Lefse: Replace half of the mashed potatoes with mashed sweet potatoes for a slightly sweeter and more colorful variation.
- Herbed Lefse: Add a tablespoon of chopped fresh herbs, such as dill or chives, to the mashed potatoes for a savory twist.
FAQs (Frequently Asked Questions)
Q: Why did my lefse turn out sticky?
A: This is likely because the mashed potatoes weren’t completely cold before you added the flour. The cold potatoes help the flour bind properly and prevent the mixture from becoming gummy.
Q: Can I use a stand mixer to make the dough?
A: Yes, you can use a stand mixer with a dough hook attachment to mix the dough. Be careful not to overmix, as this can make the lefse tough.
Q: How do I prevent the lefse from tearing when I roll them out?
A: Make sure your rolling surface is well-floured and that you are rotating the dough frequently as you roll. If the dough is still tearing, it may be too dry. Add a tablespoon or two of cold water to the mashed potatoes and mix well.
Q: My lefse are browning too quickly on the griddle. What should I do?
A: Reduce the heat of the griddle slightly. You want the lefse to cook through without burning.
Q: Can I freeze cooked lefse?
A: Yes, lefse freezes very well. Stack the cooked lefse with parchment paper between each one, wrap them tightly in plastic wrap, and then place them in a freezer bag. They can be stored in the freezer for up to 3 months.
Final Thoughts
Gramma & Grampa Fjerstad’s lefse is more than just a recipe; it’s a link to the past, a taste of heritage, and a way to connect with family and friends. Whether you’re a seasoned cook or a kitchen novice, I encourage you to give this recipe a try. Gather your loved ones, roll up your sleeves, and prepare to create a batch of memories that will last a lifetime. Don’t be intimidated if your first few attempts aren’t perfect – lefse making is a skill that improves with practice. Serve your homemade lefse with a cup of hot coffee or a glass of chilled aquavit for a truly authentic Norwegian experience.