
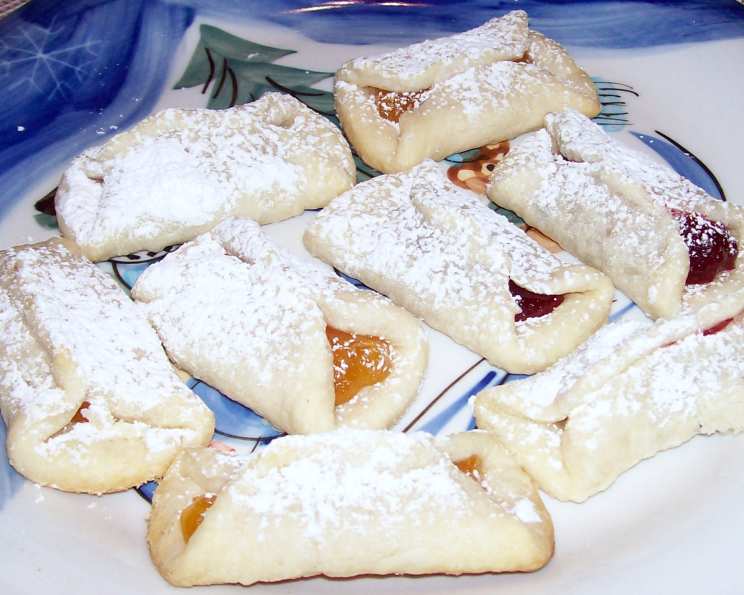
Grandma’s Kolacky Cookies: A Taste of Polish Tradition
The scent of butter, sugar, and fruit filling always transports me back to childhood Christmases. My own grandmother wasn’t Polish, but she lived in a neighborhood brimming with Polish families, and the aromas of their holiday baking were intoxicating. Each year, our neighbor, Mrs. Kowlaski, would gift us a plate of her homemade Kolacky cookies, their delicate pastry practically melting in your mouth. To me, they represented the warmth of community, the generosity of neighbors, and the magic of the holiday season—a memory I cherish and try to recreate in my own kitchen.
Recipe Overview
- Prep Time: 30 minutes
- Cook Time: 12-15 minutes
- Total Time: 1 hour 20 minutes (includes chilling time)
- Yields: 5-6 dozen cookies
- Dietary Type: Not specified (contains dairy)
Ingredients
- 3 cups sifted flour
- 1 1/2 cups butter, cold
- 1/2 cup sour cream
- 1 (8 ounce) can Solo brand filling (apricot, prune, or any flavor)
- Sifted confectioners’ sugar, for dusting
Equipment Needed
- Two large bowls
- Fork or pastry blender
- Serving spoon
- Plastic wrap
- Rolling pin
- Floured surface
- Round cookie cutter or coffee cup
- Baking sheets
- Wire racks
Instructions
- Begin by preparing the dough. In a large bowl, combine the sifted flour and cold butter.
- Using two forks or a pastry blender, cut the butter into the flour until the mixture resembles small peas, similar to making a pie crust. The smaller the pieces of butter, the flakier the crust will be.
- Add the sour cream to the flour-butter mixture.
- Using a serving spoon, stir in the sour cream until well combined. The dough will come together but may still feel slightly crumbly.
- Form the dough into two equal balls.
- Wrap each ball tightly with plastic wrap and store them in the refrigerator to chill for at least one hour, or preferably longer. This chilling process is crucial for preventing the butter from melting during rolling and baking, which would result in tough cookies.
- Preheat your oven to 350°F (175°C).
- Remove one ball of dough from the refrigerator at a time. Keep the other ball chilled while you work.
- Lightly dust a clean surface with flour.
- Dust the ball of dough with flour as well.
- Roll the dough out on the floured surface to approximately 1/8 inch thickness. If the dough starts tearing, it may need more flour or to be chilled for a bit longer. Work quickly to prevent the butter from warming up too much.
- Cut the dough with a large round cookie cutter or a coffee cup.
- Place the cut circles on baking sheets, leaving a bit of space between each cookie.
- Fill the center of each circle with approximately 1-2 teaspoons of Solo filling. Be careful not to overfill, as the filling can spill out during baking.
- Bring up two opposite sides of each circle and pinch them together to close, forming a small pocket. The shape should resemble a triangle or a boat.
- Bake at 350°F (175°C) for 12-15 minutes, or until the bottom of the cookie is just beginning to brown. Keep a close eye on them, as they can burn easily.
- Remove the cookies from the oven and cool them on wire racks completely.
- Once the cookies are completely cool, dust them generously with sifted confectioners’ sugar.
Expert Tips & Tricks
- For the flakiest dough, use very cold butter and sour cream. You can even chill your mixing bowl for 15 minutes before you begin.
- If the dough becomes too soft while you’re working with it, return it to the refrigerator for 10-15 minutes to firm up.
- Don’t overwork the dough. Overmixing can develop the gluten, resulting in a tough cookie.
- For a richer flavor, use European-style butter, which has a higher butterfat content.
- Experiment with different fillings! In addition to apricot and prune, try raspberry, poppy seed, or even a sweet cheese filling.
- You can make the dough ahead of time and store it in the refrigerator for up to 3 days, or in the freezer for up to 2 months. Thaw completely in the refrigerator before using.
- To prevent the cookies from sticking to the baking sheet, line it with parchment paper.
Serving & Storage Suggestions
These Kolacky cookies are best served at room temperature. They are perfect for enjoying with a cup of coffee or tea. They make a beautiful addition to any dessert platter, especially during the holidays.
Store the cooled cookies in an airtight container at room temperature for up to 3 days, or in the refrigerator for up to a week. For longer storage, you can freeze the cookies for up to 2 months. Thaw them completely at room temperature before serving. Dust with additional confectioners’ sugar before serving, if desired.
Nutritional Information
Note: Nutritional information is an estimate and may vary depending on the specific ingredients used.
| Nutrient | Amount per Serving | % Daily Value |
|---|---|---|
| Calories | 135 kcal | 7% |
| Total Fat | 7g | 11% |
| Saturated Fat | 4g | 20% |
| Cholesterol | 20mg | 7% |
| Sodium | 30mg | 1% |
| Total Carbohydrate | 15g | 5% |
| Dietary Fiber | 0g | 0% |
| Sugars | 5g | |
| Protein | 1g | 2% |
Variations & Substitutions
- Gluten-Free: Use a gluten-free flour blend in place of the all-purpose flour. You may need to adjust the amount of liquid depending on the blend you use.
- Dairy-Free: Substitute the butter with a plant-based butter alternative and the sour cream with a dairy-free sour cream alternative or even plain coconut yogurt.
- Vegan: To make these cookies vegan, replace the butter with a vegan butter alternative, the sour cream with a plant-based sour cream alternative or plain coconut yogurt, and ensure your chosen filling is also vegan-friendly.
- Flavor Variations: Add a touch of lemon or orange zest to the dough for a brighter flavor. You can also incorporate spices like cinnamon, nutmeg, or cardamom.
- Filling Variations: Get creative with your fillings! Try using homemade fruit preserves, nut butter, or even a chocolate hazelnut spread.
FAQs (Frequently Asked Questions)
Q: Why is it important to chill the dough?
A: Chilling the dough allows the butter to firm up, which prevents it from melting during rolling and baking. This results in a flakier, more tender cookie.
Q: Can I use a different type of filling?
A: Absolutely! Feel free to experiment with different fillings such as raspberry, cherry, apricot, poppy seed, or even a sweet cheese filling.
Q: My dough is too sticky. What should I do?
A: Add a little more flour, one tablespoon at a time, until the dough is easier to handle. Also, ensure that your butter and sour cream were very cold to start.
Q: How do I prevent the filling from spilling out during baking?
A: Avoid overfilling the cookies. Use approximately 1-2 teaspoons of filling per cookie, and make sure to pinch the sides together tightly to seal.
Q: Can I freeze the baked cookies?
A: Yes, you can freeze the baked cookies for up to 2 months. Thaw them completely at room temperature before serving. Dust with additional confectioners’ sugar before serving, if desired.
Final Thoughts
Grandma’s Kolacky cookies are more than just a dessert; they’re a taste of tradition, a symbol of warmth, and a reminder of cherished memories. While the process may seem a bit involved, the end result is well worth the effort. So, gather your ingredients, preheat your oven, and embark on a culinary journey that will transport you to a place of comfort and joy. Don’t be afraid to experiment with different fillings and flavors to create your own unique version of this classic treat. And most importantly, share these delicious cookies with your loved ones, creating new memories that will last a lifetime.