
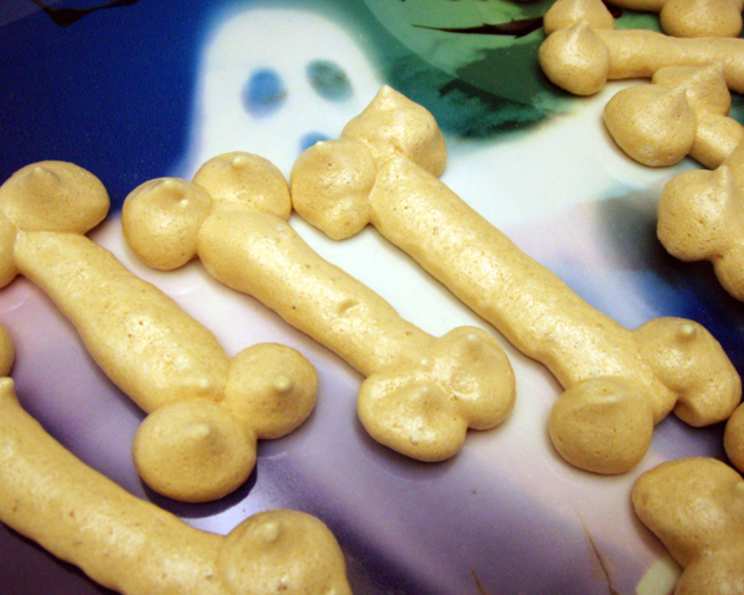
Spooky Sweet Halloween Bones: A Meringue Masterpiece
There’s something about Halloween that brings out the playful ghoul in all of us, and for me, that always translated to baking. I remember one year, determined to impress my friends with a “haunted” dessert table, I stumbled upon a meringue recipe shaped like bones. The delicate crunch, the pure sweetness, and the eerie presentation turned out to be a massive hit! Those meringue bones became a Halloween tradition. Every year, the act of carefully piping and baking these sugary skeletons fills my kitchen with a unique kind of spooky cheer.
Recipe Overview
- Prep Time: 20 minutes
- Cook Time: 1 hour 15 minutes to 1 hour 30 minutes
- Total Time: 1 hour 35 minutes to 1 hour 50 minutes
- Yields: Approximately 12 bones
- Dietary Type: Gluten-Free (naturally)
Ingredients
- 2 large egg whites
- 4 ounces (approximately ½ cup) fine white sugar
- Optional: Chopped nuts (almonds, pecans, or walnuts work well) for a more brittle texture.
Equipment Needed
- Stand mixer or hand mixer
- Baking sheets
- Parchment paper or silicone baking mats
- Piping bag
- Plain piping nozzle
- Small knife or scissors
Instructions
-
Preheat your oven to a low temperature of 250 degrees F (120 degrees C). This low heat is crucial for drying out the meringues without browning them.
-
In a clean mixing bowl, begin to beat the egg whites until they form stiff peaks. Start on a low speed and gradually increase to a higher speed. This gradual approach ensures a stable meringue. The whites should be able to hold their shape when the beater is lifted.
-
Once the egg whites have reached the stiff peak stage, begin adding the sugar one tablespoon at a time. Continue beating the mixture after each addition until the sugar is fully incorporated. This process is essential for creating a smooth, glossy meringue. The mixture should be thick and have a sheen.
-
Line your baking trays with parchment paper or silicone baking mats. This will prevent the meringues from sticking and make removal easier.
-
Fit your piping bag with a plain nozzle. A medium-sized nozzle works best for creating bone-shaped meringues.
-
Fill the piping bag with the meringue mixture. Be careful not to overfill the bag, as this can make it difficult to control.
-
Now comes the fun part! On the prepared baking sheets, pipe a straight meringue “bone” approximately 4 inches long. This forms the main shaft of the bone.
-
At each end of the meringue line, pipe two meringue “balls”. These will represent the rounded ends of the bone.
-
If you notice any pointy bits of meringue on the balls, gently take them off with a small knife or scissors. This will give the bones a smoother, more polished look.
-
Bake the bones in the preheated oven for 1 hour and 15 minutes to 1 hour and 30 minutes, or until they have completely dried out. The meringues should be firm to the touch and easily lift off the parchment paper.
-
Turn off the oven and let the bones cool completely inside with the door slightly ajar. This slow cooling process helps prevent cracking and ensures they are fully dried.
-
If you want your bones to have a more brittle appearance and nutty flavor, mix in some chopped nuts into the meringue before piping. Gently fold them in so as not to deflate the egg whites.
-
Keep in mind that the yield of this recipe will depend on the size of the bones you create and the size of the piping nozzle you use.
Expert Tips & Tricks
- Room temperature egg whites whip up to a greater volume than cold egg whites. Let your egg whites sit out for about 30 minutes before starting.
- Avoid any trace of yolk when separating the eggs. Even a tiny bit of yolk can prevent the egg whites from whipping properly.
- For extra stability, you can add a pinch of cream of tartar to the egg whites before whipping.
- Don’t open the oven door during baking, as this can cause the meringues to collapse.
- If your meringues are browning too quickly, reduce the oven temperature slightly.
- For a spooky presentation, dust the cooled bones with cocoa powder for an “aged” look.
Serving & Storage Suggestions
Serve these Halloween Bones on a platter decorated with fake cobwebs and plastic spiders for a truly spooky presentation. They also make a great addition to a Halloween-themed dessert table.
Store the meringues in an airtight container at room temperature. Avoid storing them in the refrigerator, as they will become sticky. They will last for up to a week if stored properly. Meringues don’t freeze well.
Nutritional Information
| Nutrient | Amount per Serving | % Daily Value |
|---|---|---|
| Calories | 40 kcal | 2% |
| Total Fat | 0g | 0% |
| Saturated Fat | 0g | 0% |
| Cholesterol | 0mg | 0% |
| Sodium | 10mg | 0% |
| Total Carbohydrate | 10g | 3% |
| Dietary Fiber | 0g | 0% |
| Sugars | 10g | 20% |
| Protein | 1g | 2% |
Nutritional information is an estimate and can vary based on specific ingredients and portion sizes.
Variations & Substitutions
- Flavor variations: Add a teaspoon of vanilla extract, almond extract, or peppermint extract to the meringue mixture for added flavor.
- Color variations: Use gel food coloring to tint the meringue mixture for colorful bones.
- Chocolate dipped bones: Dip the cooled bones in melted chocolate and let them set for an extra decadent treat.
- Vegan meringue (aquafaba): Substitute the egg whites with aquafaba (chickpea brine) for a vegan version. Use the same weight as the egg whites.
FAQs (Frequently Asked Questions)
Q: Why are my meringues cracking?
A: Cracking can be caused by baking at too high of a temperature or cooling the meringues too quickly. Make sure to bake at the recommended temperature and allow the meringues to cool slowly in the oven.
Q: My meringues are sticky. What did I do wrong?
A: Sticky meringues are usually the result of too much humidity. Store them in an airtight container with a desiccant pack or uncooked rice at the bottom to absorb any moisture.
Q: Can I use powdered sugar instead of granulated sugar?
A: It’s best to use granulated sugar as powdered sugar contains cornstarch, which can affect the texture of the meringues.
Q: Can I make these ahead of time?
A: Yes, you can make these meringues up to a week in advance. Store them in an airtight container at room temperature.
Q: What if I don’t have a piping bag?
A: You can use a ziplock bag with a corner snipped off as a makeshift piping bag.
Final Thoughts
I truly hope you’ll give these spooky sweet Halloween bones a try! They’re surprisingly easy to make and are guaranteed to be a crowd-pleaser at any Halloween gathering. Don’t be afraid to get creative with the decorations and flavors. If you do make them, please share your photos or feedback! I’d love to see your spooky creations. Pair these meringues with a warm cup of spiced cider for the ultimate Halloween treat. Happy haunting and happy baking!