
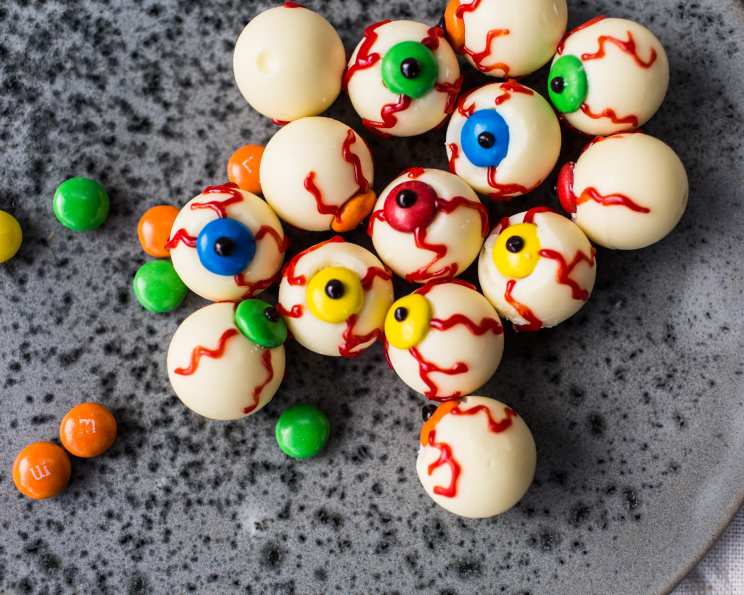
Halloween Butterfinger Eyes: A Spooktacular Treat
There’s something about Halloween that brings out the kid in all of us, isn’t there? I remember one year, my little sister and I decided to host a haunted house in our garage. The centerpiece of our spooky spread? A platter of these very Butterfinger Eyes. The slightly horrified, delighted expressions on our guests’ faces as they popped these crunchy, peanut-buttery eyeballs into their mouths are etched in my memory. Even now, decades later, whipping up a batch of these treats transports me back to that night of homemade scares and sugary thrills.
Recipe Overview
- Prep Time: 30 minutes
- Cook Time: 10 minutes
- Total Time: 1 hour 15 minutes (includes freezing and refrigeration time)
- Servings: 40
- Yield: 40 eyeballs
- Dietary Type: Not Gluten-Free
Ingredients
- 1 cup creamy peanut butter
- 6 tablespoons butter, softened
- 2 cups powdered sugar
- 2 1/8 ounces Butterfinger bar, finely chopped
- 12 ounces white chocolate or 12 ounces vanilla candy coating
- 40 plain chocolate M&M’s
- Red food coloring or red decorating gel
- Black food coloring or black decorating gel
Equipment Needed
- Mixing bowl
- Waxed paper
- Double boiler or saucepan and glass bowl
- Spoon or dipping tools
- Ziploc bag or pastry bag
Instructions
-
In a mixing bowl, thoroughly stir together the peanut butter and softened butter until you achieve a creamy consistency. Ensuring the butter is properly softened will allow for a smoother, easier blending process.
-
Gradually add the powdered sugar to the peanut butter mixture. Stir consistently until everything is well combined and a dough-like texture begins to form. This step requires patience; adding the sugar in small increments will prevent clumps and ensure a uniform mixture.
-
Stir in the finely chopped Butterfinger candy bar. Distribute the candy evenly throughout the peanut butter mixture to ensure each eyeball has that signature crunchy Butterfinger surprise.
-
Shape the mixture into 1-inch balls. The size is important for achieving that “eyeball” look. Place these balls carefully onto a sheet of waxed paper.
-
Freeze the peanut butter balls for approximately 45 minutes. This will help them firm up, making them easier to dip into the melted chocolate later without losing their shape.
-
Next, it’s time to melt the white chocolate or vanilla candy coating. You can use a double boiler for this, or create a makeshift one by filling a medium saucepan about one-quarter full with water and bringing it to a simmer. Then, place a large glass or stainless steel bowl over the top of the saucepan, ensuring the bottom of the bowl doesn’t touch the water. Turn off the heat once the water is simmering.
-
Add the chocolate to the bowl and stir constantly until it is completely melted and smooth. Avoid overheating the chocolate, as this can cause it to seize. If you desire a thinner coating, add a tablespoon of shortening and stir until you reach your desired consistency.
-
Carefully dip each frozen peanut butter ball into the melted chocolate, one at a time. Ensure the entire ball is coated.
-
Allow any excess coating to drip off. A gentle tap against the side of the bowl can help remove excess chocolate.
-
Place the coated balls back onto the waxed paper. Immediately press a plain chocolate M&M onto the center of each peanut butter ball. This will form the iris of the “eyeball.” You can also wait until after the coating has set to adhere the M&M’s using a small dot of your piped colored chocolate.
-
Refrigerate the coated eyeballs until the coating is firm, which typically takes about 30 minutes.
-
Using the leftover white chocolate, add red food coloring until you reach your desired bloodshot color. You may need to reheat the chocolate slightly to maintain its melted consistency.
-
Place the colored chocolate into a Ziploc bag or pastry bag. Cut a very small corner off the bag. This will allow you to pipe fine lines.
-
Pipe squiggly lines onto the eyes to create the appearance of blood vessels. Alternatively, you can use red decorating gel for this step.
-
Finally, add a small dot of black gel or black food-colored coating to the center of each M&M piece to represent the pupil.
Expert Tips & Tricks
- For an extra smooth chocolate coating, try using paramount crystals (available at most baking supply stores) in addition to, or instead of, shortening.
- If your chocolate seizes while melting, try adding a teaspoon of vegetable oil to the chocolate and stirring vigorously.
- If you’re short on time, you can skip the freezing step, but be extra careful when dipping the balls into the melted chocolate to avoid them losing their shape. The freezing helps to solidify the peanut butter mixture.
Serving & Storage Suggestions
Serve these Halloween Butterfinger Eyes on a festive platter alongside other spooky treats. They are best enjoyed chilled. Store any leftovers in an airtight container in the refrigerator for up to a week. You can also freeze them for longer storage; just be sure to let them thaw in the refrigerator before serving to prevent the chocolate from cracking.
Nutritional Information
| Nutrient | Amount per Serving | % Daily Value |
|---|---|---|
| Calories | 228 kcal | N/A |
| Calories from Fat | N/A | N/A |
| Total Fat | 12.2g | 18% |
| Saturated Fat | 6.2g | 31% |
| Cholesterol | 9.3mg | 3% |
| Sodium | 66.6mg | 2% |
| Total Carbohydrate | 27.6g | 9% |
| Dietary Fiber | 1g | 4% |
| Sugars | 25.1g | 100% |
| Protein | 3.1g | 6% |
Variations & Substitutions
- For a gluten-free version, ensure your Butterfinger bar is certified gluten-free, as some may contain trace amounts.
- Use dark chocolate instead of white chocolate for a richer, more intense flavor.
- Add a pinch of sea salt to the peanut butter mixture for a salty-sweet contrast.
- For a vegan option, use vegan butter, vegan white chocolate, and substitute the M&M’s with a vegan-friendly candy for the iris.
FAQs (Frequently Asked Questions)
Q: Can I use a different type of candy bar instead of Butterfinger?
A: Absolutely! Snickers, Heath bars, or even chopped-up cookies would be delicious substitutes. Just be sure to chop them finely.
Q: My chocolate is seizing up! What should I do?
A: A tiny bit of shortening or vegetable oil (about 1 teaspoon) can help smooth out seized chocolate. Stir it in vigorously.
Q: How can I make these ahead of time?
A: You can make the peanut butter balls several days in advance and store them in the freezer. Just be sure to thaw them slightly before dipping them in chocolate.
Q: The M&M’s are sliding off the eyeballs before the chocolate sets. What am I doing wrong?
A: Make sure the chocolate is still melted when you attach the M&M and gently press the candy onto the surface. If necessary, let the coating set slightly before applying the M&M.
Q: Can I use food coloring paste instead of liquid food coloring?
A: Yes, you can use food coloring paste. Start with a very small amount and gradually add more until you achieve the desired color.
Final Thoughts
These Halloween Butterfinger Eyes are sure to be a hit at your next spooky gathering. They are not only delicious but also incredibly fun to make, and the recipe is easy enough for even beginner bakers to tackle. So gather your ingredients, put on some Halloween tunes, and get ready to create some edible eyeballs that will both delight and slightly unnerve your guests. Don’t forget to share your creations and let me know what you think! Pair them with a bubbling cauldron of hot chocolate for the ultimate Halloween treat experience.