
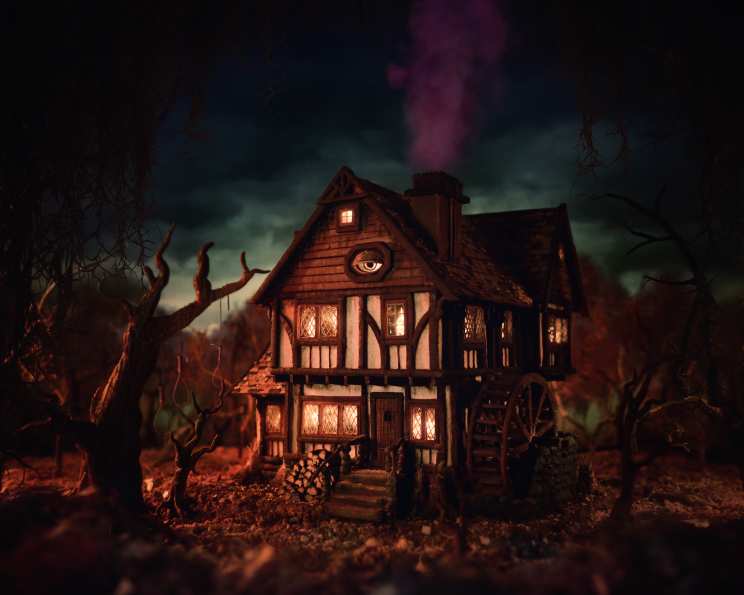
Hocus Pocus Cottage Cake: A Spellbinding Halloween Treat
The first time I saw Hocus Pocus, I was probably far too young, huddled on the couch with my older sister, clutching a pillow for dear life. Beyond the Sanderson sisters’ delightfully wicked antics, what truly captured my imagination was their bewitching cottage – a gingerbread-esque dream that seemed pulled straight from a storybook. Years later, the warm, slightly spooky feeling of that movie night still lingers, and every Halloween, I find myself drawn to recreating that edible piece of movie magic, turning what seemed like a daunting task into a rewarding, delicious adventure.
Recipe Overview
- Prep Time: 50 hours (Note: This includes chilling, baking, and decorating time)
- Cook Time: Varies
- Total Time: 50 hours
- Yields: 1 Large Cake
- Dietary Type: Not specified; contains gluten, dairy, and eggs. Can be modified with substitutions.
Ingredients
Chocolate Cake
- 2 cups sugar
- 1 cup milk
- 1⁄2 cup vegetable oil
- 2 eggs
- 2 teaspoons vanilla extract
- 2 cups all-purpose flour
- 3⁄4 cup unsweetened cocoa powder
- 2 teaspoons baking powder
- 1 1⁄2 teaspoons baking soda
- 1 teaspoon salt
- 1 cup boiling water
- 12 Oreo cookies, pulsed in a food processor
Cookies and Cream Buttercream Frosting
- 2 cups unsalted butter, softened
- 6 cups confectioners’ sugar
- 3 teaspoons vanilla
- 2 tablespoons heavy whipping cream
- 1 teaspoon salt
- 2 Oreo cookies, finely ground
Chocolate Cookie Wood Trim
- 1 1⁄2 cups unsalted butter, softened
- 1 1⁄2 cups brown sugar, packed
- 1 1⁄2 cups Hershey’s Chocolate Syrup
- 2 teaspoons salt
- 5 tablespoons cocoa
- 2 large eggs
- 7 cups all-purpose flour
Candy Glass
- 2 cups water
- 3 1⁄2 cups granulated sugar
- 1 cup light corn syrup
- 1⁄4 teaspoon cream of tartar
- 2 drops blue food coloring
Royal Icing
- 3 1⁄2 cups confectioners’ sugar
- 3 large egg whites
- 1⁄2 cup cocoa powder
Royal Icing Fall Leaves
- 3 large egg whites
- 4 cups confectioners’ sugar
- 2 drops food coloring (brown, red, and yellow)
Equipment Needed
- Stand mixer
- Large mixing bowls
- Saucepan
- Candy thermometer
- Food processor
- Baking pans (10×10 square)
- Parchment paper
- Cardboard cutout stencils
- Large cookie sheets
- Half tablespoon measure
- Aluminum foil
- Craft blade
- Dremel tool (optional, for cookie sculpting)
- Cake board
- Wooden dowel rods
- Battery operated tea lights
- Electrical tape
- Basting brush
- Tri-fold presentation board (optional, for background)
Instructions
-
Prepare the Chocolate Cake: Preheat oven to 350 degrees F (175 degrees C). Place 3 cups of water in a saucepan and set on the stove over high heat, bringing it to a boil.
-
In a stand mixer, blend 2 cups sugar, 1 cup milk, 1⁄2 cup vegetable oil, 2 eggs, and 2 teaspoons vanilla extract.
-
In a large mixing bowl, combine 2 cups all-purpose flour, 3⁄4 cup unsweetened cocoa powder, 2 teaspoons baking powder, 1 1⁄2 teaspoons baking soda, and 1 teaspoon salt.
-
Slowly mix the dry ingredients into the wet ingredients until just incorporated. Then, pour in 1 cup of boiling water.
-
Lastly, mix in 12 Oreo cookie crumbles into the batter.
-
Pour the batter into two buttered and floured 10×10 square baking pans.
-
Bake for 35 minutes, or until a toothpick inserted into the center comes out clean.
-
Wrap the baked cakes and chill well before cutting and assembling.
Note: The provided chocolate cake recipe yields 10 servings. To recreate the full cake, you’ll need to make this recipe 6 times, resulting in 60 servings. -
Prepare the Cookies and Cream Buttercream Frosting: In a stand mixer, beat 2 cups of room temperature unsalted butter until light and fluffy.
-
Add 6 cups of powdered sugar one cup at a time, blending each addition before adding the next.
-
Add 3 teaspoons vanilla, 2 tablespoons whipping cream, 1 teaspoon salt, and 2 ground Oreo cookies. The Oreo cookies add flavor and give the frosting a lightly speckled look.
Note: If making the full cake, make this recipe 3 times. -
Prepare the Chocolate Cookie Wood Trim: Using parchment paper, cardboard cutout stencils, and large cookie sheets, in a stand mixer, beat 1 1/2 cups butter and 1 1/2 cups brown sugar until creamy.
-
Add 1 1/2 cups Hershey’s Chocolate Syrup and 2 eggs.
-
In a separate bowl, mix 2 teaspoons salt, 5 tablespoons cocoa, and 7 cups all-purpose flour.
-
Slowly mix the dry ingredients into the wet ingredients until a dough ball forms.
-
Wrap softball-sized portions of dough in foil and chill until ready to use.
-
Preheat oven to 360 degrees F (182 degrees C).
-
Line cookie sheets with parchment paper and roll the dough directly onto the cookie sheets, using flour to prevent sticking.
-
Cut out shapes using homemade stencils. Save scrapes for the next sheet. For planks and strips, use a long ruler and a craft blade to cut 1/4-inch strips.
-
Bake for 8.5 minutes.
-
Immediately after removing a batch from the oven, place a sheet of parchment over the top and using a slightly smaller baking sheet, press, slide and swivel the smaller sheet on top until perfect. This is my secret to getting smooth cookies!
-
Allow the cookies to cool before removing and place on paper towels.
-
Prepare the Candy Glass: Important note: You will have very little time to work with the candy glass, so have everything as close to the stove as possible. I set up a fully prepared table directly next to the stove for the easiest and least messy process.
-
For the eye mold, gently press aluminum foil into a half tablespoon measure to create the right shape for the eye on the house. Do not remove the foil yet.
-
In a large pot, mix 2 cups water, 3 1/2 cups granulated sugar, 1 cup light corn syrup, and 1/4 teaspoon cream of tartar on medium/high heat.
-
Stir constantly until the mixture begins to boil. Stop stirring and place a candy thermometer on the edge of the pot with the temp gauge submerged in the sugar syrup.
-
Allow the mixture to heat to 300 degrees F (149 degrees C) and immediately remove from heat.
-
Stir and mix in two drops of blue food coloring.
-
Have cookies and eye mold clean and resting face up on a very flat surface covered in aluminum foil. Pour candy glass into the cookies using a bent teaspoon or small ladle.
-
Once poured, immediately clean up any sugar strands that occurred.
Note: For the full cake, make this recipe 3 times. -
Prepare the Royal Icing: In a stand mixer, beat 3 large egg whites until frothy.
-
Incorporate 3 1/2 cups confectioners’ sugar until smooth.
-
Then mix in 1/2 cup cocoa powder. Mix a little bit at a time until the color you desire is achieved.
Note: For the full cake, make this recipe 3 times. -
Prepare the Royal Icing Fall Leaves: In a stand mixer, beat 3 large egg whites until frothy and incorporate 4 cups confectioners’ sugar until smooth.
-
Separate the icing into three bowls and add food coloring to each in a fall array of your choice (brown, red, and yellow).
-
Take a basting brush and paint a thin layer of each color onto a large parchment-lined baking sheet.
-
Allow each color to dry at room temperature. Once completely dry, crumble all colors together making sure nothing is too large. If the final product is too vivid, you can add a bit of cocoa powder to it for a more natural appearance. This recipe will yield about 1 1/2 cups of fall leaves.
-
Assemble the Cake: This is where the magic happens. Cake board, wooden dowel rods, battery-operated tea lights, and electrical tape are needed for this part.
-
Remove the light element and battery from the tea lights and use electrical tape to adhere them together for a fun light to place in each window cavern. The light stays lit for roughly three days and should be removed before cutting and serving.
-
Various colors of powder paints and ice-cold vodka can be used as a liquifying agent for the paints. I used these minimally on this project to give the house some deeper tones and shading where needed.
-
I kept all cake elements cold at all times. This was an extremely heavy cake, and allowing it to fully come to room temperature would have caused it to sag and lose its correct shape.
-
After studying the house from the movie, I cut out cake board sheets in the necessary shapes using a craft blade. Every third layer got a sheet of the board between it, and 4-5 cut dowel rods were placed variously through the layer to give the needed support.
-
Once the structure was built, it received a generous crumb coat before getting a polishing final coat of buttercream. It was then allowed to chill fully overnight before the next step.
-
The following day, the large window frames were placed in their respective places using royal icing to ‘glue’ all cookie pieces to the house. I used a bread knife to cut small pockets in each window and door frame to allow for a light to be placed before photographing. Once these pockets were cut out, I coated all their inner walls with a bit of buttercream to prevent the cake from drying out.
-
I used a Dremel tool (which I only use for baking) to perfect each edge and to cut every accent and roof strip to align with the next.
-
Once the cake was fully assembled, it received a few accents and shading done with powder paints, and then the surrounding ground was coated with brown sugar and a sprinkling of the royal icing leaves. As an additional touch, I used shredded wheat to add bails of hay in the front and used the remaining cookie dough to create surrounding trees.
-
As a final step, I hand-painted a large tri-fold presentation board as a background landscape.
Expert Tips & Tricks
- When working with royal icing, remember that the longer you work with a single batch, the darker the color will become. Keep this in mind when initially mixing. I usually make one batch at a time, mixing more as needed.
- Use a turntable for easier frosting and decorating.
- Practice your cookie decorating techniques beforehand to ensure smooth and even application.
- Consider using edible markers to add fine details to the cookie wood trim.
- If the candy glass becomes too hard to pour, gently reheat it over low heat.
- When making the royal icing leaves, experiment with different color combinations to create a more realistic fall foliage effect.
Serving & Storage Suggestions
Serve the Hocus Pocus Cottage Cake on a sturdy cake board or platter. Due to the intricate structure and heavy components, it’s best to serve slices directly from the cake rather than attempting to move individual pieces.
Leftovers should be stored in an airtight container in the refrigerator. The cake will stay fresh for up to 3-4 days. Be aware that the buttercream frosting may become slightly firmer when chilled, but it will soften at room temperature. Freezing is not recommended due to the various components and intricate details of the cake.
Nutritional Information
| Nutrient | Amount per Serving | % Daily Value |
|---|---|---|
| Calories | 2660 kcal | N/A |
| Total Fat | 858.7 g | 1321% |
| Saturated Fat | 464 g | 2319% |
| Cholesterol | 2527.4 mg | 842% |
| Sodium | 14296.7 mg | 595% |
| Total Carbohydrate | 4664.9 g | 1554% |
| Dietary Fiber | 87.3 g | 349% |
| Sugars | 3393.5 g | 13573% |
| Protein | 223.3 g | 446% |
Note: This nutritional information is an estimate based on the full recipe yield of 60 servings. Actual values may vary.
Variations & Substitutions
- Gluten-Free: Substitute gluten-free all-purpose flour for regular all-purpose flour in the cake and cookie recipes. Ensure your Oreo cookies are also gluten-free (some brands offer gluten-free versions).
- Dairy-Free: Use a non-dairy milk alternative (such as almond or soy milk) in the cake recipe. Replace the butter in the buttercream frosting with a vegan butter alternative.
- Egg-Free: Use an egg replacement powder or flaxseed meal mixed with water to replace the eggs in the cake and cookie recipes.
- Candy Glass Color: Experiment with different food coloring to create different colors of candy glass. Green or purple would also be fitting for a Halloween-themed cake.
- Regional Adaptation: Consider using local or seasonal flavors to personalize the cake. For example, add pumpkin spice to the buttercream frosting or use locally sourced honey in the candy glass.
FAQs (Frequently Asked Questions)
Q: Is it necessary to chill the cake layers before assembling?
A: Yes, chilling the cake layers is crucial for easier handling and preventing the cake from crumbling during assembly. The cold firms the cake, making it more stable.
Q: Can I make the cookie wood trim in advance?
A: Absolutely! The cookie wood trim can be made several days in advance and stored in an airtight container at room temperature.
Q: What is the best way to prevent the candy glass from sticking to the aluminum foil?
A: Ensure the aluminum foil is completely smooth and lightly greased with cooking spray before pouring the candy glass.
Q: Can I use pre-made royal icing instead of making it from scratch?
A: Yes, pre-made royal icing can be used, but be sure to check the consistency and adjust with a little water or confectioners’ sugar as needed.
Q: How do I transport this cake safely?
A: This cake is best transported in a sturdy box with non-slip padding at the base. Keep the cake as level as possible during transport and avoid sudden stops.
Final Thoughts
Creating the Hocus Pocus Cottage Cake is a true labor of love, a culinary adventure that combines baking, decorating, and a whole lot of patience. But the end result – a whimsical, edible replica of a beloved movie icon – is well worth the effort. So gather your ingredients, channel your inner Sanderson sister, and prepare to cast a spell on your friends and family with this unforgettable Halloween masterpiece. Don’t be afraid to get creative with your decorations and let your imagination run wild! And most importantly, share your creations and experiences – I’d love to see how you bring this spooky-sweet cottage to life.