
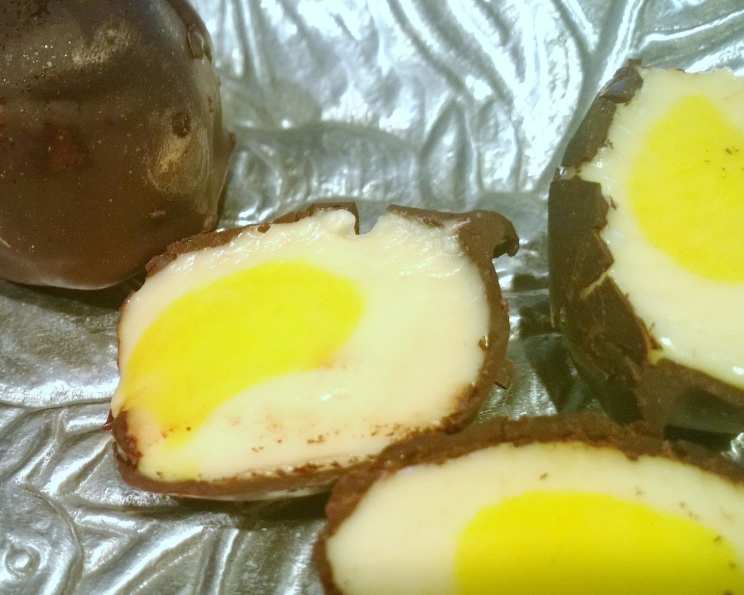
Homemade Cadbury Creme Eggs: A Decadent Easter Treat
The first time I tasted a Cadbury Creme Egg, I was probably about seven years old. The Easter bunny had hidden a basket overflowing with goodies, and nestled among the chocolate bunnies and jelly beans was that iconic foil-wrapped egg. I remember biting into the smooth, dark chocolate shell and being utterly captivated by the gooey, almost otherworldly filling. That sugary, yellow and white center was unlike anything I’d ever tasted. It was pure Easter magic, a fleeting, glorious treat I looked forward to every year. Now, years later, I’m tackling the challenge of recreating that magic in my own kitchen.
Recipe Overview
- Prep Time: 30 minutes
- Cook Time: 10 minutes
- Total Time: 1 hour (including chilling time)
- Servings: 15
- Yield: 15 eggs
- Dietary Type: Vegetarian
Ingredients
- 1/2 cup Lyle’s golden syrup
- 6 tablespoons butter, softened
- 1/2 teaspoon salt
- 1 vanilla bean, scraped & seeds removed (optional)
- 1 teaspoon vanilla extract
- 3 cups powdered sugar
- 1/4 – 1/2 teaspoon yellow food coloring
- 12 ounces dark chocolate, chopped (or 1 bag bittersweet chocolate chips)
Equipment Needed
- Stand mixer (or hand mixer)
- Rubber spatula
- Small bowls
- Plastic wrap
- Plate or sheet tray
- Parchment paper
- Toothpicks
- Microwave-safe bowls
Instructions
-
In the bowl of a stand mixer fitted with the paddle attachment (or using a hand mixer, or doing it by hand), place the softened butter. Add the Lyle’s golden syrup, salt, vanilla seeds (if using), and vanilla extract.
-
Mix to combine on medium speed, scraping down the sides of the bowl with a rubber spatula to ensure everything is thoroughly mixed and incorporated. This step is crucial for a smooth and consistent filling.
-
Gradually add the powdered sugar, mixing on low speed until completely smooth. Be patient and add the sugar slowly to avoid creating a cloud of powdered sugar in your kitchen. Scrape the bowl frequently. The mixture should be thick and pliable.
-
Eyeball about a third of the mixture and transfer it to a small bowl. This will be the “yolk” of your creme egg.
-
Add enough yellow food coloring to the smaller bowl until it reaches your desired shade of yellow. Remember, a little goes a long way, so start with a small amount and add more gradually until you achieve the perfect yolk color.
-
Cover both bowls (the yellow yolk mixture and the remaining white mixture) with plastic wrap, pressing the plastic wrap directly onto the surface of the mixture to prevent a skin from forming.
-
Freeze both bowls for at least 15 minutes. The mixtures need to be very cold and firm to work with easily. You can freeze them for a little longer if needed, but keep a close eye to make sure the mixture doesn’t become too hard to work with.
-
Working quickly, take about 1/2 teaspoon of the yellow yolk mixture and roll it into a ball using your hands. Repeat with the rest of the yellow mixture. Try to keep the balls uniform in size for a consistent appearance.
-
Once the yellow “yolks” are complete, place them on a plate or a sheet tray lined with parchment paper. Return the tray to the freezer to keep the yolks firm.
-
Now, scoop out about 1 tablespoon of the white mixture and roll it into a ball. Repeat with the rest of the white mixture. If the white mixture is too soft to work with, return it to the freezer for a few minutes to firm up.
-
When the yellow yolks are thoroughly chilled, take one white ball and place it in the palm of your hand. Gently flatten it slightly to create a small disc.
-
Create an indent in the center of the flattened white disc to cradle the yellow yolk.
-
Place a yellow yolk in the center of the white disc. Gently wrap the white mixture around the yolk, carefully sealing it to form an egg shape. Roll the egg between your palms to smooth out any imperfections.
-
Continue this process until all your eggs are complete. Return them to the freezer one more time for at least 15 minutes to firm up before dipping. This step is crucial for preventing the eggs from melting during the chocolate dipping process.
-
While your eggs are chilling, melt the dark chocolate. You can microwave it in 30-second intervals, stirring very well in between each interval to prevent burning. Alternatively, you can melt it over a double boiler for more controlled heat.
-
If melting in the microwave, add a tablespoon of canola oil to the melted chocolate and stir well. This will thin the chocolate slightly, giving you a smoother and more flexible coating.
-
Now for the dipping! Working with one egg at a time, remove the egg from the freezer and insert a toothpick into one end.
-
Dip the egg completely into the melted chocolate, ensuring it’s fully coated. Let the excess chocolate drip off back into the bowl.
-
Insert the other end of the toothpick into something sturdy like a potato or a piece of floral foam to hold the egg upright while the chocolate sets. This will prevent the egg from flattening on one side.
-
Once all the eggs are dipped, put them in the refrigerator for only 10 minutes to allow the chocolate to set completely. Avoid leaving them in the fridge for too long, as this can cause the filling to become too firm.
-
Remove the toothpicks from the eggs and cover up the small hole with a dab of melted chocolate, smoothing it over with a small spatula or the tip of a knife.
Expert Tips & Tricks
- Use high-quality dark chocolate: The flavor of the chocolate shell is just as important as the filling. Opt for a good quality dark chocolate with a cocoa content of at least 60% for a rich and satisfying taste.
- Chill everything thoroughly: Keeping the filling and the eggs cold throughout the process is key to preventing them from becoming too soft and melty. Don’t skip the freezing steps!
- Work quickly: Once the filling is cold, work quickly to form the eggs before they start to soften. If the filling becomes too soft, simply pop it back into the freezer for a few minutes.
- Make smaller eggs: If you prefer smaller eggs, simply adjust the amount of filling you use for each egg.
- Customize the filling: For a more authentic Cadbury Creme Egg flavor, consider adding a tiny pinch of citric acid to the filling for a slight tang.
Serving & Storage Suggestions
Serve your homemade Cadbury Creme Eggs chilled or at room temperature. They are best enjoyed within a few days of making them. Store them in an airtight container in the refrigerator for up to a week. While you can freeze them, the texture of the filling may change slightly upon thawing. They can be kept in a dry, cool place for up to 3 days.
Nutritional Information
| Nutrient | Amount per Serving | % Daily Value |
|---|---|---|
| Calories | 281 kcal | N/A |
| Calories from Fat | 148 kcal | 53% |
| Total Fat | 16.5 g | 25% |
| Saturated Fat | 10.2 g | 51% |
| Cholesterol | 12.2 mg | 4% |
| Sodium | 131.1 mg | 5% |
| Total Carbohydrate | 39.5 g | 13% |
| Dietary Fiber | 3.8 g | 15% |
| Sugars | 26.8 g | N/A |
| Protein | 3 g | 5% |
Variations & Substitutions
- Milk Chocolate Shell: If you prefer milk chocolate, feel free to use milk chocolate chips or a chopped milk chocolate bar instead of dark chocolate.
- White Chocolate Shell: For a sweeter variation, try using white chocolate for the shell. You can even add a few drops of food coloring to the white chocolate to create colorful Easter eggs.
- Peanut Butter Filling: For a delicious twist, add a tablespoon or two of peanut butter to the white filling mixture.
- Mint Chocolate Eggs: Add a few drops of peppermint extract to the melted chocolate for a refreshing minty flavor.
- Vegan Creme Eggs: Substitute the butter with vegan butter, ensuring it has a similar fat content for the proper texture. You may also need to find a vegan alternative to Lyle’s Golden Syrup; maple syrup can be used, but it will impact the flavor.
FAQs (Frequently Asked Questions)
Q: Why is Lyle’s Golden Syrup important for this recipe?
A: Lyle’s Golden Syrup has a unique, slightly buttery flavor that is difficult to replicate. It contributes to the signature taste and texture of the filling.
Q: Can I use regular corn syrup instead of Lyle’s Golden Syrup?
A: While you can substitute corn syrup, it will alter the flavor profile of the filling. Lyle’s Golden Syrup provides a depth and richness that corn syrup lacks.
Q: Why do I need to freeze the filling?
A: Freezing the filling ensures that it is firm enough to work with and prevents it from melting during the chocolate dipping process.
Q: My filling is too soft. What should I do?
A: If the filling is too soft, simply return it to the freezer for a few more minutes to firm up.
Q: How long will these eggs last?
A: These eggs are best enjoyed within a few days of making them. Store them in an airtight container in the refrigerator for up to a week.
Final Thoughts
These homemade Cadbury Creme Eggs are a labor of love, but the results are well worth the effort. Recreating a childhood favorite is a truly rewarding experience. Don’t be afraid to experiment with different flavors and variations to create your own unique Easter treat. Gather your loved ones in the kitchen, put on some music, and enjoy the process of creating these delightful, decadent eggs together. Share your creations with friends and family, and let them savor the magic of homemade Easter treats. Happy cooking!