
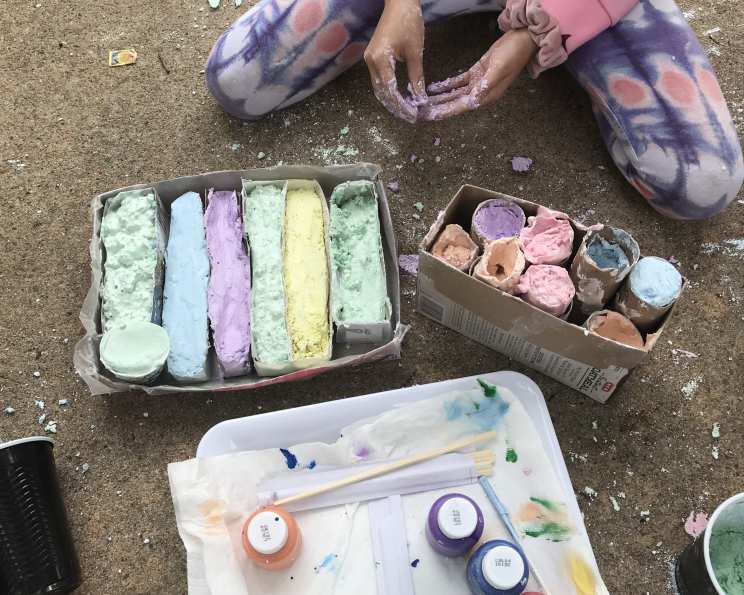
Homemade Sidewalk Chalk: A Colorful Childhood Memory
I can still recall the sheer joy of drawing sprawling murals across the driveway as a child, the vibrant colors popping against the dull concrete. My sister and I would spend hours transforming our mundane suburban world into fantastical landscapes filled with rainbow-maned unicorns, smiling suns, and houses that defied architectural logic. While store-bought chalk was readily available, there was something uniquely satisfying about creating our own, knowing we had complete control over the color palette and the creative process. The slight imperfection of each stick only added to their charm.
Recipe Overview
- Prep Time: 15 minutes
- Cook Time: None
- Total Time: Varies (drying time)
- Yields: 6 chalks
- Dietary Type: Non-Edible (for external use only)
Ingredients
- 1 cup plaster of paris
- ½ cup cool water
- 3 tablespoons liquid powdered tempura paints
Equipment Needed
- Clean container (coffee tin, ice cream tub, or similar)
- Disposable stir sticks
- Small containers (tiny Dixie paper cups, for example)
Instructions
-
Begin by pouring the plaster of paris into your chosen clean container. This will serve as your mixing bowl. A coffee tin or an empty ice cream tub works well as they are sturdy and easy to clean (or dispose of afterwards).
-
Using a disposable stir stick (a popsicle stick or plastic spoon are great alternatives), gradually stir in most of the cool water. It’s crucial not to add all of the water at once. This allows you to control the consistency of the mixture and prevent it from becoming too watery.
-
Now, introduce the color! Add 2 tablespoons of the liquid powdered tempura paint to the plaster mixture. Stir thoroughly, paying special attention to the bottom and sides of the container to ensure the color is evenly distributed. If you desire a more vibrant hue, add the remaining 1 tablespoon of paint, mixing well until you achieve your desired shade. Remember, you can use different colors for each batch to create a rainbow of sidewalk chalk!
-
As you continue to stir, the mixture will naturally thicken. If it becomes too thick to easily pour, add a small amount of the remaining water, a little at a time, until you reach a pourable consistency similar to a thick pancake batter.
-
Carefully pour the colored plaster mixture into your small containers. Dixie paper cups are perfect for this, as they create individual chalk sticks. Fill each cup almost to the top, leaving a little room for expansion as the plaster dries.
-
Now comes the waiting game. Allow the chalk to dry completely. The drying time will vary depending on the humidity and temperature of your environment, but it generally takes anywhere from 24 to 48 hours. You’ll know the chalk is ready when it feels hard and solid to the touch.
-
Once the chalk is fully dry, carefully peel away the paper cups to reveal your homemade sidewalk chalk creations.
-
Give your artistic masterpieces to the kids (or unleash your own inner child!), and let the sidewalk art begin! Remember, these are for outdoor use only.
Expert Tips & Tricks
- Color Intensity: Experiment with different brands and types of tempura paint to achieve various levels of color saturation. Some paints may be more concentrated than others.
- Preventing Cracking: To minimize cracking during the drying process, avoid placing the filled cups in direct sunlight or near a heat source. A cool, shaded area is ideal.
- Adding Texture: For a more textured chalk, try adding a small amount of fine sand to the plaster mixture before pouring.
- Large Batch: If you’re making a large batch, work quickly as the plaster will begin to set relatively fast.
- Troubleshooting Consistency: If your mixture becomes too thick before you add all the paint, add a teaspoon of water at a time until you reach the desired consistency. Conversely, if the mixture is too runny, add a small amount of plaster of paris to thicken it.
Serving & Storage Suggestions
Serve your homemade sidewalk chalk immediately and watch the colorful creations unfold! Store any unused chalk in a dry place, away from moisture. While the chalk won’t “expire” in the traditional sense, exposure to humidity can cause it to soften or crumble over time. Keep them in an airtight container or a resealable plastic bag to ensure they remain in good condition for future artistic endeavors.
Nutritional Information
As sidewalk chalk is not intended for consumption, nutritional information is not applicable. It’s important to supervise children while they are using sidewalk chalk to prevent ingestion.
| Nutrient | Amount per Serving | % Daily Value |
|---|---|---|
| Not Applicable | Not Applicable | Not Applicable |
| Not Applicable | Not Applicable | Not Applicable |
| Not Applicable | Not Applicable | Not Applicable |
| Not Applicable | Not Applicable | Not Applicable |
Variations & Substitutions
- Natural Dyes: Experiment with natural dyes like beet juice (for pink/red), spinach juice (for green), or turmeric powder (for yellow) for a more eco-friendly approach. Keep in mind that these natural dyes may not produce as vibrant colors as the tempura paints.
- Essential Oils: Add a few drops of essential oil (like lavender or citrus) to the mixture for a subtle, pleasant scent. Ensure the essential oil is safe for children to be around and handle.
- Glitter Chalk: For extra sparkle, stir in a small amount of biodegradable glitter into the plaster mixture before pouring.
- Chunky Chalk: Use larger containers, such as small yogurt cups or muffin tins, to create thicker, chunkier pieces of chalk.
FAQs (Frequently Asked Questions)
Q: Is plaster of paris safe for children to handle?
A: Plaster of paris is generally considered safe, but it’s important to supervise children while they are using the chalk. Avoid inhalation of the plaster dust during mixing and ensure they don’t ingest the chalk.
Q: Can I use regular acrylic paint instead of tempura paint?
A: While acrylic paint can be used, it will likely produce a different texture and may stain clothing more easily. Tempura paint is specifically designed to be washable and less permanent, making it a better choice for sidewalk chalk.
Q: How long does the chalk last on the sidewalk?
A: The longevity of the chalk drawings depends on the weather and the amount of foot traffic. Rain will naturally wash the chalk away, but even without rain, the drawings will fade over time with use.
Q: Can I make different shapes of chalk?
A: Absolutely! Get creative with your molds. Use silicone molds in various shapes (stars, hearts, animals) to create fun and unique chalk designs. Just ensure the molds are small enough for children to easily grip and use.
Q: What do I do if the plaster mixture dries too quickly?
A: Unfortunately, once the plaster of paris begins to set, there’s no way to reverse the process. Work quickly and efficiently, and prepare all your materials beforehand to minimize delays. If it dries too quickly, it’s best to start a new batch.
Final Thoughts
Creating homemade sidewalk chalk is a rewarding experience that brings back cherished childhood memories and inspires new ones. Not only is it a fun and engaging activity for both children and adults, but it also provides a creative outlet for artistic expression. So, gather your ingredients, unleash your inner artist, and transform your sidewalk into a vibrant canvas! Don’t forget to share your colorful creations with friends and family – the world could always use a little more chalk art.