
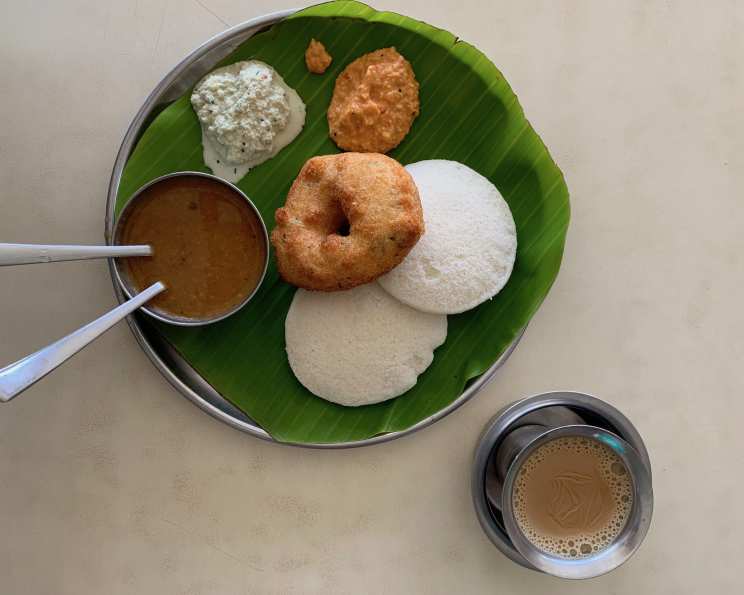
The Humble Idli: A Steamed South Indian Delight
Growing up, the aroma of steaming idlis was the quintessential morning perfume in my grandmother’s kitchen. Before the sun fully painted the sky, she would be there, a silhouette against the pre-dawn light, carefully ladling the fermented batter into the molds. The soft, pillowy texture, the slightly tangy flavor, and the warmth that spread through me as I dipped it into spicy sambar – these are not just flavors, but cherished memories etched into my soul. Idli, more than just a breakfast staple, is a symbol of comfort, tradition, and the loving hands that have nourished generations.
Recipe Overview
- Prep Time: 15 minutes
- Cook Time: 20 minutes
- Total Time: 15 hours 20 minutes (includes soaking and fermentation time)
- Servings: 36
- Dietary Type: Vegan, Gluten-Free
Ingredients
- 3 cups par-boiled cooked rice
- 1 cup Urad Dal (split black lentils)
- 1 – 1 ½ teaspoons salt
Equipment Needed
- Blender or wet grinder
- Large bowl
- Idli steamer or pressure cooker
- Idli plates with molds
Instructions
- Thoroughly rinse the par-boiled rice and Urad Dal separately under cold running water until the water runs clear. This removes excess starch and impurities.
- Place the rinsed rice and Urad Dal into separate bowls. Add enough fresh water to completely cover them, allowing ample room for expansion.
- Soak the rice and dal for approximately 2-3 hours. This crucial step softens the grains, making them easier to grind into a smooth batter.
- After soaking, drain the rice and dal completely. Discard the soaking water.
- Using a blender or wet grinder, grind the Urad Dal first, adding small amounts of water gradually to achieve a smooth, fluffy, and airy batter. The consistency should be similar to a thick milkshake. Transfer the ground dal batter to a large bowl.
- Next, grind the par-boiled rice using the same method, adding water as needed. The rice batter should be slightly coarse, but not grainy. Aim for a semolina-like consistency.
- Combine the ground Urad Dal batter and the ground rice batter in the large bowl.
- Add salt (1 to 1 ½ teaspoons, or to taste) to the combined batter. Use your hand to thoroughly mix the batter for several minutes. This incorporates air and helps with fermentation.
- Cover the bowl with a lid or a clean cloth and set aside to ferment in a warm place for approximately 12 hours. The fermentation time will vary depending on the ambient temperature; warmer temperatures will speed up the process. The batter should approximately double in volume and have a slightly sour aroma.
- Once fermented, gently stir the batter. If the batter appears too thick, add a small amount of water (1-2 tablespoons) to achieve a pouring consistency.
- Lightly grease the idli plates with a drop of oil (vegetable or sesame oil) in each mold. Spread the oil evenly over the entire surface of each mold using your finger or a small brush. This prevents the idlis from sticking.
- Pour the fermented batter into each mold, filling it about ¾ full. Leave some space for the idlis to expand during steaming.
- Heat 2 cups of water in an idli steamer or a pressure cooker. If using a pressure cooker, do NOT use the whistle.
- Arrange the filled idli plates inside the steamer or pressure cooker.
- Cover the steamer or pressure cooker with a lid and steam the idlis on high heat for approximately 20 minutes.
- After 20 minutes, turn off the heat and let the steamer or pressure cooker sit for a few minutes to allow the steam to settle.
- Carefully remove the idli plates from the steamer or pressure cooker.
- To remove the idlis from the molds, use a spoon or a small knife to gently loosen the edges.
- Serve hot with sambar, coconut chutney, or dosai milagai powder. A drizzle of sesame oil is a delightful addition.
Expert Tips & Tricks
- Fermentation is Key: The fermentation process is crucial for achieving light and fluffy idlis. The time required will vary depending on the temperature. A warm environment (around 75-80°F or 24-27°C) is ideal. If your batter isn’t fermenting properly, try placing it in a slightly warmer spot, like near a warm oven or in a sunny windowsill.
- Grinding Consistency: The consistency of the batter is also vital. Over-grinding the rice can result in dense idlis. The rice batter should have a slightly coarse texture.
- Baking Soda (Optional): If your idlis are not turning out soft enough, you can add a pinch (1/4 teaspoon) of baking soda to the batter just before steaming. Be careful not to add too much, as it can alter the taste.
- Pre-Heating: Ensure the water in the steamer is boiling vigorously before placing the idli plates inside. This helps in even cooking and prevents the idlis from becoming soggy.
- Don’t Overfill: Avoid overfilling the molds, as the idlis will expand during steaming.
- Toothpick Test: To check if the idlis are cooked through, insert a toothpick into the center of an idli. If it comes out clean, the idlis are done.
- Wet Grinder vs. Blender: While a blender can be used, a wet grinder generally produces a smoother and fluffier batter, resulting in softer idlis.
- Urad Dal Quality: Use high-quality Urad Dal for best results. Freshly milled dal tends to ferment better.
Serving & Storage Suggestions
Idlis are best served hot, straight from the steamer. The classic accompaniments are sambar and coconut chutney, but they also pair well with various other South Indian chutneys and podis (spice powders). A drizzle of sesame oil adds a lovely nutty flavor.
Storage: Leftover idlis can be stored in an airtight container in the refrigerator for up to 2-3 days. They can also be frozen for longer storage (up to 1 month). To reheat refrigerated idlis, steam them for a few minutes or microwave them with a splash of water. To reheat frozen idlis, steam them for a longer time or thaw them in the refrigerator overnight before steaming or microwaving.
Nutritional Information
(Approximate values per idli. Actual values may vary based on ingredient variations and serving size.)
| Nutrient | Amount per Serving | % Daily Value |
|---|---|---|
| Calories | 39 kcal | – |
| Calories from Fat | 0 kcal | – |
| Total Fat | 0.1 g | 0% |
| Saturated Fat | 0 g | 0% |
| Cholesterol | 0 mg | 0% |
| Sodium | 64.9 mg | 2% |
| Total Carbohydrate | 7.6 g | 2% |
| Dietary Fiber | 1.7 g | 6% |
| Sugars | 0.1 g | 0% |
| Protein | 1.7 g | 3% |
Variations & Substitutions
- Rava Idli: Replace the rice batter with semolina (rava) for a quicker and easier version. Roast the rava lightly before adding it to the batter.
- Oats Idli: Add ground oats to the batter for a healthier twist.
- Vegetable Idli: Incorporate finely chopped vegetables like carrots, peas, or beans into the batter for added nutrients and flavor.
- Spicy Idli: Add chopped green chilies, ginger, and curry leaves to the batter for a spicy kick.
- Millet Idli: Substitute a portion of the rice with millet flour for a gluten-free and nutrient-rich option.
- Quinoa Idli: Use cooked and cooled quinoa instead of rice.
FAQs (Frequently Asked Questions)
Q: Why are my idlis hard and dense?
A: This is often due to insufficient fermentation, improper batter consistency (too thick), or over-grinding the rice. Ensure proper fermentation time and adjust the batter consistency by adding water if needed.
Q: How do I make my idlis softer?
A: Use good quality Urad Dal, ensure proper fermentation, and avoid over-grinding the rice. Adding a pinch of baking soda just before steaming can also help.
Q: Can I make idli batter in advance?
A: Yes, you can store the fermented batter in the refrigerator for up to 2-3 days. However, the batter may become more sour over time.
Q: What is the ideal consistency of the idli batter?
A: The batter should be thick but pourable, similar to the consistency of a thick milkshake.
Q: Can I steam idlis in a regular steamer?
A: Yes, you can use a regular steamer as long as it has a tight-fitting lid and you can maintain a consistent steam.
Final Thoughts
The idli, in its simplicity, is a testament to the power of humble ingredients transformed by time and technique. From the initial soak to the final steaming, each step contributes to its unique texture and flavor. I encourage you to embark on this culinary journey and experience the joy of creating these soft, pillowy delights in your own kitchen. Don’t be afraid to experiment with variations and find the perfect combination that suits your taste. And most importantly, share your creations with loved ones, spreading the warmth and comfort that only a plate of freshly steamed idlis can provide. Bon appétit!