
The Soulful Simplicity of Injera: A Culinary Journey to Ethiopia
My first encounter with Injera happened in a small, unassuming Ethiopian restaurant tucked away in my college town. The aroma alone, a tantalizing blend of earthy spice and subtle fermentation, drew me in. But it wasn’t just the scent; it was the communal spirit of sharing a large, spongy injera laden with vibrant stews that truly captivated me. Each bite was a revelation – the slightly sour tang of the bread perfectly complementing the rich, savory sauces. From that moment on, I was hooked, eager to learn the secrets of this remarkable staple.
Recipe Overview
- Prep Time: 104 hours 10 minutes
- Cook Time: 2-3 minutes per injera
- Total Time: 4 Days + 10 minutes
- Yields: 20 pieces
- Dietary Type: Gluten-Free, Vegan
Ingredients
- 1 ½ lbs teff flour
- ½ lb barley flour
- ¼ cup wheat flour
- 12 cups water
Equipment Needed
- Large mixing bowl
- Large cast-iron pan with lid
Instructions
- In a large mixing bowl, combine the teff flour and 12 cups of water.
- Thoroughly mix the ingredients until you achieve a smooth batter.
- Cover the bowl and store it in a dark, cool place for 3 to 4 days. This fermentation process is crucial for developing the characteristic sour flavor of injera. Be patient; this is where the magic happens!
- On the last day of fermentation, mix the fermented teff flour mixture with the barley and wheat flours.
- Let the mixture rest for another 8 hours. This allows the flavors to meld and the batter to further develop.
- Heat a large cast-iron pan over medium heat. It’s important to have the pan properly heated before you begin cooking, ensuring that the injera cooks evenly and develops its signature spongy texture.
- Pour 1 cup of the fermented mixture into the hot pan, swirling the pan to cover the entire surface area evenly. The goal is to create a thin, crepe-like layer.
- Cover the pan with a lid. This traps the steam, which is essential for creating the characteristic holes on the surface of the injera.
- Cook for 2 to 3 minutes. The injera is ready when holes have formed on the surface and the edges are set. The top should no longer be wet.
- Gently remove the injera from the pan.
- Repeat steps 7-10 until all the batter is used, stacking the cooked injera as you go.
Expert Tips & Tricks
- Teff Flour Quality: The quality of your teff flour greatly impacts the final product. Opt for a fine, high-quality teff flour for the best results.
- Fermentation is Key: Don’t rush the fermentation process! This is what gives injera its unique sour flavor and spongy texture. Taste the batter after a few days; it should have a distinct tang.
- Adjusting Consistency: If your batter is too thick, add a little water to thin it out. If it’s too thin, add a little more teff flour. The ideal consistency is similar to that of a thin pancake batter.
- Cast Iron Advantage: A well-seasoned cast iron pan is ideal for making injera because it distributes heat evenly. If you don’t have one, a non-stick pan can be used, but you might not get the same slightly crispy edges.
- Temperature Control: Keep an eye on the pan’s temperature. If it gets too hot, the injera will burn. If it’s not hot enough, it won’t cook properly.
- Dealing with Sticking: If your injera is sticking to the pan, ensure that the pan is properly heated and lightly oiled.
- Mastering the Swirl: The swirling motion to spread the batter evenly takes practice. Don’t worry if your first few attempts aren’t perfect.
Serving & Storage Suggestions
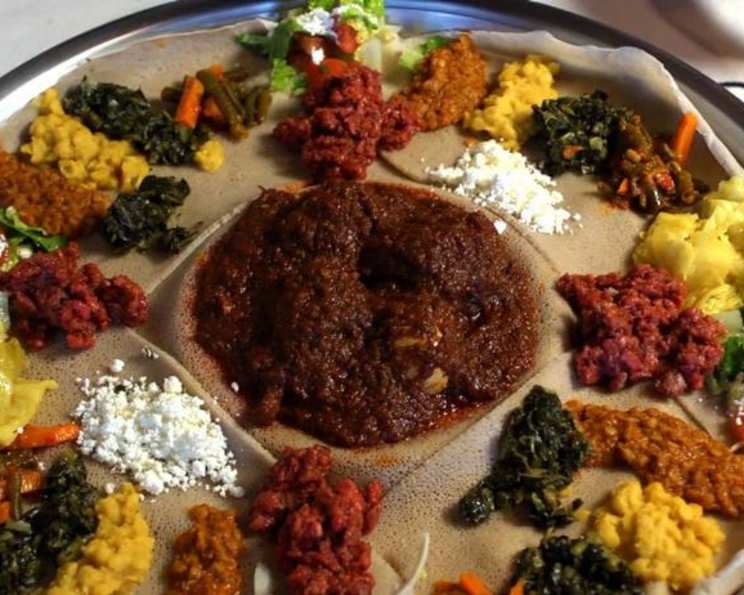
Injera is traditionally served as a base for various Ethiopian stews and dishes, such as wat (stew) and tibs (sautéed meat). The stews are placed directly on top of the injera, and diners tear off pieces of the injera to scoop up the food. It’s a communal and incredibly satisfying way to eat!
- Serving: Serve injera warm or at room temperature. Stack multiple injeras on a large plate or tray before topping with stews.
- Storage: Leftover injera can be stored at room temperature for a day, in the refrigerator for up to a week, or in the freezer for up to a month.
- Reheating: To reheat, lightly dampen the injera with water and microwave for a few seconds or steam it in a covered pot on the stovetop. Frozen injera should be thawed completely before reheating.
Nutritional Information
| Nutrient | Amount per Serving | % Daily Value |
|---|---|---|
| Calories | 44.3 kcal | N/A |
| Calories from Fat | N/A | N/A |
| Total Fat | 0.2 g | 0% |
| Saturated Fat | 0 g | 0% |
| Cholesterol | 0 mg | 0% |
| Sodium | 0.5 mg | 0% |
| Total Carbohydrate | 9.5 g | 3% |
| Dietary Fiber | 1.3 g | 5% |
| Sugars | 0.1 g | 0% |
| Protein | 1.4 g | 2% |
Note: Nutritional information is an estimate and can vary based on specific ingredients and portion sizes.
Variations & Substitutions
- Gluten-Free Variation: While this recipe already uses teff flour, which is naturally gluten-free, ensure your barley and wheat flours are certified gluten-free if you have a strict gluten intolerance. Alternatively, replace the barley and wheat flour with additional teff flour or a gluten-free flour blend.
- Spicier Injera: Add a pinch of berbere spice blend to the batter for a subtle kick.
- Herbed Injera: Incorporate finely chopped herbs like cilantro or parsley into the batter for added flavor and visual appeal.
FAQs (Frequently Asked Questions)
Q: Why does injera need to ferment for so long?
A: The fermentation process is essential for developing the characteristic sour flavor and spongy texture of injera. It also helps to break down the starches in the teff flour, making the injera easier to digest.
Q: Can I use a different type of flour instead of teff flour?
A: While teff flour is the traditional ingredient, you can experiment with other gluten-free flours like sorghum or millet flour. However, the flavor and texture will be different.
Q: How do I know when the injera batter has fermented enough?
A: The batter should have a slightly sour, tangy smell and taste. You might also see small bubbles forming on the surface.
Q: Why are there holes on the surface of the injera?
A: The holes are created by the steam trapped under the lid during cooking. This is a sign that the injera is cooking properly and developing its signature spongy texture.
Q: Can I make injera ahead of time?
A: Yes, you can make injera ahead of time and store it in the refrigerator or freezer. Just reheat it before serving.
Final Thoughts
Injera is more than just a bread; it’s a cultural icon, a symbol of hospitality, and a delicious embodiment of Ethiopian cuisine. While the fermentation process might seem daunting, the reward is a unique and flavorful bread that’s perfect for sharing with friends and family. Don’t be afraid to experiment and make it your own. I encourage you to try making injera at home and experience the joy of this soulful and satisfying staple. Share your creations and feedback – I’d love to hear about your culinary adventures!