
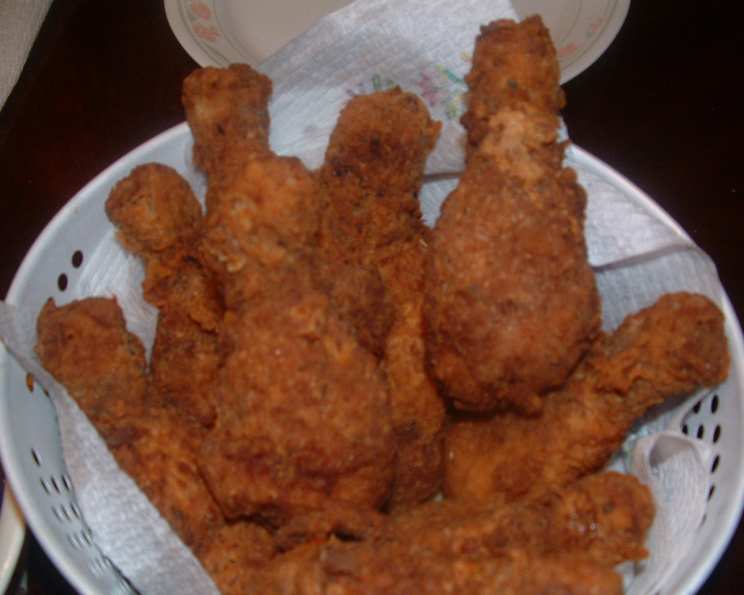
Mastering the Crunch: Recreating KFC’s Extra Tasty Crispy Chicken at Home
There’s something undeniably comforting about the aroma of fried chicken wafting through the kitchen. My earliest memories are intertwined with family gatherings, the centerpiece always being a bucket of crispy, golden-brown fried chicken. The anticipation as the lid was lifted, revealing that perfectly imperfect landscape of battered goodness, is a feeling I’ve chased in my own cooking ever since. While I’ve explored countless fried chicken recipes, one particular craving always lingered: that distinctly seasoned, extra crispy bite reminiscent of KFC’s Extra Tasty Crispy. After much experimentation, tweaking and joyful (and sometimes frustrating!) tests, I’m ready to share my version of this iconic dish.
Recipe Overview
- Prep Time: 30 minutes
- Cook Time: 15 minutes
- Total Time: 45 minutes
- Servings: 8 pieces
- Yields: 8 pieces
- Dietary Type: Not Gluten-Free
Ingredients
- 1 whole frying chicken, cut up
- 6 cups vegetable oil (to 8 cups)
Marinade
- 4 cups water
- 1 tablespoon salt
- ½ teaspoon MSG
Coating
- 1 egg, beaten
- 1 cup milk
- 2 cups all-purpose flour
- 2 ½ teaspoons salt
- ¾ teaspoon fresh ground black pepper
- ¾ teaspoon MSG
- 1 teaspoon garlic powder
- 1 teaspoon onion powder
- 1 teaspoon poultry seasoning
- 1 ½ teaspoons Italian seasoning
- ¼ teaspoon nutmeg
- ¼ teaspoon allspice
- ¼ teaspoon sage
Equipment Needed
- Deep-fryer or large, heavy-bottomed pot
- Large bowl
- Medium bowls (2)
- Paper towels
- Plate or cookie sheet
- Tongs
- Thermometer (optional, for oil temperature)
Instructions
-
Begin by preparing the chicken. Trim any excess skin and fat from each piece. This helps the coating adhere better and prevents excessive splattering during frying.
-
Preheat the vegetable oil in a deep-fryer or large, heavy-bottomed pot to between 350°F (175°C) and 360°F (182°C). Use a thermometer to ensure accurate temperature control. If you don’t have a deep-fryer, clip a thermometer to the side of your pot. Maintaining the correct temperature is crucial for crispy, evenly cooked chicken that isn’t greasy.
-
Prepare the marinade: In a large bowl, combine the 4 cups of water, 1 tablespoon of salt, and ½ teaspoon of MSG. Whisk until the salt and MSG are dissolved.
-
Add the chicken pieces to the marinade. Ensure all pieces are submerged. Let the chicken sit in the marinade for at least 20 minutes, turning the pieces a couple of times to ensure even flavoring. This step is essential for juicy, flavorful chicken.
-
While the chicken marinates, prepare the egg wash and dry coating. In a medium bowl, whisk together the beaten egg and 1 cup of milk.
-
In another medium bowl, combine all the dry coating ingredients: 2 cups of all-purpose flour, 2 ½ teaspoons of salt, ¾ teaspoon of fresh ground black pepper, ¾ teaspoon of MSG, 1 teaspoon of garlic powder, 1 teaspoon of onion powder, 1 teaspoon of poultry seasoning, 1 ½ teaspoons of Italian seasoning, ¼ teaspoon of nutmeg, ¼ teaspoon of allspice, and ¼ teaspoon of sage. Whisk thoroughly to ensure even distribution of spices.
-
Once the chicken has marinated, remove each piece from the marinade and place it on paper towels to drain off excess liquid. Pat the chicken dry with additional paper towels. Excess moisture will prevent the coating from adhering properly.
-
Now, it’s time to coat the chicken. Working with one piece at a time, first coat the chicken generously with the dry flour mixture. Make sure to press the flour into the chicken to create a thick, even coating.
-
Next, dip the flour-coated chicken into the egg and milk mixture, ensuring it’s fully submerged. Let any excess drip off.
-
Finally, return the chicken to the dry flour mixture for a second coating. Again, press the flour into the chicken, ensuring a thick, even layer. This double-coating is key to achieving that extra crispy texture.
-
Stack the coated chicken on a plate or cookie sheet until all pieces are coated. This prevents the coating from becoming soggy.
-
Carefully lower the chicken, one piece at a time, into the hot oil. Do not overcrowd the fryer; fry only half of the chicken (about 4 pieces) at a time. Overcrowding will lower the oil temperature and result in greasy, unevenly cooked chicken.
-
Fry the chicken for 12 to 15 minutes, or until it is golden brown and cooked through. Use tongs to gently stir the chicken around halfway through the cooking time to ensure even browning. The internal temperature of the chicken should reach 165°F (74°C).
-
Remove the chicken from the oil and place it on a wire rack or paper towels to drain for about 5 minutes before serving. This allows excess oil to drip off, resulting in crispier chicken.
Expert Tips & Tricks
- Buttermilk Substitution: For a tangier flavor, substitute buttermilk for the milk in the egg wash.
- Spice Level Adjustment: Adjust the amount of pepper and other spices to your liking. For a spicier version, add a pinch of cayenne pepper to the flour mixture.
- Double Dredge Technique: The double-dredging method is crucial for achieving that signature crispy texture. Don’t skip it!
- Oil Temperature Control: Maintaining a consistent oil temperature is key. Use a thermometer and adjust the heat as needed. If the oil is too hot, the chicken will burn on the outside before it’s cooked through. If it’s too cold, the chicken will be greasy.
- Resting Time: Allowing the chicken to rest after frying is essential for crispy skin. Avoid stacking the chicken on top of each other as it drains, as this will trap steam and make the skin soggy.
Serving & Storage Suggestions
Serve the Extra Tasty Crispy Chicken immediately while it’s hot and crispy. It pairs perfectly with classic sides like mashed potatoes, coleslaw, corn on the cob, and biscuits.
Leftovers can be stored in an airtight container in the refrigerator for up to 3 days. To reheat, bake in a preheated oven at 350°F (175°C) for about 15-20 minutes, or until heated through. For crispier results, you can also reheat in an air fryer.
Nutritional Information
| Nutrient | Amount per Serving | % Daily Value |
|---|---|---|
| Calories | 270 kcal | N/A |
| Calories from Fat | 96 kcal | N/A |
| Total Fat | 10.8 g | 16% |
| Saturated Fat | 3.5 g | 17% |
| Cholesterol | 73.8 mg | 24% |
| Sodium | 1666.2 mg | 69% |
| Total Carbohydrate | 26.2 g | 8% |
| Dietary Fiber | 1 g | 4% |
| Sugars | 0.3 g | 1% |
| Protein | 15.8 g | 31% |
Note: Nutritional information is an estimate and may vary depending on specific ingredients and cooking methods.
Variations & Substitutions
- Gluten-Free: Substitute the all-purpose flour with a gluten-free blend that contains xanthan gum.
- Spicy Chicken: Add 1-2 teaspoons of cayenne pepper to the flour mixture for a spicy kick.
- Herb Infusion: Experiment with different herbs in the flour mixture. Try adding dried thyme, rosemary, or oregano.
- Air Fryer Version: While deep-frying provides the most authentic flavor, you can adapt this recipe for an air fryer. Preheat your air fryer to 375°F (190°C). Place the coated chicken in the air fryer basket, ensuring it’s not overcrowded. Cook for 15-20 minutes, flipping halfway through, until golden brown and cooked through. You may need to spray the chicken with a little oil for extra crispiness.
FAQs (Frequently Asked Questions)
Q: Why is MSG used in this recipe?
A: MSG (monosodium glutamate) enhances the savory flavor of the chicken and coating, contributing to that umami taste. It’s optional, but it does contribute to the authentic KFC flavor.
Q: Can I marinate the chicken for longer than 20 minutes?
A: Yes, you can marinate the chicken for longer, even overnight in the refrigerator. This will result in more flavorful and tender chicken.
Q: How do I know when the chicken is cooked through?
A: The best way to check for doneness is to use a meat thermometer. Insert it into the thickest part of the chicken (without touching the bone). The internal temperature should reach 165°F (74°C).
Q: What can I do if my chicken is browning too quickly?
A: If the chicken is browning too quickly, lower the oil temperature slightly.
Q: Can I use a different type of oil for frying?
A: Yes, you can use other oils with a high smoke point, such as peanut oil, canola oil, or corn oil.
Final Thoughts
This recipe is a labor of love, a journey to recreate a childhood favorite. While it may take a little time and effort, the end result is well worth it: juicy, flavorful, and unbelievably crispy fried chicken that rivals the original. Don’t be afraid to experiment with the spices and adjust the recipe to your liking. And most importantly, enjoy the process and share your creations with friends and family! Serve with your favorite sides and a cold beverage for the ultimate comfort food experience. Happy frying!