
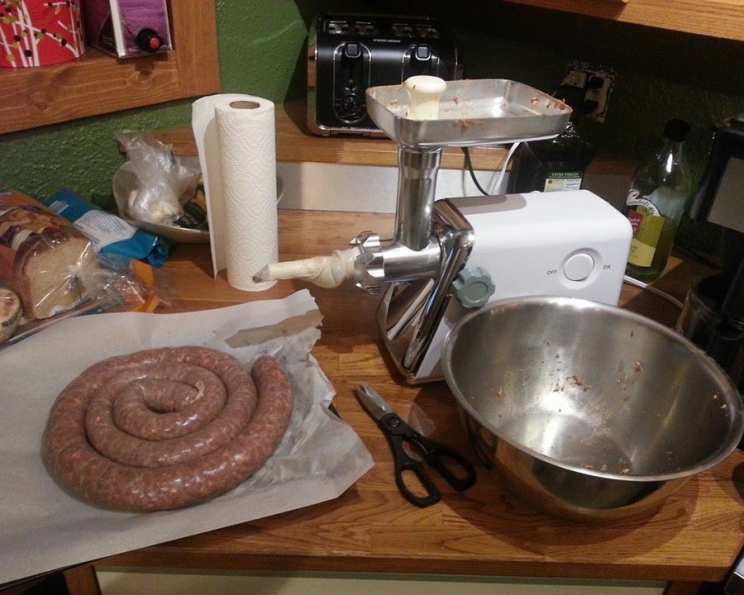
Kielbasa: A Family Tradition of Fresh Polish Sausage
I can almost smell it now – the unmistakable aroma of garlic and pepper permeating every corner of the house, a scent so strong it seemed to cling to the curtains for days. Making kielbasa was more than just cooking; it was an event, a chaotic but joyous tradition passed down through generations. My grandmother, a formidable woman with flour perpetually dusting her apron, would oversee the operation, her sharp eyes missing nothing as we transformed humble cuts of pork into something extraordinary. And although the process was always a bit messy, sometimes a little stressful, the end result was always worth it – a taste of home, a taste of heritage, a taste of love.
Recipe Overview
- Prep Time: 48 hours
- Yields: 12-14 lbs
- Serves: 40-50
Ingredients
- 10-12 lbs pork butt, whole pieces, not ground, fatty is good
- 3-6 fresh garlic cloves
- 1 tablespoon garlic powder (yes, powder, too!)
- 4-6 tablespoons salt (we use kosher salt)
- 1 tablespoon Accent seasoning
- 1 tablespoon white sugar (some people use brown sugar, we don’t)
- 4-6 tablespoons fresh ground coarse black pepper
- Casings
- Some people use a little marjoram, we don’t
Equipment Needed
- Garlic press or knife for mincing garlic
- Small pot
- Plastic dishpans
- Aluminum foil or plastic wrap
- Refrigerator
- Freezer
- Electric grinder with sausage-making horn
- String (optional, for tying off sausages)
- Saran wrap, aluminum foil, ziplock bags, or vacuum sealer
- Paper towels
Instructions
- Begin by preparing the garlic. Either put the garlic through a garlic press or mince it very finely with a knife.
- In a small pot, combine the minced garlic, garlic powder, salt, Accent seasoning, sugar, and black pepper with a pint of water. Bring the mixture to a boil, then remove from heat and allow it to cool completely.
- While the seasoning mixture cools, prepare the pork butt. Cut the pork off the bone and slice it into strips approximately 1″ by 3″. The exact size isn’t crucial, so don’t worry about being too precise. Remember, strips feed through the grinder much better than large chunks.
- Do not trim off any fat from the pork, unless there are parts that you absolutely can’t stand to include. It’s essential to retain the fat content for a moist and flavorful kielbasa. However, DO trim off any bloody-type stuff.
- Place the pork strips into plastic dishpans. Pour the cooled liquid seasoning mixture over the meat, then add about 4 cups of ice cubes. Mix everything together thoroughly until your hands get uncomfortably cold. The mixture should be somewhat sloppy. If it seems dry, add more water or ice.
- Cover the dishpans with aluminum foil or plastic wrap and refrigerate overnight, allowing the meat to marinate and absorb the flavors. Stir the mixture occasionally during this period. The ice will likely melt overnight, and the meat will absorb the seasoned water. Expect the refrigerator, and even the whole house, to take on the distinct aroma of the kielbasa seasoning.
- The next day, take the casings out and soak them in warm water for several hours to increase their flexibility and reduce the risk of splitting during stuffing. Cut the soaked casings into approximately 4-foot lengths.
- Place the seasoned meat in the freezer for about 1/2 to 1 hour before grinding. This will firm it up slightly, making it easier to feed through the grinder. (It’s okay if you forget this step sometimes!).
- Take each length of casing and run warm water through the inside of it to flush it out. This ensures they are clean and ready for stuffing.
- Before you start, rub a little oil on your hand and run it over the horn where the meat will come out of the grinder. Run each casing through your fingers to drain slightly. Then, carefully slide one end of a casing onto the sausage-making horn attachment of your meat grinder.
- With everything as cold as possible, one person should feed the meat through the grinder while the other carefully controls the filling of the casing. As the casing fills, it will naturally curl up. Hold it upward while it fills to reduce pressure on the casing and minimize the risk of splitting.
- Aim to make each sausage link about 12-16 inches long, or until the casing threatens to split. Tie off the end of each sausage with string, or knot it tightly if you can get close enough to the end of the filled casing. Some people twist it every 6″ or so to make smaller sausages.
- If a casing splits, carefully scrape out the meat, return it to the dishpan, and start over with a fresh casing. Splitting can be frustrating, but soaking the casings adequately and using good quality casings can help minimize this issue. Sometimes, however, it simply comes down to a bad batch of casings.
- Place the coils of filled sausage back into clean dishpans, preferably on a rack, and refrigerate them overnight to allow them to dry slightly.
- The following day, pack the sausages securely in Saran wrap, aluminum foil, ziplock bags, or vacuum-sealed bags. Aim for 2-3 lb. packages. Vacuum sealing is particularly effective for long-term storage.
- Finally, transfer the packaged sausages to the freezer for storage.
Expert Tips & Tricks
- Don’t skimp on the fat! Lean pork will result in a dry, less flavorful kielbasa. If you’re concerned about leanness, consider adding some extra pork fat to the mixture.
- Keep everything as cold as possible throughout the process. This helps the meat bind properly and prevents the fat from melting.
- Taste-test a small patty of the ground meat before stuffing the casings. This allows you to adjust the seasoning if needed, although it will be too late to make major changes to the entire batch.
- Use the coarse grinding plate on your meat grinder. You want the meat to have some texture, not a mealy consistency.
- If you find that the casings are constantly splitting, try soaking them for a longer period or switching to a different brand.
Serving & Storage Suggestions
Fresh kielbasa can be cooked in a variety of ways. It’s delicious grilled, pan-fried, baked, or added to soups and stews. For a simple and classic preparation, try grilling it until nicely browned and heated through. Serve with pierogi, sauerkraut, and mustard for a traditional Polish feast.
Store uncooked kielbasa in the freezer for several months. Once cooked, it can be stored in the refrigerator for 3-4 days. Reheat gently in a pan or microwave until warmed through.
Nutritional Information
| Nutrient | Amount per Serving | % Daily Value |
|---|---|---|
| Calories | 255.8 kcal | N/A |
| Calories from Fat | N/A | 63% |
| Total Fat | 17.8 g | 27% |
| Saturated Fat | 6.2 g | 30% |
| Cholesterol | 74.8 mg | 24% |
| Sodium | 767.1 mg | 31% |
| Total Carbohydrate | 1 g | 0% |
| Dietary Fiber | 0.2 g | 0% |
| Sugars | 0.3 g | 1% |
| Protein | 21.4 g | 42% |
Variations & Substitutions
- Smoked Kielbasa: If you prefer smoked kielbasa, you can smoke the sausages after stuffing them and before freezing.
- Spice Variations: Feel free to adjust the spices to your liking. Some people add marjoram, while others prefer a spicier version with more pepper or a pinch of cayenne.
- Meat Variations: While pork butt is the traditional choice, you can experiment with other cuts of pork or even a combination of pork and beef.
FAQs (Frequently Asked Questions)
Q: Why is my kielbasa so pale?
A: This recipe produces fresh, unsmoked kielbasa, which is naturally pale in color. If you prefer a darker, smoked sausage, you’ll need to smoke it after stuffing.
Q: The casings keep splitting. What am I doing wrong?
A: Ensure the casings are soaked in warm water for several hours before stuffing. Also, avoid overfilling the casings and try to maintain a consistent pressure while grinding. If the problem persists, you might have a bad batch of casings.
Q: Can I use pre-ground pork for this recipe?
A: While you can use pre-ground pork, the texture of the kielbasa will be better if you grind the meat yourself. This allows you to control the coarseness of the grind.
Q: How long can I store the kielbasa in the freezer?
A: Properly packaged kielbasa can be stored in the freezer for several months without significant loss of quality. Vacuum sealing is the best way to prevent freezer burn.
Q: Can I adjust the amount of garlic and pepper?
A: Absolutely! This recipe is a guideline, and you can adjust the seasonings to suit your personal taste preferences. Just be sure to use enough salt for proper preservation.
Final Thoughts
Making homemade kielbasa is a labor of love, but the reward is a truly exceptional sausage that’s far superior to anything you can buy in a store. Don’t be intimidated by the process; with a little patience and these detailed instructions, you’ll be well on your way to creating a family tradition of your own. Gather your loved ones, roll up your sleeves, and prepare to unleash the unforgettable aroma of fresh Polish sausage in your kitchen. Don’t hesitate to experiment with variations and seasonings to create a kielbasa that’s uniquely yours. And be sure to share your creations with friends and family – they’ll thank you for it!