
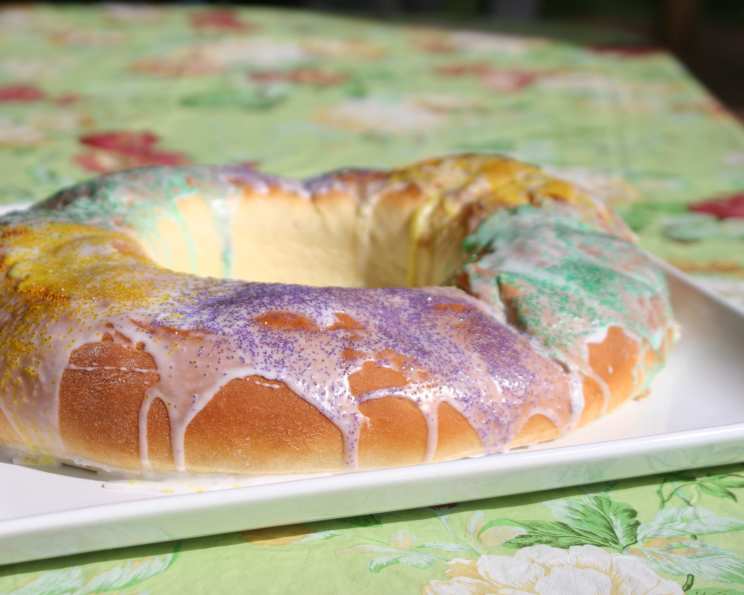
La Mexicana’s Rosca De Reyes: A Sweet Taste of Tradition
The aroma of anise and orange zest always transports me back to my Abuela’s kitchen. Every year, on the eve of El Dia de Reyes, she’d gather all the grandkids around her massive wooden table, flour dusting our noses as we helped knead the dough for the rosca de reyes. The anticipation was palpable, not just for the sweet bread itself, but for the thrill of finding the hidden muñequito, the little baby Jesus, promising a year of good fortune. Those memories are so deeply ingrained in my heart that I now bake a rosca every year to keep the tradition alive.
Recipe Overview
- Prep Time: 3 hours 15 minutes (includes rising time)
- Cook Time: 30 minutes
- Total Time: 3 hours 45 minutes
- Yields: 2 cakes
- Dietary Type: Vegetarian
Ingredients
Cake:
- 2 (1/4 ounce) packages active dry yeast
- 1/2 cup warm water
- 1 cup milk, warm
- 1 cup sugar
- 1 cup butter or 1 cup Crisco, melted
- 1 teaspoon salt
- 6 eggs, beaten
- 6 cups flour (may need up to 8 cups)
- 1 (12 ounce) can Solo almond filling (Substitute Danish – Almond Filling, marzipan or the jam of your choice if you can’t find the Solo Almond Filling)
- 2 dried beans (for the babies)
- Colored sugar sprinkles (optional) or candied fruit (optional)
Icing:
- 3 cups powdered sugar
- 6 tablespoons butter
- 2 tablespoons milk
- 2 tablespoons vanilla
Equipment Needed
- Large mixing bowl
- Small bowl
- Measuring cups and spoons
- Baking sheets
- Wire racks
- Plastic wrap
- Standing mixer with dough hook (optional)
Instructions
-
In a small bowl, combine the yeast and warm water, stirring until the yeast is dissolved. Set aside for about 5-10 minutes, or until the yeast is proofed, meaning it becomes foamy and bubbly. This step ensures your yeast is active and will help the dough rise properly.
-
In a large mixing bowl, combine the warm milk, sugar, and melted butter (or Crisco), stirring until the sugar is mostly dissolved. The warmth of the milk helps the sugar dissolve more easily.
-
Add the salt, beaten eggs, and the proofed yeast mixture to the milk mixture. Blend thoroughly with a whisk or spoon until well combined.
-
Beat in 3 cups of the flour to the wet ingredients to form a smooth batter. This initial addition of flour creates a base for the dough.
-
Gradually add more flour, a little at a time, until a soft dough forms. Be careful not to add too much flour at once, as this can make the dough tough. The dough will be quite sticky at this stage. You may need up to 8 cups of flour in total, but start with 6 and add more as needed.
-
Turn the dough out onto a lightly floured board or countertop. Knead the dough for approximately 8 minutes, or until it becomes smooth and elastic. Add more flour as needed to prevent the dough from sticking, but try to avoid adding too much. A standing mixer with a dough hook can also be used for this step, kneading on medium speed for the same amount of time.
-
Round the kneaded dough into a ball and place it in a warm, buttered bowl, turning the dough to lightly coat the top with butter. This prevents a skin from forming on the dough as it rises.
-
Cover the bowl loosely with plastic wrap and let the dough rise in a warm place until it has doubled in size. This usually takes about 1 1/2 to 2 hours, depending on the temperature of your kitchen. A warm spot, like near a preheating oven, will expedite the process.
-
Punch down the risen dough to release the air. This helps to even out the texture of the dough.
-
Divide the dough in half. Each half will become one rosca.
-
To prepare the roscas, flatten each dough half into a long oval.
-
Spread half of the Solo almond filling (or your chosen substitute) evenly over each oval of dough, leaving a small border around the edges.
-
Place one dried bean (the “baby”) into each oval of dough, concealing it within the almond filling. Space the beans strategically so they’re not too close to each other.
-
Roll each oval of dough into a rope, starting from one end and rolling tightly.
-
Join the ends of each rope together to form a ring (oval), leaving a large hole in the middle. Make sure the ends are sealed well to prevent the rosca from opening up during baking.
-
Cover the shaped roscas loosely with plastic wrap and let them rise again until doubled in size, about 1 hour.
-
While the bread is rising for the second time, preheat the oven to 350°F (175°C).
-
Bake the roscas for 30 minutes in the preheated oven, or until they are golden brown and sound hollow when thumped on the bottom. Rotate the baking sheets halfway through baking to ensure even browning.
-
Remove the baked roscas from the oven and let them cool completely on wire racks.
-
Prepare the icing: In a medium bowl, mix together the powdered sugar, butter, milk, and vanilla until the icing is fluffy and well blended. Adjust the amount of milk to achieve your desired consistency.
-
Frost the cooled roscas generously with the prepared icing.
-
Decorate the frosted roscas with colored sugar sprinkles or candied fruit, if desired. This adds a festive touch to the finished product.
Expert Tips & Tricks
- If you don’t have time for a long first rise, you can use the “rapid rise” method for the dough. Simply mix the yeast directly with the dry ingredients, and proceed with the recipe as directed.
- For a richer flavor, try using browned butter in the dough. Brown the butter in a saucepan over medium heat until it is nutty and fragrant, then let it cool slightly before adding it to the wet ingredients.
- To prevent the roscas from drying out during baking, place a pan of hot water on the bottom rack of the oven. The steam will help to keep the bread moist.
- If you can’t find Solo almond filling, you can easily make your own by combining almond paste, powdered sugar, and a little bit of almond extract in a food processor.
- Don’t overbake the rosca; it should be golden brown and sound hollow when tapped on the bottom. Overbaking will result in a dry bread.
Serving & Storage Suggestions
Serve the rosca de reyes warm or at room temperature. It is traditionally enjoyed with hot chocolate or coffee. To store leftovers, wrap them tightly in plastic wrap or place them in an airtight container. The rosca will keep at room temperature for 2-3 days, in the refrigerator for up to a week, or in the freezer for up to 2 months. To reheat, wrap the rosca in foil and warm it in a 350°F oven for about 10-15 minutes.
Nutritional Information
| Nutrient | Amount per Serving | % Daily Value |
|---|---|---|
| Calories | 3918.9 kcal | N/A |
| Calories from Fat | 1347 g | 34% |
| Total Fat | 149.8 g | 230% |
| Saturated Fat | 88.6 g | 443% |
| Cholesterol | 912.8 mg | 304% |
| Sodium | 2572.2 mg | 107% |
| Total Carbohydrate | 575.9 g | 191% |
| Dietary Fiber | 10.8 g | 43% |
| Sugars | 279.2 g | 1116% |
| Protein | 64.4 g | 128% |
Note: Nutritional information is an estimate and may vary based on specific ingredients and portion sizes.
Variations & Substitutions
- For a gluten-free version, substitute the all-purpose flour with a gluten-free blend. You may need to adjust the amount of liquid to achieve the right dough consistency.
- Try adding different flavorings to the dough, such as orange zest, lemon zest, or anise extract.
- Instead of almond filling, use guava paste, fig jam, or even a chocolate hazelnut spread.
- Decorate the rosca with a variety of candied fruits, nuts, and sprinkles to create a personalized touch.
- For a vegan rosca, use plant-based butter and milk alternatives. You can also use an egg replacer or a flaxseed meal “egg” to bind the dough.
FAQs (Frequently Asked Questions)
Q: What is the significance of the baby in the rosca de reyes?
A: The baby represents the baby Jesus, hidden from King Herod. Finding the baby in your slice means you’re responsible for hosting a tamales party on Día de la Candelaria (Candlemas) on February 2nd.
Q: Can I make the dough ahead of time?
A: Yes, you can make the dough ahead of time and refrigerate it after the first rise. Punch it down and refrigerate for up to 24 hours. Let it come to room temperature before shaping and baking.
Q: What if I can’t find dried beans?
A: You can use small plastic figurines, almonds, or any other small, edible or food-safe item.
Q: How do I keep the rosca from drying out after baking?
A: Make sure to cool it completely before frosting and storing it in an airtight container.
Q: Can I freeze the rosca?
A: Yes, you can freeze the rosca after it has been baked and cooled. Wrap it tightly in plastic wrap and then in foil before freezing. Thaw it completely before frosting and serving.
Final Thoughts
Now that you have the recipe for La Mexicana’s Rosca De Reyes, I encourage you to try it and create your own family traditions. Don’t be afraid to experiment with different flavors and decorations to make it your own. And most importantly, enjoy the process of baking and sharing this sweet bread with loved ones. Share your creations and experiences – I can’t wait to hear about your own Rosca de Reyes memories! This pairs wonderfully with a spiced Mexican hot chocolate or a rich café de olla.