
The Magic of Homemade Pita: A Baker’s Journey
The first time I made pita bread from scratch, it was a revelation. I remember the sheer excitement of watching those humble circles of dough puff up into perfect little balloons in the oven, a transformation that felt nothing short of magical. The aroma that filled my kitchen – that warm, yeasty scent mingled with a hint of nutty wheat – transported me back to bustling Middle Eastern bakeries I’d visited as a child. Each bite was a taste of pure, unadulterated comfort, a testament to the simple beauty of homemade bread. This recipe isn’t just about making pita; it’s about recreating that magic in your own kitchen.
Recipe Overview
- Prep Time: 45 minutes
- Cook Time: 3-4 minutes per pita
- Total Time: Approximately 2 hours 15 minutes (including rising time)
- Servings: 16 pitas
- Yield: 16 pitas
- Dietary Type: Vegetarian
Ingredients
- 1 teaspoon active dry yeast
- 2 1/2 cups water (approximately 105 degrees F)
- 1 cup whole wheat flour
- 3 cups all-purpose flour (or bread flour), plus more for dusting
- 1 tablespoon salt
- 2 tablespoons olive oil
Equipment Needed
- Large bread bowl
- Measuring cups and spoons
- Mixing spoon or stand mixer
- Plastic wrap
- Clean kitchen towel
- Baking stone or unglazed quarry tiles (optional, but recommended) or baking sheets
- Rolling pin
- Cooling rack
Instructions
-
Activate the Yeast: In a large bread bowl, sprinkle the active dry yeast over the warm water. Stir to dissolve. Make sure the water isn’t too hot, or it will kill the yeast. Ideally, it should feel like lukewarm bathwater.
-
Create the Sponge: Add the whole wheat flour, then 1 cup of the all-purpose flour to the yeast mixture. Stir vigorously, about 100 times (approximately one minute), in the same direction. This action activates the gluten in the flour, laying the foundation for a chewy, elastic pita. Let this “sponge” rest, covered, for at least 30 minutes, or up to 2 hours. The longer it rests, the more flavorful your pita will be.
-
Add Remaining Ingredients: After the sponge has rested, sprinkle the salt over it. Stir in the olive oil. Mix well. Now, add the remaining all-purpose flour, one cup at a time, mixing after each addition. You might not need all 3 cups; add only enough flour until the dough comes together and is no longer overly sticky.
-
Knead the Dough: When the dough becomes too stiff to stir with a spoon, turn it out onto a lightly floured bread board or countertop. Knead the dough for 8 to 10 minutes, until it becomes smooth and elastic. The dough should feel supple and spring back when gently pressed. If it’s too sticky, add a little more flour, a tablespoon at a time.
-
First Rise: Return the kneaded dough to a lightly oiled bread bowl, turning to coat all sides. Cover the bowl tightly with plastic wrap. Let the dough rise in a warm place until it has at least doubled in size, about 1 1/2 hours. The rising time will vary depending on the temperature of your kitchen.
-
Punch Down and Rest (or Refrigerate): Gently punch down the risen dough to release the trapped air. At this point, you have two choices: you can proceed with baking the pita bread immediately, or you can refrigerate the dough for later use.
- To Refrigerate: Wrap the punched-down dough in a large plastic bag, ensuring it has plenty of room to expand. Secure the bag loosely. Refrigerating the dough slows down the fermentation process and allows for the development of even more complex flavors. You can store the dough in the refrigerator for up to 5 days. Simply cut off the amount of dough you need each day and keep the rest refrigerated. Bring the dough to room temperature before baking. The dough will have a slightly fermented aroma after a few days; this is perfectly normal and will enhance the flavor of the bread.
-
Preheat Oven and Baking Surface: If you’re using unglazed quarry tiles or a baking stone, place them on a rack in the bottom third of your oven. If using baking sheets, use heavy duty ones and place them in the same position. Leave a one-inch gap all around the tiles or baking sheets to allow air to circulate. Preheat the oven to 450 degrees Fahrenheit. It’s crucial that the baking surface is thoroughly heated before you start baking the pitas.
-
Divide and Roll the Dough: Divide the dough in half. Set one half aside, covered with a clean kitchen towel to prevent it from drying out, while you work with the other half. Divide the working half of the dough into eight equal pieces. Flatten each piece with lightly floured hands. Using a rolling pin, roll out each piece to a circle approximately 8 inches in diameter and about 1/4 inch thick. Keep the rolled-out pitas covered to prevent them from drying.
-
Bake the Pitas: Bake the pitas two at a time (or more, depending on the size of your oven and baking surface) directly on the preheated quarry tiles or baking sheets. Bake each pita for 3-4 minutes. The pita is done when it has fully “ballooned” (puffed up) or when it starts to turn lightly golden, whichever comes first. Don’t be discouraged if your pita doesn’t fully balloon; it will still taste delicious! The more you bake pita bread, the more familiar you will become with the nuances of your oven and dough.
-
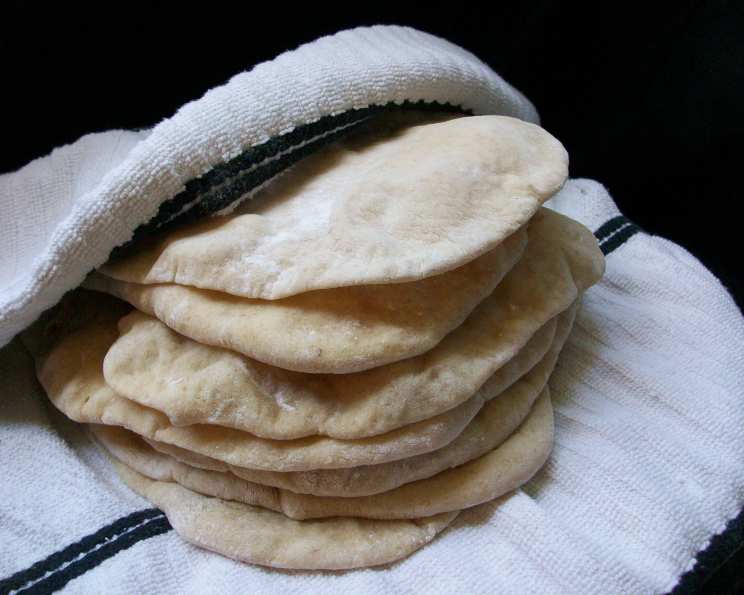
Cool and Wrap: Remove the baked pitas from the oven and place them on a cooling rack for a few minutes to cool slightly. I usually leave them on the rack until the next batch is ready to come out of the oven. Then, wrap the warm pitas in a large, clean kitchen towel. This will help to trap the steam and keep the pitas soft and pliable.
Expert Tips & Tricks
-
Warm Water is Key: The water temperature for activating the yeast is crucial. Too cold, and the yeast won’t activate. Too hot, and you’ll kill the yeast. Aim for around 105 degrees F.
-
Don’t Over-Flour: Be careful not to add too much flour when kneading. Over-flouring can result in tough, dry pita bread.
-
Hot Baking Surface: A preheated baking stone or quarry tiles are ideal for achieving that signature pita puff. If you don’t have one, a heavy-duty baking sheet will work.
-
Steam is Your Friend: Wrapping the warm pitas in a towel helps to trap steam, which keeps them soft and pliable.
-
Experiment with Flavors: Add herbs, spices, or even a touch of honey to the dough for a unique twist.
Serving & Storage Suggestions
Serve your homemade pita bread warm with your favorite dips, spreads, or fillings. They’re perfect for hummus, falafel, gyros, or simply enjoyed with a drizzle of olive oil and a sprinkle of za’atar.
- Storage: Store leftover pita bread in an airtight container at room temperature for up to 2 days.
- Refrigeration: For longer storage, refrigerate in an airtight container for up to a week.
- Freezing: Pita bread freezes beautifully. Wrap them tightly in plastic wrap, then place them in a freezer bag. Freeze for up to 1 month. Thaw completely before reheating.
- Reheating: To reheat, wrap the pita bread in foil and warm it in a 350°F oven for a few minutes, or until heated through. You can also toast them lightly.
Nutritional Information
| Nutrient | Amount per Serving | % Daily Value |
|---|---|---|
| Calories | 127 kcal | 6% |
| Total Fat | 2 g | 3% |
| Saturated Fat | 0 g | 0% |
| Cholesterol | 0 mg | 0% |
| Sodium | 438 mg | 18% |
| Total Carbohydrate | 23 g | 8% |
| Dietary Fiber | 2 g | 8% |
| Sugars | 0 g | 0% |
| Protein | 4 g | 8% |
Variations & Substitutions
- Gluten-Free Pita: Experiment with gluten-free flour blends to create a gluten-free version of this recipe. Keep in mind that gluten-free dough can be more delicate and may require adjustments to the kneading and rising times.
- Whole Wheat Pita: Increase the amount of whole wheat flour for a more rustic, nutty flavor.
- Herb-Infused Pita: Add chopped fresh herbs like rosemary, thyme, or oregano to the dough for a flavorful twist.
- Spiced Pita: Incorporate spices like cumin, coriander, or chili powder for a Middle Eastern-inspired flavor.
- Sweet Pita: Add a tablespoon of honey or maple syrup to the dough for a slightly sweet pita bread.
FAQs (Frequently Asked Questions)
Q: Why isn’t my pita puffing up in the oven?
A: There could be several reasons. The oven might not be hot enough, the dough might not be elastic enough, or the baking surface might not be properly preheated.
Q: Can I use instant yeast instead of active dry yeast?
A: Yes, you can substitute instant yeast for active dry yeast. You can add it directly to the flour without proofing it first.
Q: How do I prevent my pita bread from drying out?
A: Wrap the warm pita bread in a clean kitchen towel after baking to trap the steam and keep them soft.
Q: Can I make the dough in a bread machine?
A: Yes, you can use a bread machine to make the dough. Follow your bread machine’s instructions for making dough, then proceed with rolling and baking the pita bread as directed in the recipe.
Q: How can I use day-old pita bread?
A: Day-old pita bread can be toasted, grilled, or used to make pita chips. You can also use it in salads or soups.
Final Thoughts
Making pita bread from scratch might seem daunting at first, but I promise you, it’s an incredibly rewarding experience. The aroma that fills your kitchen, the satisfaction of watching those little balloons rise in the oven, and the taste of warm, fresh pita bread – it’s all worth it. Don’t be afraid to experiment with different flours, herbs, and spices to create your own signature pita. And most importantly, have fun with it! Share your creations with friends and family, and let them experience the magic of homemade pita bread. Happy baking!