
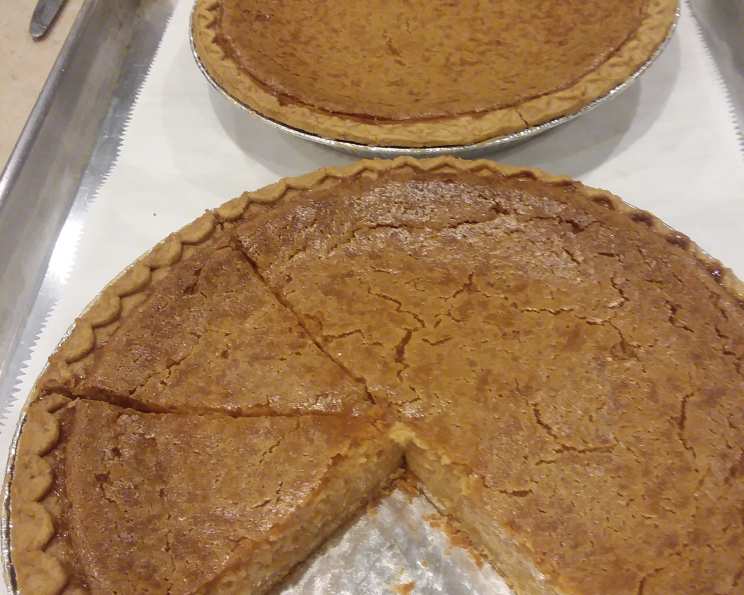
Mama’s Famous Sweet Potato Pie: A Taste of Home
The scent alone transports me back – to a bustling kitchen filled with laughter, the rhythmic whir of Mama’s ancient blender, and the warm, comforting aroma of cinnamon and sweet potatoes baking in the oven. More than just a dessert, this sweet potato pie is a tangible piece of my childhood, a culinary heirloom passed down through generations, and a non-negotiable centerpiece of every Thanksgiving feast. It’s the taste of home, the epitome of Southern comfort, and a reminder of the love baked into every single slice.
Recipe Overview
- Prep Time: 20 minutes
- Cook Time: 1 hour
- Total Time: 1 hour 20 minutes
- Servings: 16
- Yield: 2 pies
- Dietary Type: Vegetarian
Ingredients
- 2 cups mashed sweet potatoes
- 1 cup melted butter
- 2 cups sugar
- 2 (12 ounce) cans evaporated milk
- 1/2 teaspoon salt
- 1 teaspoon cinnamon
- 1 teaspoon nutmeg
- 2 teaspoons vanilla
- 2 tablespoons lemon juice
- 4 egg yolks
- 2 unbaked pie crusts (store-bought or homemade)
Equipment Needed
- Blender
- Large Container with pouring spout (plastic juice pitcher is ideal)
- Two deep-dish pie plates
- Oven
- Aluminum foil
- Cooling rack
Instructions
-
Preheat your oven to 350 degrees Fahrenheit (175 degrees Celsius). Ensure your oven rack is positioned in the center. A properly preheated oven is crucial for even baking.
-
In a blender, combine all the filling ingredients: the mashed sweet potatoes, melted butter, sugar, evaporated milk, salt, cinnamon, nutmeg, vanilla, lemon juice, and egg yolks.
-
Puree the ingredients until completely smooth. Depending on the size of your blender, you may need to do this in two batches to avoid overflowing. If necessary, divide the ingredients evenly and blend separately.
-
Pour each blended batch into a large container with a pouring spout. A plastic juice pitcher works perfectly for this, allowing for easy and controlled pouring.
-
Carefully pour the sweet potato filling into two unbaked pie crusts. This recipe makes enough filling for two deep-dish pies. Ensure the filling is evenly distributed in each crust.
-
Bake in the preheated 350-degree Fahrenheit oven for approximately 1 hour.
-
After about 30 minutes of baking, carefully remove the pies from the oven and cover the edges of the crust with strips of aluminum foil. This will prevent the crust from over-browning or burning while the filling continues to bake.
-
Return the pies to the oven and continue baking for the remaining 30 minutes.
-
After another 30 minutes (1 hour total baking time), remove the foil and rotate the pies in the oven. Rotating the pies helps ensure that they cook evenly, as ovens can have hot spots.
-
Check for doneness. The pies are done when the filling is set around the edges but still has a slight jiggle in the center. A toothpick inserted near the center should come out mostly clean. If the filling is still very liquid, continue baking for another 5-10 minutes, checking frequently.
-
Once baked, remove the pies from the oven and place them on a cooling rack.
-
Allow the pies to cool completely before slicing and serving. This is crucial as the filling needs time to set properly. Ideally, let them cool at room temperature for at least 2-3 hours, or even overnight in the refrigerator.
Expert Tips & Tricks
- Sweet Potato Prep: For the best flavor and texture, bake your sweet potatoes whole until they are very soft before mashing. Roasting intensifies their sweetness. You can also boil them, but be careful not to overcook, as they can become waterlogged.
- Spice it Up: Feel free to adjust the amounts of cinnamon and nutmeg to your preference. A pinch of ground ginger or cloves can also add a warm, spicy note.
- Lemon Juice: Don’t skip the lemon juice! It brightens the flavor of the pie and balances the sweetness.
- Preventing a Soggy Crust: Blind-baking the crust partially before adding the filling can help prevent a soggy bottom crust. To do this, prick the bottom of the crust with a fork, line it with parchment paper, and fill it with pie weights or dried beans. Bake at 350°F for about 15 minutes, then remove the weights and parchment paper and bake for another 5-10 minutes until lightly golden.
- Crust Shield: If you don’t have foil to protect the crust edges, you can purchase a pie crust shield, a reusable silicone ring designed to fit over the crust.
- Make Ahead: Sweet potato pie is a fantastic make-ahead dessert. You can bake it a day or two in advance and store it in the refrigerator.
Serving & Storage Suggestions
Serve Mama’s Famous Sweet Potato Pie chilled or at room temperature. A dollop of whipped cream or a scoop of vanilla ice cream complements the warm spices beautifully. For a festive touch, garnish with a sprinkle of cinnamon or grated nutmeg.
Leftover pie should be stored in the refrigerator, covered tightly, for up to 3-4 days. You can also freeze sweet potato pie for longer storage. Wrap the pie tightly in plastic wrap and then in foil. Frozen pie will keep for up to 2-3 months. To thaw, place the pie in the refrigerator overnight. You can reheat individual slices in the microwave or in a low oven (around 300°F) until warmed through.
Nutritional Information
(Estimated per serving, based on 1/16 of the recipe):
| Nutrient | Amount per Serving | % Daily Value |
|---|---|---|
| Calories | 302 kcal | N/A |
| Calories from Fat | N/A | 47% |
| Total Fat | 15.9 g | 24% |
| Saturated Fat | 9.7 g | 48% |
| Cholesterol | 84.3 mg | 28% |
| Sodium | 329.1 mg | 13% |
| Total Carbohydrate | 37.1 g | 12% |
| Dietary Fiber | 1.1 g | 4% |
| Sugars | 27.5 g | 109% |
| Protein | 4.2 g | 8% |
Variations & Substitutions
- Vegan Sweet Potato Pie: Substitute the butter with a vegan butter alternative, the evaporated milk with coconut milk or other plant-based milk, and the egg yolks with a flax egg (1 tablespoon ground flaxseed mixed with 3 tablespoons water, let sit for 5 minutes to thicken).
- Gluten-Free Sweet Potato Pie: Use a gluten-free pie crust. You can find pre-made gluten-free crusts in most supermarkets or make your own using a gluten-free flour blend.
- Spiced Rum Sweet Potato Pie: Add 2 tablespoons of dark rum to the filling for a boozy kick.
- Maple Sweet Potato Pie: Substitute half of the sugar with maple syrup for a richer, more complex flavor.
FAQs (Frequently Asked Questions)
Q: Can I use canned sweet potato puree instead of fresh?
A: Yes, you can use canned sweet potato puree, but fresh roasted sweet potatoes will give you the best flavor and texture. If using canned, make sure it’s 100% sweet potato puree and not sweet potato pie filling.
Q: My pie crust is browning too quickly. What should I do?
A: Cover the edges of the crust with aluminum foil to prevent over-browning. You can also purchase a pie crust shield for this purpose.
Q: How do I know when the sweet potato pie is done?
A: The pie is done when the filling is set around the edges but still has a slight jiggle in the center. A toothpick inserted near the center should come out mostly clean.
Q: Can I freeze sweet potato pie?
A: Yes, you can freeze sweet potato pie. Wrap the pie tightly in plastic wrap and then in foil. Frozen pie will keep for up to 2-3 months. Thaw overnight in the refrigerator before serving.
Q: Why is my sweet potato pie cracked on top?
A: Cracking can occur if the pie is baked at too high a temperature or for too long. While visually not perfect, it doesn’t affect the taste.
Final Thoughts
Mama’s Famous Sweet Potato Pie is more than just a recipe; it’s a cherished tradition, a taste of home, and a reminder of the love and warmth that surrounds us during the holidays. I encourage you to try this recipe and share it with your loved ones. Feel free to experiment with variations and make it your own. And most importantly, don’t forget to savor every delicious bite! Pair it with a cup of freshly brewed coffee or a glass of sweet tea for the ultimate Southern experience.