
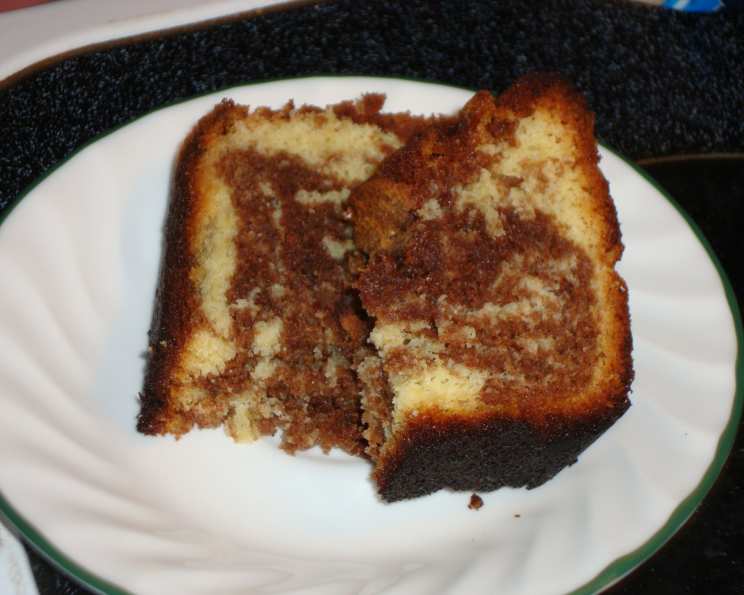
Marbled Chocolate Tea Bread: A Slice of Nostalgia
I remember vividly the first time I saw marbled cake. It wasn’t in a fancy bakery or a glossy magazine; it was in my grandmother’s kitchen, a warm and inviting space filled with the comforting aroma of baking. She pulled a loaf from her ancient oven, the golden crust giving way to a mesmerizing swirl of vanilla and chocolate within. It wasn’t just a cake; it was a work of art, a testament to simple ingredients transformed into something extraordinary. This Marbled Chocolate Tea Bread brings back that cherished memory every time I bake it, filling my kitchen with the same warmth and magic.
Recipe Overview
- Prep Time: 20 minutes
- Cook Time: 1 hour 15 minutes – 1 hour 30 minutes
- Total Time: 1 hour 35 minutes – 1 hour 50 minutes
- Servings: 5
- Yields: 10 slices
- Dietary Type: Not specified
Ingredients
- ½ lb unsalted butter
- ½ lb caster sugar or ½ lb superfine sugar
- 4 eggs, beaten
- ½ lb self raising flour
- 1 large orange, zest only
- 1-2 drops orange extract (optional)
- 3 ounces chocolate
- 1 tablespoon cocoa powder
Equipment Needed
- 8” by 4” loaf tin
- Greaseproof paper
- Mixing bowls
- Electric mixer or whisk
- Small saucepan
- Wire rack
- Knife or skewer
Instructions
-
Begin by preparing your loaf tin. Grease an 8” by 4” loaf tin thoroughly with butter or cooking spray, then line the base and sides with greaseproof paper. This will ensure the bread releases easily after baking.
-
In a large mixing bowl, cream together the butter and sugar until the mixture is pale and fluffy. This step is crucial for creating a light and tender crumb. Use an electric mixer for best results, but a sturdy whisk and some elbow grease will also do the trick.
-
Gradually add the beaten eggs, beating well after each addition. This prevents the mixture from curdling. Incorporate the eggs slowly, allowing each addition to fully emulsify before adding more.
-
Fold in the self-raising flour until just combined. Be careful not to overmix, as this can develop the gluten in the flour and result in a tough bread.
-
Transfer half of the cake mixture to another bowl. This will be the base for your orange-flavored portion.
-
To one of the bowls, beat in the orange zest from the large orange, along with orange extract, if using. The zest provides a vibrant citrus flavor, while the extract intensifies the aroma.
-
Break the chocolate into pieces and place them in a small heatproof bowl. Place the bowl over a pan of simmering water, ensuring the bottom of the bowl doesn’t touch the water. Stir until the chocolate melts completely and smoothly.
-
Stir the melted chocolate and cocoa powder into the remaining cake mixture. This will create the rich chocolate portion of your marbled bread.
-
Now comes the fun part! Put alternate spoonfuls of the two mixtures (orange and chocolate) into the prepared loaf tin. Don’t be too precise – the goal is to create a random, marbled effect.
-
Once all the batter is in the tin, use a knife or skewer to swirl through the mixture to create a marbled effect. Be careful not to over-swirl, or the colors will blend together too much. A few gentle swirls are all you need. Then level the surface of the batter with a spatula.
-
Bake at 350°F (175°C) for about 1¼- 1½ hours, or until well risen and firm to the touch. A skewer inserted into the center should come out clean. If the top of the bread starts to brown too quickly, tent it loosely with foil during the last 20-30 minutes of baking.
-
Once baked, remove the loaf tin from the oven and turn the bread out onto a wire rack to cool completely before slicing and serving. Cooling completely is vital to allow the crumb structure to set.
Expert Tips & Tricks
- For an even more intense chocolate flavor, use a high-quality dark chocolate with a cocoa content of 70% or higher.
- To prevent the bread from sticking, you can lightly dust the greased and lined loaf tin with flour before adding the batter.
- If you don’t have self-raising flour, you can make your own by adding 2 teaspoons of baking powder per cup of all-purpose flour.
- The bread can be made a day ahead and stored in an airtight container at room temperature. This allows the flavors to meld together and the texture to improve.
- To check for doneness, insert a long skewer into the center of the bread. If it comes out clean, the bread is done. If it has wet batter clinging to it, return the bread to the oven for another 5-10 minutes.
Serving & Storage Suggestions
Serve the Marbled Chocolate Tea Bread sliced at room temperature. It’s delicious on its own with a cup of tea or coffee, or you can spread it with a little butter or cream cheese. For a more decadent treat, warm a slice slightly and serve it with a scoop of vanilla ice cream.
To store, wrap the bread tightly in plastic wrap or place it in an airtight container. It will keep at room temperature for up to 3 days, in the refrigerator for up to a week, or in the freezer for up to 2 months. Thaw frozen bread overnight in the refrigerator before serving. To refresh the bread, you can warm it slightly in a low oven (300°F) for a few minutes.
Nutritional Information
| Nutrient | Amount per Serving | % Daily Value |
|---|---|---|
| Calories | 828.6 kcal | N/A |
| Calories from Fat | 451 g | 54% |
| Total Fat | 50.2 g | 77% |
| Saturated Fat | 30.2 g | 151% |
| Cholesterol | 246.4 mg | 82% |
| Sodium | 67.5 mg | 2% |
| Total Carbohydrate | 90.4 g | 30% |
| Dietary Fiber | 5.3 g | 21% |
| Sugars | 49.2 g | 196% |
| Protein | 12.8 g | 25% |
Variations & Substitutions
- Lemon Poppy Seed Marbled Bread: Substitute lemon zest for the orange zest and add 2 tablespoons of poppy seeds to the orange batter.
- Spice Cake Marbled Bread: Add 1 teaspoon of ground cinnamon, ½ teaspoon of ground ginger, and ¼ teaspoon of ground cloves to the chocolate batter.
- Nutella Swirl Bread: Instead of the chocolate mixture, swirl in dollops of Nutella for a rich and nutty variation.
- Gluten-Free Option: Substitute a gluten-free self-raising flour blend for the regular self-raising flour. You may need to add a binding agent like xanthan gum to improve the texture.
FAQs (Frequently Asked Questions)
Q: Can I use margarine instead of butter?
A: While you can, butter provides a richer flavor and a more tender crumb. If you must substitute, choose a high-quality margarine with a high fat content.
Q: My bread is sinking in the middle. What did I do wrong?
A: This can be caused by several factors, including overmixing the batter, not baking the bread long enough, or opening the oven door too frequently during baking. Make sure to follow the recipe carefully and avoid overmixing.
Q: Can I freeze the bread?
A: Yes, the bread freezes well. Wrap it tightly in plastic wrap and then in foil or place it in a freezer-safe bag. It will keep in the freezer for up to 2 months.
Q: How can I prevent the chocolate from seizing when melting it?
A: Make sure the bowl you’re using to melt the chocolate is completely dry and that no water gets into the chocolate. Stir gently and avoid overheating.
Q: Can I use a different size loaf tin?
A: Yes, but you may need to adjust the baking time accordingly. A smaller tin will require a longer baking time, while a larger tin will require a shorter baking time. Keep an eye on the bread and check for doneness regularly.
Final Thoughts
This Marbled Chocolate Tea Bread is more than just a recipe; it’s an invitation to create a moment of joy and connection. The beautiful swirls of chocolate and orange, the comforting aroma, and the delicious taste are sure to delight anyone who tries it. So, gather your ingredients, preheat your oven, and let the magic of baking fill your home. I encourage you to share this recipe with your loved ones and create your own memories around this delightful treat. And if you have any special twists or variations, please share them – I’d love to hear what you create!