
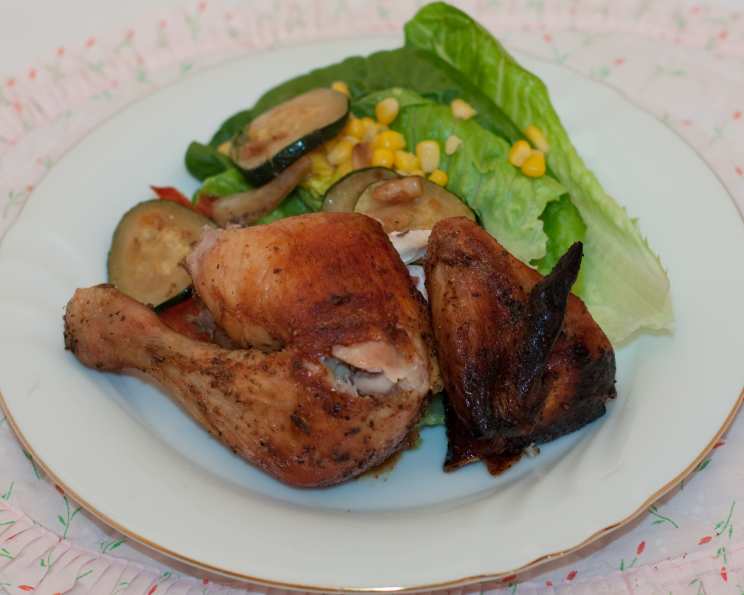
Smoked Beer Can Chicken: A Culinary Adventure
There’s something almost primal about roasting a chicken, the way its aroma fills the kitchen with warmth and anticipation. But add a smoky kiss and the subtle tang of beer, and you elevate the experience to a whole new level. I remember the first time I attempted this recipe, a nervous graduate student with a charcoal grill far too big for my tiny patio. Despite the initial mishaps – a near flare-up and a slightly singed wing – the resulting bird was so succulent and flavorful it was a revelation. It’s a dish that transforms a simple meal into a celebratory feast, and I’m thrilled to share my version with you.
Recipe Overview
- Prep Time: 30 minutes
- Cook Time: 2 hours 30 minutes
- Total Time: 3 hours
- Servings: 6
- Yield: 1 whole chicken
- Dietary Type: Varies (See Notes)
Ingredients
For the Dry Rub:
- 2 teaspoons dried sage
- 2 teaspoons cayenne pepper
- 1 tablespoon celery salt
- 1 tablespoon black pepper
- 2 tablespoons brown sugar
- 1 tablespoon garlic powder
- 1 tablespoon thyme leaves
For the Chicken:
- 1 roasting chicken (6-7 lbs.)
- 1 (16 ounce) can beer (lager recommended)
- ¼ cup chicken stock
- 1 tablespoon brandy
- 2 teaspoons lemon juice, freshly squeezed
- 2 tablespoons butter
- 4 tablespoons butter, melted (for basting)
- 2 cups mesquite wood chips
Ingredient Notes:
- For a gluten-free option, verify that your beer and chicken stock are gluten-free. For a dairy-free option, substitute the butter with a plant-based butter alternative.
- Feel free to use your favourite wood chips. Apple or cherry add a sweeter note, while hickory will provide a stronger smoke flavor.
Equipment Needed
- Mixing bowl
- Small saucepan
- Sharp knife
- Flavor injector (syringe style)
- Aluminum foil
- Can opener
- Barbecue grill
- Drip pan
- Meat thermometer
- Tongs
Instructions
-
Prepare the Dry Rub: In a mixing bowl, combine the dried sage, cayenne pepper, celery salt, black pepper, brown sugar, garlic powder, and thyme leaves. Mix well until all ingredients are evenly distributed. This aromatic blend will be the foundation of our chicken’s flavor.
-
Make the Marinade: In a small saucepan, combine the chicken stock, brandy, lemon juice, butter, and 1 tablespoon of the prepared dry rub. Warm gently over low heat until the butter melts, stirring occasionally. Once melted, remove from heat and allow the marinade to cool to room temperature.
-
Prep the Chicken: Remove the giblets and any excess fat from inside the chicken cavity. Rinse the chicken thoroughly under cold running water, then pat it dry inside and out with paper towels. A dry bird will help the rub and marinade adhere properly, leading to better flavor absorption.
-
Season the Chicken: Season the inside cavity of the chicken with 2 tablespoons of the dry rub, ensuring even coverage. Then, rub 3 tablespoons of the rub all over the outside of the chicken, massaging it into the skin. This step is crucial for a flavorful and well-seasoned bird.
-
Inject the Marinade: Using a syringe-style flavor injector, inject the cooled marinade into the breast, thighs, and drumsticks of the chicken. Distribute the marinade evenly, injecting until the meat appears plump. This infuses the chicken with moisture and flavor from the inside out.
-
Butter and Marinate: Brush the outside of the bird generously with some of the melted butter. Place the chicken in the refrigerator and let it marinate for 3 hours. This allows the flavors to meld and penetrate the meat.
-
Prepare the Wood Chips: About 2½ hours into the chicken’s marinating time, prepare the mesquite wood chips for smoking. Pour half of the can of beer over the wood chips in a bowl and let them soak for a half hour. Soaking the chips prevents them from burning too quickly and creates a richer smoke.
-
Prep the Beer Can: Use a sharp can opener to punch a couple more holes in the top of the beer can. This helps the steam escape during cooking, ensuring the chicken cooks evenly. Set the can aside.
-
Set Up the Grill for Indirect Cooking: Prepare your barbeque grill for indirect cooking. This means placing a drip pan underneath the grate on one side and removing the grate from the other side. Turn on only the burner opposite of the drip pan to high heat. Indirect cooking prevents the chicken from burning and allows it to cook slowly and evenly.
-
Create a Smoking Pouch: Squeeze the excess beer from the soaked wood chips. Create a smoking pouch by wrapping the wood chips in aluminum foil and poking holes with a fork. Alternatively, you can use a smoking tray or tube.
-
Start Smoking: Place the smoking pouch or tray directly over the burner that is on. Close the lid of the grill and wait for smoke to appear. Once smoke appears, reduce the burner to medium heat.
-
Mount the Chicken: Hold the chicken upright with the body cavity down and carefully lower it onto the beer can, ensuring the can is securely inside the cavity. Place the chicken on the cool side of the grill over the drip pan. Pull the legs forward to form a stable tripod so the chicken can stand upright on its own.
-
Cook and Baste: Brush the chicken with melted butter. Continue to cook at 220°F (104°C) with the lid down, basting every 45 minutes or so with more melted butter. Basting keeps the skin moist and helps it to brown beautifully.
-
Prevent Over-Browning: If the chicken starts to get too brown on the outside before it is done cooking, cover it loosely with aluminum foil to prevent burning.
-
Check for Doneness: Remove the chicken from the grill once it reaches an internal temperature of 180°F (82°C). Insert a meat thermometer into the thickest part of the thigh, being careful not to touch the bone. This typically takes about 2½ hours.
-
Rest the Chicken: Once cooked through, cover the chicken with aluminum foil and let it rest for 10 minutes before carving. This allows the juices to redistribute, resulting in a more tender and flavorful bird.
Expert Tips & Tricks
- For extra crispy skin, pat the chicken dry very thoroughly before applying the rub and marinade. You can even leave it uncovered in the refrigerator overnight to dry out the skin further.
- If you don’t have a flavor injector, you can simply pour the marinade over the chicken and under the skin, but the injector will yield a more intensely flavored result.
- Monitor the smoke during cooking. If it stops, you may need to add more wood chips to the smoking pouch.
- If you don’t have a grill, you can roast this chicken in the oven at 375°F (190°C), but you won’t get the smoky flavor. Consider adding a few drops of liquid smoke to the marinade for a hint of smokiness.
- If you have one, a digital thermometer that can stay in the bird during the cook is a great way to monitor the temperature of the bird without opening the lid.
Serving & Storage Suggestions
Serve the Smoked Beer Can Chicken whole for a dramatic presentation, or carve it into pieces for easier serving. Pair it with classic sides like roasted vegetables, mashed potatoes, coleslaw, or cornbread.
Leftover chicken can be stored in an airtight container in the refrigerator for up to 3-4 days. For longer storage, freeze the cooked chicken, either whole or in pieces, for up to 2-3 months. Reheat in the oven at 350°F (175°C) until warmed through, or use in sandwiches, salads, or casseroles. Reheating can also be done in the microwave but be aware that the skin will be less crispy.
Nutritional Information
Please note that these values are estimates and can vary based on specific ingredients and portion sizes.
| Nutrient | Amount per Serving | % Daily Value |
|---|---|---|
| Calories | 420 kcal | 21% |
| Total Fat | 28g | 43% |
| Saturated Fat | 12g | 60% |
| Cholesterol | 150mg | 50% |
| Sodium | 450mg | 19% |
| Total Carbohydrate | 8g | 3% |
| Dietary Fiber | 1g | 4% |
| Sugars | 5g | N/A |
| Protein | 35g | 70% |
Variations & Substitutions
- Spice it up: Add more cayenne pepper to the dry rub for a spicier kick, or include a pinch of chili flakes.
- Herbaceous Twist: Experiment with different herbs in the dry rub, such as rosemary, oregano, or marjoram.
- Citrus Infusion: Add orange or grapefruit zest to the dry rub for a bright, citrusy flavor.
- Beer Alternatives: While a lager is traditional, try using a stout or pale ale for different flavor profiles. You could also use hard cider.
- Dry Rub Alternative: Use your favourite store bought dry rub to save time.
FAQs (Frequently Asked Questions)
Q: Can I use a different type of wood chips?
A: Absolutely! Mesquite provides a strong, smoky flavor, but you can use apple, cherry, hickory, or any other wood chips you prefer. Experiment to find your favorite smoke profile.
Q: What if my chicken tips over on the grill?
A: Make sure the chicken is securely placed on the beer can and that the legs are forming a stable tripod. If it still tips, use a crumpled piece of foil to prop it up.
Q: How do I know when the chicken is fully cooked?
A: The best way is to use a meat thermometer. Insert it into the thickest part of the thigh, away from the bone. The internal temperature should reach 180°F (82°C). The juices should also run clear when you pierce the thigh with a fork.
Q: Can I prepare the dry rub and marinade in advance?
A: Yes, both the dry rub and marinade can be made a day or two ahead of time. Store the dry rub in an airtight container and the marinade in the refrigerator.
Q: Can I use a different liquid instead of beer?
A: While beer adds a unique flavor, you can use chicken broth, apple juice, or even a mixture of water and vinegar as a substitute. However, the flavor profile will be different.
Final Thoughts
Smoked Beer Can Chicken is more than just a recipe; it’s an experience. From the fragrant blend of the dry rub to the smoky aroma wafting from the grill, every step is a celebration of flavor. Don’t be afraid to experiment with different herbs, spices, and wood chips to create your own signature version. Gather your friends and family, fire up the grill, and prepare to be amazed. And of course, I’d love to hear your feedback and see your culinary creations! This chicken pairs wonderfully with a crisp summer salad and a cold, refreshing beer, making it the perfect centerpiece for your next outdoor gathering. Happy grilling!