
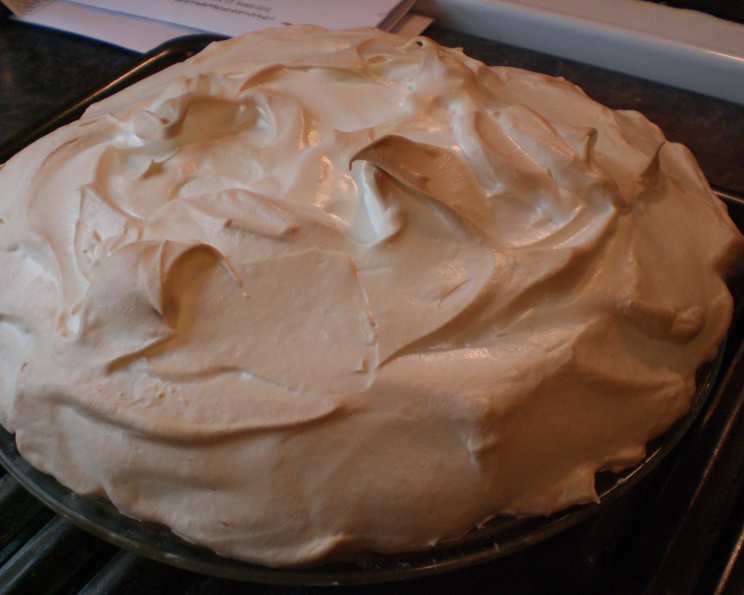
Meringue Topping… You Don’t Weep, It Doesn’t Either!!
My grandmother, Nana Bess, was the undisputed queen of Lemon Meringue Pie. I remember sitting on a stool in her sun-drenched kitchen, mesmerized as she whipped egg whites into a towering cloud of pristine, sugary fluff. The anticipation was almost unbearable; that first bite, the tart lemon curd balanced perfectly by the sweet, airy meringue, was pure bliss. I spent years trying to replicate her magic, battling weeping meringue and collapsed peaks, before finally cracking the code to a perfect, stable topping.
Recipe Overview
- Prep Time: 20 minutes
- Cook Time: 15 minutes
- Total Time: 35 minutes
- Servings: 8
- Yield: 1 pie
- Dietary Type: Not specified
Ingredients
- 1 tablespoon cornstarch
- 2 tablespoons cold water
- ½ cup boiling water
- 1 teaspoon lemon juice or 1 teaspoon vanilla
- 3 egg whites
- 6 tablespoons sugar
Equipment Needed
- Small saucepan
- Mixing bowl
- Electric mixer (handheld or stand mixer)
- Whisk
- Measuring cups and spoons
Instructions
-
Preheat your oven to 350 degrees Fahrenheit (175 degrees Celsius). Accuracy here is important for proper meringue setting.
-
In a small saucepan, thoroughly mix together the cornstarch and cold water. Make sure there are no lumps. A whisk works best for this.
-
Add the boiling water to the cornstarch mixture. Place the saucepan over low to medium heat.
-
Stir the mixture constantly as it heats up. This prevents the cornstarch from clumping and ensures a smooth base for the meringue.
-
Continue stirring until the mixture thickens. It should become almost translucent.
-
Once thickened, remove the saucepan from the heat. Place the pan in a bowl of cool water (an ice bath is even better) to cool the mixture down to room temperature before adding it to the egg whites. This step is crucial! Adding warm cornstarch will cook the egg whites prematurely. Let this mixture rest while you prepare the meringue.
-
Separate 3 egg whites, being extremely careful not to get even a trace of yolk in the bowl. Egg yolk contains fat, which will prevent the egg whites from whipping up properly and achieving the desired volume and stability. Use a clean, dry bowl for the best results.
-
Add the lemon juice (or vanilla) to the egg whites. The lemon juice helps to stabilize the egg whites and adds a bright flavor, while vanilla provides a warm, comforting note.
-
Beat the egg whites with an electric mixer until they stand in soft, white peaks. This might take a few minutes, so be patient. The peaks should be soft and droopy, not stiff.
-
Gradually add the sugar, one tablespoon at a time. This is where the real magic happens! After each individual tablespoon of sugar is added, beat the meringue vigorously.
-
Continue beating the meringue until it is glossy and has firm peaks. The meringue should be shiny and stand straight up on its own when the beaters are lifted. This indicates that the sugar has fully dissolved and the meringue is stable.
-
Check the cornstarch mixture and make sure it is at room temperature. Once it is cooled, spoon the entire mixture into the bowl with the meringue.
-
Blend the cornstarch mixture into the meringue thoroughly, but gently. You want to incorporate it evenly without deflating the meringue.
-
Ensure that your pie filling is hot. A hot filling helps to “cook” the meringue from the bottom up, preventing weeping.
-
Starting around the crust, add the meringue in big spoonfuls. Press the meringue firmly onto the crust to seal any potential air pockets. This helps to prevent the meringue from shrinking and pulling away from the crust. I like to get down at eye level to make sure there are no gaps.
-
Once the meringue has completely covered the pie filling, use a spoon to create decorative peaks. This not only looks beautiful but also increases the surface area that browns in the oven.
-
Bake for about 15 minutes, or until the meringue is nicely browned. Watch it closely! Undercooked meringue is prone to weeping.
-
To test for doneness, insert a toothpick into the meringue. If the toothpick comes out clean, the meringue is done.
Expert Tips & Tricks
- Room Temperature Egg Whites: While some recipes call for cold egg whites, I find that room temperature egg whites whip up faster and achieve greater volume. Let them sit out for about 30 minutes before starting.
- Copper Bowl: If you have one, use a copper bowl for whipping the egg whites. The copper ions react with the egg whites, creating an even more stable meringue.
- Cream of Tartar: Adding a pinch of cream of tartar along with the lemon juice can further stabilize the egg whites.
- Don’t Overbake: Overbaking will cause the meringue to become dry and brittle. Keep a close eye on it during the last few minutes of baking.
- Spoon Placement: Start by placing spoonfuls of meringue around the edge of the pie, touching the crust. By making a ring around the edge and spreading inwards, you are sealing the meringue on the crust and keeping the moisture in.
Serving & Storage Suggestions
Serve your lemon meringue pie slightly cooled, allowing the filling to set up properly. Store leftover pie in the refrigerator, loosely covered. Meringue is best eaten fresh, but it will generally last for 2-3 days in the fridge. Be aware that the meringue may soften slightly over time. It is not recommended to freeze meringue, as it will lose its texture.
Nutritional Information
| Nutrient | Amount per Serving | % Daily Value |
|---|---|---|
| Calories | 47 kcal | N/A |
| Calories from Fat | N/A | 0% |
| Total Fat | 0 g | 0% |
| Saturated Fat | 0 g | 0% |
| Cholesterol | 0 mg | 0% |
| Sodium | 21 mg | 0% |
| Total Carbohydrate | 10.5 g | 3% |
| Dietary Fiber | 0 g | 0% |
| Sugars | 9.5 g | N/A |
| Protein | 1.4 g | 2% |
Note: Nutritional information is an estimate and may vary based on specific ingredients and preparation methods.
Variations & Substitutions
- Flavor Extracts: Experiment with different flavor extracts in the meringue, such as almond, coconut, or orange.
- Brown Sugar Meringue: For a richer, caramel-like flavor, use brown sugar instead of granulated sugar in the meringue.
- Torched Meringue: Instead of baking the meringue, use a kitchen torch to brown the peaks for a dramatic presentation.
- Vegan Meringue: Believe it or not, you can make a meringue from the liquid leftover from canned chickpeas! It will need cream of tartar to stablize the mixture though!
FAQs (Frequently Asked Questions)
Q: Why is my meringue weeping?
A: Weeping meringue is usually caused by undercooked meringue or a filling that is too watery. Ensure that the meringue is properly browned in the oven and that the filling is not overly liquid. Sealing the meringue to the pie crust will also help!
Q: How do I prevent my meringue from shrinking?
A: Make sure to press the meringue firmly onto the crust to seal any air pockets. This helps prevent the meringue from shrinking and pulling away from the crust. A hot filling is also a must!
Q: Can I use a hand mixer instead of a stand mixer?
A: Yes, you can definitely use a hand mixer. It might take a little longer to whip the egg whites to the desired consistency, but the results will be the same.
Q: What if I accidentally get some egg yolk in the egg whites?
A: Unfortunately, even a small amount of egg yolk can prevent the egg whites from whipping up properly. It’s best to start over with fresh egg whites.
Q: Can I make the meringue ahead of time?
A: Meringue is best made fresh and used immediately. It doesn’t hold well and will start to deflate and weep if stored for too long.
Final Thoughts
Conquering meringue can feel like a culinary rite of passage, but with these tips and tricks, you’ll be creating beautiful, stable meringue toppings in no time. Don’t be discouraged if your first attempt isn’t perfect. Keep practicing, and soon you’ll be wowing your friends and family with your meringue masterpieces! Feel free to play around with the recipe by adding other flavors or changing up the pie filling. Once you are comfortable with the recipe and you’ve made it a few times, you will know what works best for you in your kitchen! Share your creations and any variations you try – I’d love to hear about your meringue adventures!