
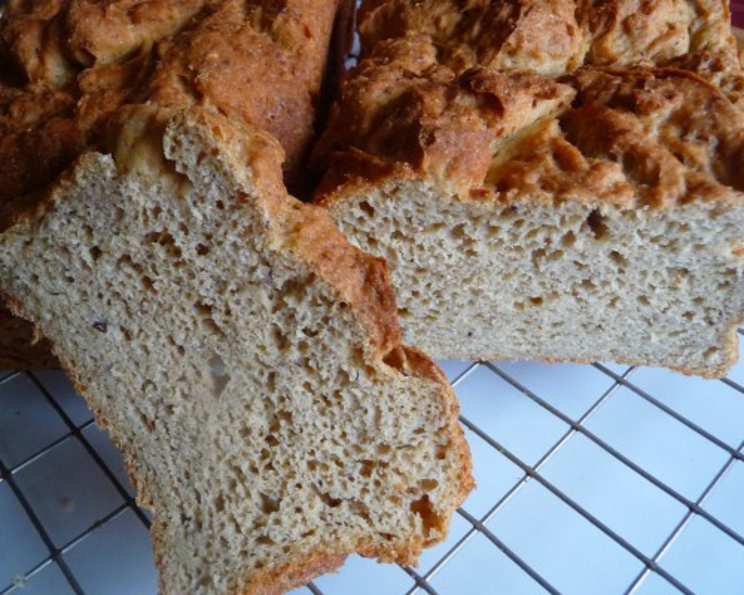
Millet Oatmeal Bread (Gluten-Free)
I can still picture my childhood kitchen, the heart of our home, always filled with the warm, comforting aroma of freshly baked bread. While most of my friends enjoyed classic white bread sandwiches, my mom was on a mission, tirelessly experimenting with gluten-free flours to create a loaf that wouldn’t compromise on taste or texture. The quest often led to hilarious (and sometimes inedible) results, but then, one day, she struck gold with this Millet Oatmeal Bread. The slightly nutty fragrance, the hearty crumb, and the fact that it actually held together? It was a triumph, a testament to her unwavering dedication to making sure I never felt deprived, and a memory I cherish with every slice.
Recipe Overview
- Prep Time: 25 minutes
- Cook Time: 40 minutes
- Rise Time: 1 hour to 1 hour 30 minutes
- Total Time: 2 hours 45 minutes
- Yield: 1 10-inch loaf or 2 8-inch loaves
- Dietary Type: Gluten-Free
Ingredients
- 1 cup brown rice flour
- ½ cup oat flour (can pulverize oats to make this)
- ¾ cup millet flour
- ⅓ cup arrowroot (can substitute cornstarch if necessary)
- ⅓ cup sweet rice flour
- ¼ cup flax seed meal
- 1 tablespoon xanthan gum
- 3 eggs, at room temperature
- 1 teaspoon apple cider vinegar
- ¼ ounce active dry yeast (1 packet, or about 2 ¼ tsp)
- 1 teaspoon granulated sugar (for proofing yeast)
- 1 tablespoon molasses
- 3 tablespoons brown sugar
- 1 ½ teaspoons salt
- 4 tablespoons butter, melted
- ¼ cup water, heated to ~120F (for proofing yeast)
- 1 cup water, heated to ~120F (for dough)
Equipment Needed
- Stand mixer
- Medium mixing bowl
- Small prep bowl
- 10-inch loaf pan or two 8-inch loaf pans
- Measuring cups and spoons
- Plastic wrap or kitchen towel
Instructions
- Ensure all dry ingredients and the eggs are at room temperature. This helps everything incorporate smoothly and rise properly.
- Grease the bottom of a 10-inch loaf pan or two 8-inch pans very well. This prevents the bread from sticking and makes it easier to remove after baking.
- Heat the oven to 200 degrees Fahrenheit and then turn it off. This creates a warm, draft-free environment for the dough to rise.
- In the bowl of your stand mixer, sift together the brown rice flour, oat flour, millet flour, arrowroot, sweet rice flour, flax seed meal, xanthan gum, and salt. Sifting ensures a lighter, more even texture.
- In a separate medium bowl, mix the eggs, molasses, apple cider vinegar, and melted butter. Make sure the butter isn’t too hot, or it might cook the eggs.
- Heat your water for proofing the yeast to approximately 120°F. This temperature activates the yeast without killing it. A thermometer is helpful here, but you can also test it with your finger – it should feel warm but not scalding.
- In a small prep bowl, stir together the active dry yeast and one teaspoon of sugar. The sugar provides food for the yeast, helping it to activate.
- Add ¼ cup of the heated water to the yeast mixture. Let the yeast sit for 10 minutes. It should become foamy and active. This confirms the yeast is alive and well. If it doesn’t foam, start over with a fresh packet of yeast.
- Once the yeast is ready (foamy and active), add the egg mixture to the dry ingredients in the stand mixer.
- Add the yeast mixture to the stand mixer.
- Slowly add the remaining 1 cup of warm water to the mixer to achieve the right consistency of the batter. This is crucial: since different brands of flours, measuring techniques, and even humidity levels can affect the amount of liquid needed, avoid simply dumping in all the water at once. Add it gradually until the dough reaches the desired consistency – it should be like a very stiff cake batter.
- Beat the dough on high speed for about 15 minutes in the mixer. This helps to develop the structure of the bread.
- If you accidentally add too much water, simply add a little rice flour until you achieve the correct dough consistency.
- Put the dough in the prepared pan(s) and place in the turned-off oven to rise for about 1 to 1 ½ hours. Cover the pan with plastic wrap or a towel to prevent the surface from drying out.
- Once the dough has risen to the top of the pan, bake the bread for 40 minutes at 350 degrees Fahrenheit or until the internal temperature reaches 190 degrees Fahrenheit. Use an instant-read thermometer to check for doneness. If the top is browning too quickly, you can tent it with foil.
- Let the bread cool completely in the pan before slicing. This helps to prevent it from crumbling.
Expert Tips & Tricks
- For an extra boost of flavor, try toasting the millet flour lightly in a dry skillet before adding it to the other dry ingredients. This brings out its nutty notes.
- If you don’t have oat flour, you can easily make your own by pulsing rolled oats in a food processor until finely ground.
- Don’t be afraid to experiment with different gluten-free flours! Teff flour or sorghum flour could be used in small amounts to add depth of flavor.
- The xanthan gum is crucial for binding the gluten-free flours together and creating a good texture. Don’t skip it!
- Using a kitchen scale for measuring the ingredients will provide the most accurate and consistent results.
Serving & Storage Suggestions
This Millet Oatmeal Bread is fantastic for sandwiches, toast, or even enjoyed on its own with a smear of butter or jam. It’s particularly good with soups and salads.
To store, wrap the cooled bread tightly in plastic wrap or place it in an airtight container. It will keep at room temperature for about 2-3 days, in the refrigerator for up to a week, or in the freezer for up to 2-3 months. For longer storage, slice the bread before freezing and separate each slice with wax paper to prevent sticking. You can then defrost individual slices as needed. A quick toast or a few seconds in the microwave will restore its fresh-baked flavor and texture.
Nutritional Information
| Nutrient | Amount per Serving | % Daily Value |
|---|---|---|
| Calories | 1218.4 kcal | N/A |
| Total Fat | 40.8 g | 62% |
| Saturated Fat | 18.4 g | 92% |
| Cholesterol | 340.1 mg | 113% |
| Sodium | 2079.3 mg | 86% |
| Total Carbohydrate | 188.8 g | 62% |
| Dietary Fiber | 16.9 g | 67% |
| Sugars | 29.9 g | N/A |
| Protein | 29.8 g | 59% |
Note: Nutritional information is an estimate and may vary based on specific ingredients and preparation methods.
Variations & Substitutions
- Dairy-Free Version: Substitute the melted butter with melted coconut oil or another plant-based oil.
- Sweetener Options: Instead of molasses and brown sugar, try using maple syrup or honey. Adjust the amount to your liking.
- Seed Boost: Add a tablespoon or two of chia seeds or sunflower seeds to the batter for added nutrition and texture.
- Herb Infusion: Mix in a teaspoon of dried herbs like rosemary or thyme for a savory twist.
FAQs (Frequently Asked Questions)
Q: Can I use a different gluten-free flour blend?
A: While this recipe is specifically formulated for the flours listed, you can experiment with other gluten-free blends, but you may need to adjust the amount of liquid accordingly.
Q: My bread is sinking in the middle. What did I do wrong?
A: This can happen if the oven temperature is too high, the dough hasn’t risen enough, or there’s too much moisture in the dough. Make sure your oven is accurately calibrated and follow the rising instructions carefully.
Q: Can I make this bread without a stand mixer?
A: Yes, you can, but it will require a lot more elbow grease! Be prepared to knead the dough vigorously by hand for at least 20 minutes to develop the gluten-free structure.
Q: How can I tell if the bread is fully baked?
A: The best way to check for doneness is to use an instant-read thermometer. The internal temperature should reach 190 degrees Fahrenheit. You can also tap the bottom of the loaf – it should sound hollow.
Q: Can I halve this recipe?
A: Absolutely! Simply halve all the ingredient quantities to make a smaller loaf. Reduce the baking time by a few minutes and keep a close eye on it.
Final Thoughts
Don’t be intimidated by the list of ingredients – this Millet Oatmeal Bread is well worth the effort! The combination of wholesome flours and that subtle sweetness creates a truly satisfying and nutritious loaf. I encourage you to give it a try, experiment with different variations, and share your creations with loved ones. And who knows, maybe this will become a cherished family recipe for you, just like it is for me. Grab your apron, preheat that oven (then turn it off!), and let the aroma of homemade gluten-free bread fill your kitchen!