
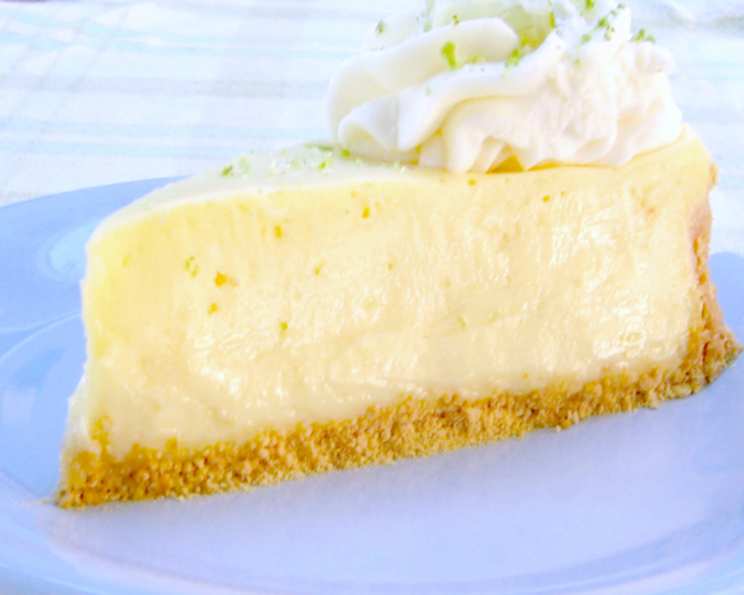
My Favorite Key Lime Cheesecake: A Slice of Sunshine
Every year as the first hints of spring air begin to thaw the winter chill, I find myself craving sunshine. Not just the warm rays on my skin, but the bright, zesty flavors that transport me to sun-drenched shores. And no flavor embodies that feeling more perfectly than key lime. This Key Lime Cheesecake is a culmination of years of tweaking and perfecting. It’s light, tangy, unbelievably creamy, and guaranteed to brighten even the cloudiest day. It’s more than just a dessert; it’s a miniature vacation in every bite.
Recipe Overview
- Prep Time: 1 hour 45 minutes (includes tempering cream cheese and chilling time)
- Cook Time: 1 hour 15 minutes – 1 hour 22 minutes
- Total Time: 5 hours minimum (includes chilling time)
- Servings: 12
- Yield: 1 cheesecake
- Dietary Type: Not Gluten-Free
Ingredients
For the Crust:
- 2 cups Nilla Wafers cookie crumbs (use Nilla Wafers only)
- 1 tablespoon granulated sugar
- 4 tablespoons melted unsalted butter
For the Filling:
- 32 ounces (four 8 ounce bricks) tempered cream cheese (Philadelphia)
- 1 1/4 cups granulated sugar
- 1/4 cup all-purpose flour
- 1/2 teaspoon finely grated fresh key lime zest
- 1 cup freshly squeezed key lime juice
- 1 tablespoon pure vanilla extract
- 1 cup real sour cream
- 1 (5 1/8 ounce) package instant vanilla pudding (Jell-O)
- 4 eggs
For the Garnish:
- Fresh whipped cream
- Cookie crumbs
- Finely grated fresh key lime zest
- Key lime slice (or twist)
Equipment Needed
- Food processor
- 9-inch or 10-inch springform pan
- Microwaveable dish
- Large mixing bowl
- Hand-held mixer
- Flexible spatula
- Wire rack
- Sharp knife
- Pastry bag with decorator tip (optional)
Instructions
- NOTE: A hand-held mixer works best for blending the filling, pausing at intervals to scrape sides of mixing bowl. Allow a minimum of 4 hours for baked cheesecake to refrigerate and set before serving.
- Temper the cream cheese: Temper 32 ounces of Philadelphia cream cheese (four 8 ounce bricks) until room temperature is reached (about 1 1/2 hours). This step is crucial for a smooth, lump-free cheesecake.
- Prepare the Key Limes: Grate the outer green peel from enough key limes to yield 1/2 teaspoon plus desired amount for final garnish, using the finest shred grate of a cheese grater to produce fine zest flakes. Then, squeeze enough key limes to yield 1 cup juice. Freshly squeezed juice is key (pun intended!) for the best flavor.
- Preheat the Oven: Preheat oven to 375°F with one oven rack in center position and another in the lowest position.
- Melt the Butter: Melt 4 tablespoons unsalted butter in a microwaveable dish in a microwave for about 40 seconds for the crust.
- Make the Cookie Crumbs: Process enough Nilla Wafers cookies in a food processor to yield 2 cups crumbs. Ensure the crumbs are finely ground for a cohesive crust.
- Combine Crust Ingredients: Add 1 tablespoon granulated sugar to the cookie crumbs. Then, pour the melted butter mixture through the processor feeder tube while running. Process the mixture until thoroughly mixed.
- Prepare the Springform Pan: Reserve a few teaspoons of crumb mixture for garnish if desired. Dump the crumb mixture into a 9-inch or 10-inch springform pan.
- Press the Crust: Lightly spread the mixture evenly into bottom of pan to approximately 1/4 inch thickness, then partway up the sides of pan. Use the bottom of a measuring cup to firmly press the crumbs into the pan.
- Bake the Crust: Bake the crust at 375°F on center rack for 5 minutes. This pre-baking helps the crust set and prevents it from becoming soggy.
- Set Aside and Leave Oven On: Remove the spring pan from oven and set aside. Leave oven on at 375°F.
- Combine Filling Ingredients: Into a large mixer bowl, add 32 ounces tempered cream cheese, 1 1/4 cups granulated sugar, 1/4 cup flour, and 1/2 teaspoon fresh Key lime zest.
- Mix Filling: Whip with mixer on medium speed until blended. Pause at intervals to scrape the sides of the bowl to ensure everything is well combined.
- Add Key Lime Juice and Vanilla: Pour in 1 cup freshly squeezed Key lime juice and 1 tablespoon pure vanilla extract while mixing on lowest speed.
- Incorporate Sour Cream: Mix in 1 cup real sour cream. This adds a subtle tang and richness to the cheesecake.
- Add Pudding Mix: Add 1 (5.1 ounce) package Jell-O Vanilla Instant Pudding mix gradually while mixing on highest speed until well blended and lump-free. The pudding mix helps to stabilize the cheesecake and gives it a smooth texture.
- Add Eggs: Beat 4 eggs in a separate bowl, then add to mixture, beating on lowest speed until blended, without over-mixing or creating air bubbles (pause to scrape sides of bowl if necessary). Over-mixing can cause the cheesecake to crack.
- Pour Filling into Crust: Pour the cheesecake batter carefully into the springform pan containing crust mixture.
- Smooth the Filling: Smooth mixture in swirls from edges of pan to center until level, using a flexible spatula.
- Bake the Cheesecake: Bake cheesecake at 375°F for 15 minutes. Then, reduce oven temperature to 260°F. Continue baking cheesecake for 1 hour for a 10-inch pan, or 1 hour and 7 minutes for a 9-inch pan. The lower temperature helps prevent cracking.
- Cool and Loosen: Remove cheesecake carefully from oven. Gently run a sharp knife around edges of cheesecake in springform pan to loosen.
- Cool Completely: Leave cheesecake in springform pan and allow to cool completely on a wire rack. This gradual cooling prevents the cheesecake from sinking.
- Refrigerate: Refrigerate cheesecake in the springform pan for at least 4 hours to set. Overnight is even better.
- Remove from Pan: Remove side pan carefully.
- Garnish: Sprinkle a light border of cookie crumbs on cheesecake. Top with a dollop of fresh whipped cream (use a pastry bag with decorator tip). Garnish each serving with a pinch of finely grated fresh key lime zest and/or a fresh key lime twist if desired.
- Serve and ENJOY!
Expert Tips & Tricks
- Water Bath: For an even creamier texture and to further prevent cracking, consider baking the cheesecake in a water bath. Wrap the bottom of the springform pan tightly in foil, then place it in a larger pan. Pour hot water into the larger pan until it reaches about halfway up the sides of the springform pan. Bake as directed.
- Tempering Eggs: To prevent curdling, you can temper the eggs before adding them to the filling. Whisk a small amount of the warm filling into the beaten eggs, then whisk the egg mixture into the remaining filling.
- Blind Baking: If you find your crust is browning too quickly, you can blind bake it. After pressing the crust into the pan, line it with parchment paper and fill it with pie weights or dried beans. Bake as directed, then remove the weights and parchment paper and continue baking for a few more minutes until golden brown.
- Overmixing: Be careful not to overmix the filling, especially after adding the eggs. Overmixing can incorporate too much air into the batter, which can cause the cheesecake to puff up and then crack as it cools.
- Doneness Check: The cheesecake is done when the edges are set, but the center still has a slight wobble. It will continue to set as it cools.
Serving & Storage Suggestions
This Key Lime Cheesecake is best served chilled. The vibrant flavors are most pronounced when cold. It can be served directly from the refrigerator, or you can let it sit at room temperature for about 15-20 minutes before serving to soften slightly.
Leftover cheesecake should be stored in an airtight container in the refrigerator. It will keep for up to 5 days.
Freezing is not recommended, as the texture of the cheesecake can change and become grainy.
Nutritional Information
| Nutrient | Amount per Serving | % Daily Value |
|---|---|---|
| Calories | 501.7 kcal | N/A |
| Calories from Fat | 317 g | N/A |
| Total Fat | 35.2 g | 54% |
| Saturated Fat | 19.8 g | 99% |
| Cholesterol | 165.4 mg | 55% |
| Sodium | 457.6 mg | 19% |
| Total Carbohydrate | 40.7 g | 13% |
| Dietary Fiber | 0.1 g | 0% |
| Sugars | 36.7 g | N/A |
| Protein | 7.4 g | 14% |
Note: Nutritional information is an estimate and may vary based on specific ingredients and preparation methods.
Variations & Substitutions
- Gluten-Free: Substitute the Nilla Wafers with gluten-free vanilla wafers or graham crackers for a gluten-free crust. Ensure that the pudding mix is also gluten-free.
- Vegan: This recipe isn’t easily adaptable to vegan due to the cream cheese and eggs. Vegan cream cheese alternatives often don’t bake the same way.
- Lime Variation: While Key limes are the star, you can use regular limes if Key limes are unavailable. The flavor will be slightly different but still delicious.
- Crust Variation: Try using graham crackers, gingersnaps, or even crushed pretzels for a different crust flavor profile.
FAQs (Frequently Asked Questions)
Q: Why is it important to temper the cream cheese?
A: Tempering the cream cheese allows it to blend smoothly with the other ingredients, preventing lumps in the finished cheesecake.
Q: Can I use bottled Key lime juice instead of fresh?
A: Freshly squeezed Key lime juice provides the best flavor, but bottled juice can be used in a pinch. Look for 100% Key lime juice without added sweeteners.
Q: How do I prevent my cheesecake from cracking?
A: Bake at a low temperature, avoid overmixing the batter, and allow the cheesecake to cool gradually in the oven to minimize cracking. A water bath can also help.
Q: Why do I need to run a knife around the edge of the cheesecake after baking?
A: This helps to release the cheesecake from the sides of the springform pan as it cools, preventing it from cracking as it shrinks.
Q: How long does this cheesecake need to chill in the refrigerator?
A: It needs to chill for at least 4 hours, but preferably overnight, to allow the filling to set completely and for the flavors to meld together.
Final Thoughts
This Key Lime Cheesecake is more than just a recipe; it’s an experience. From the first zesty bite to the last creamy spoonful, it’s a journey to a sun-drenched paradise. Don’t be intimidated by the multiple steps – each one is simple and contributes to the overall perfection of this dessert. I encourage you to try this recipe and bring a little sunshine into your kitchen. I’m confident you’ll love it as much as I do. Feel free to experiment with the garnishes and make it your own. And most importantly, share your creations and experiences! Happy baking!