
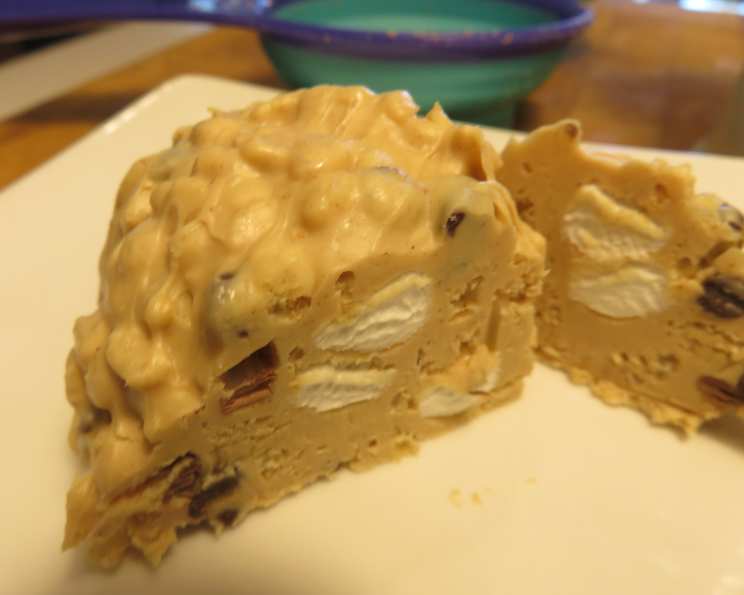
No-Bake Avalanche Cookies: A Sweet Slice of Childhood
My grandma, bless her heart, wasn’t much of a baker, but she had a knack for finding the most ridiculously delicious no-bake treats. I remember one sweltering summer afternoon, the kind where the air hangs heavy and still, she presented me with a plate of these Avalanche Cookies. The combination of creamy peanut butter, crunchy cereal, and melty chocolate chips was absolute heaven. Each bite was like a mini-celebration, a perfect antidote to the summer heat. They were so good, they quickly became a requested favorite.
Recipe Overview
- Prep Time: 15 minutes
- Cook Time: 0 minutes
- Chill Time: 30 minutes
- Total Time: 45 minutes
- Yields: 18 cookies
- Serves: 18
- Dietary Type: Vegetarian
Ingredients
- ½ cup mini chocolate chips
- 16 ounces vanilla candy coating (Almond Bark or CandiQuik)
- 1 (15 ounce) jar creamy peanut butter
- 2 cups Rice Krispies
- 1 ½ cups mini marshmallows
Equipment Needed
- 2 Cookie Sheets
- Parchment Paper
- Heat-proof Bowl
- Microwave
- Large Bowl
- 2-tablespoon scoop
Instructions
-
Begin by preparing your cookie sheets. Line two cookie sheets with parchment paper and set them aside. This will prevent the cookies from sticking and make cleanup a breeze.
-
Next, place the mini chocolate chips in the freezer until you’re ready to use them. This helps them retain their shape and prevents them from melting completely when you add them to the warm mixture.
-
Now, it’s time to melt the vanilla candy coating. Place the almond bark or CandiQuik in a heat-proof bowl and microwave it at half power for 30 seconds at a time. Stir well between each interval. Continue this process until the candy coating is completely melted and smooth. Be careful not to overheat it, as it can seize up and become difficult to work with.
-
While the candy coating is melting, pour the Rice Krispies into a large bowl and set it aside.
-
Once the vanilla candy coating is melted and smooth, add the creamy peanut butter to the bowl. Stir until the peanut butter is fully incorporated and the mixture is homogenous. The peanut butter adds a rich, nutty flavor and helps bind the cookies together.
-
Pour the vanilla candy and peanut butter mixture over the Rice Krispies in the large bowl. Stir gently but thoroughly to ensure that all the cereal is coated. The mixture should be evenly distributed, giving each cookie a consistent flavor and texture.
-
Allow the mixture to cool to room temperature. This is important, because if the mixture is too hot, the marshmallows will melt completely.
-
Once the mixture has cooled to room temperature, add the mini marshmallows. Mix gently to combine, being careful not to crush the marshmallows. You want them to retain their shape and add a soft, chewy texture to the cookies.
-
Take the frozen chocolate chips out of the freezer. Add them to the mixture and stir gently to combine. The frozen chocolate chips will help cool the mixture and add a nice contrast to the creamy peanut butter and chewy marshmallows.
-
Use a 2-tablespoon scoop to portion out the cookies onto the prepared cookie sheets. Place each scoop of mixture onto the parchment paper, leaving some space between each cookie.
-
Leave the cookies on the cookie sheets until they have firmed up completely. To speed up the process, or if your kitchen is too warm, you can pop the cookie sheets into the fridge. This will help the cookies set more quickly and prevent them from becoming too soft.
Expert Tips & Tricks
- Preventing Seizing: When melting the vanilla candy coating, microwaving at half power in short intervals and stirring frequently is key to preventing it from seizing. If it does seize, try adding a teaspoon of vegetable oil and stirring until smooth.
- Room Temperature is Key: Letting the peanut butter/almond bark mixture cool down before adding the marshmallows is important. If it’s too hot, the marshmallows will dissolve into a sticky mess.
- Chocolate Chip Strategy: Freezing the chocolate chips beforehand helps them maintain their shape and provides a pleasant textural contrast in the finished cookie.
- Peanut Butter Perfection: Using a good quality creamy peanut butter really makes a difference. Avoid peanut butter with a lot of added sugar or stabilizers for the best flavor and texture. Natural peanut butter can be used, but make sure to stir it well before adding it to the melted almond bark, as the oil tends to separate.
- Consistency Considerations: If the mixture seems too wet or sticky, add a bit more Rice Krispies. If it seems too dry, add a touch more melted vanilla candy coating or peanut butter.
Serving & Storage Suggestions
Serve these no-bake Avalanche Cookies chilled or at room temperature. They’re fantastic with a glass of cold milk, a cup of hot coffee, or even a scoop of vanilla ice cream. Store the cookies in an airtight container at room temperature for up to 3 days, in the refrigerator for up to a week, or in the freezer for up to a month. If freezing, wrap the cookies individually in plastic wrap before placing them in a freezer-safe container to prevent freezer burn. To thaw, simply leave them at room temperature for a few minutes until they soften.
Nutritional Information
| Nutrient | Amount per Serving | % Daily Value |
|---|---|---|
| Calories | 335.9 kcal | N/A |
| Calories from Fat | 203 g | 60% |
| Total Fat | 22.6 g | 34% |
| Saturated Fat | 8.5 g | 42% |
| Cholesterol | 5.3 mg | 1% |
| Sodium | 162.4 mg | 6% |
| Total Carbohydrate | 29.1 g | 9% |
| Dietary Fiber | 1.9 g | 7% |
| Sugars | 22.6 g | 90% |
| Protein | 8.4 g | 16% |
Variations & Substitutions
- Chocolate Peanut Butter Avalanche Cookies: Use chocolate almond bark instead of vanilla for an even richer chocolate flavor.
- Nut-Free Avalanche Cookies: Substitute sunflower seed butter or tahini for the peanut butter.
- Gluten-Free Avalanche Cookies: Ensure you use gluten-free Rice Krispies.
- Festive Avalanche Cookies: Add red and green sprinkles for a Christmas-themed treat or pastel sprinkles for Easter.
- Caramel Avalanche Cookies: Drizzle melted caramel over the finished cookies for an extra layer of sweetness.
FAQs (Frequently Asked Questions)
Q: Can I use regular chocolate chips instead of mini chocolate chips?
A: While you can, mini chocolate chips are preferred because they distribute more evenly throughout the mixture and freeze quicker.
Q: My candy coating seized up while melting. What do I do?
A: Try adding a teaspoon of vegetable oil or shortening and stirring vigorously. This can sometimes help to smooth it out. Be sure to melt it at half power in short bursts from now on.
Q: Can I use a different kind of cereal instead of Rice Krispies?
A: Yes, you can experiment with other crispy cereals like Corn Flakes or Crispix, but Rice Krispies provide the best light and airy texture.
Q: Do I have to freeze the chocolate chips?
A: Freezing the chocolate chips is highly recommended to prevent them from melting completely when mixed into the warm peanut butter and candy coating mixture.
Q: How do I store these cookies to keep them fresh?
A: Store them in an airtight container at room temperature for up to 3 days, in the refrigerator for up to a week, or in the freezer for up to a month.
Final Thoughts
These No-Bake Avalanche Cookies are a delightful trip down memory lane, a perfect blend of textures and flavors that will satisfy any sweet tooth. They’re incredibly easy to make, requiring no baking and minimal effort. They’re perfect for a quick dessert, a party treat, or a fun activity to do with kids. So, gather your ingredients, get in the kitchen, and whip up a batch of these irresistible cookies. I’m sure you and your loved ones will enjoy them as much as I always have! Don’t hesitate to get creative with variations and substitutions to make them your own. Happy cooking!