
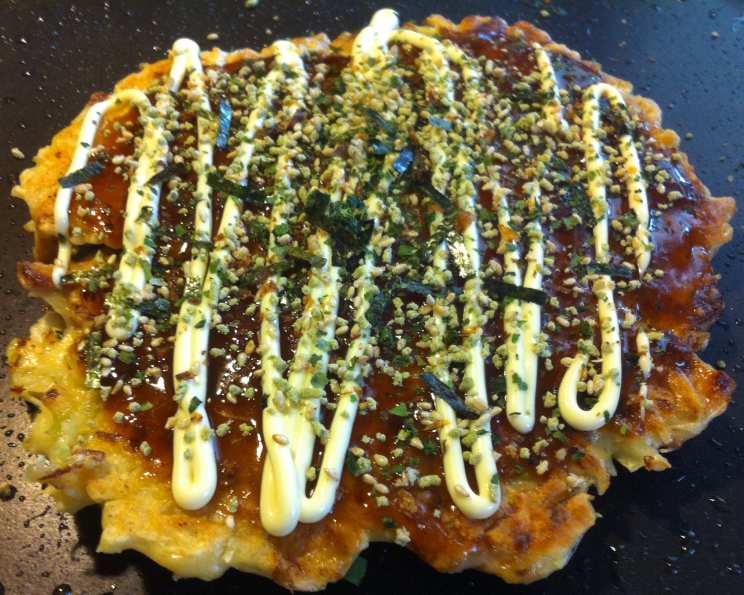
Okonomiyaki: A Taste of Japan on Your Griddle
The first time I encountered okonomiyaki, I was wandering through the vibrant Dotonbori district of Osaka. The air was thick with the savory aroma of sizzling batter, and the sight of chefs expertly flipping these golden-brown discs on massive griddles was mesmerizing. I remember the explosion of flavors – the sweetness of the sauce, the umami of the bonito flakes, and the satisfying crunch of the cabbage. It was a culinary experience that instantly transported me, and I’ve been chasing that perfect okonomiyaki ever since.
Recipe Overview
- Prep Time: 20 minutes
- Cook Time: 20 minutes
- Total Time: 40 minutes
- Servings: 4
- Yield: 4 griddle cakes
- Dietary Type: Vegetarian (easily adaptable to vegan)
Ingredients
- 1 cup all-purpose flour (or okonomiyaki flour, if you can find it)
- ¾ cup water (or dashi stock, if preferred)
- 3 eggs
- 10 large cabbage leaves, chopped (or 500g cabbage)
- 2 green onions, chopped
- 1 ½ tablespoons vegetable oil
- ½ cup okonomi sauce
- 8 ounces sliced mushrooms
- ¼ cup Japanese mayonnaise
- 2 tablespoons nori flakes
- 2 tablespoons bonito flakes
- 1 tablespoon tempura batter (cooked and crumbled)
Equipment Needed
- Medium-size mixing bowl
- Whisk or fork
- Griddle, hot plate, or large skillet
- Spatula
- Serving plates
Instructions
- In a medium-size bowl, mix the flour with the water. Whisk until just combined. Be careful not to overmix. A few lumps are perfectly fine. If using dashi stock, it will add a wonderful umami depth to the batter.
- Stir the eggs into the batter, ensuring they are fully incorporated.
- Next, add the chopped cabbage and green onions to the batter. Gently fold them in until they are evenly distributed. The batter should be thick enough to coat the vegetables.
- Heat the vegetable oil on a griddle, hot plate, or in a large skillet over medium-low heat. Make sure the surface is evenly heated to prevent uneven cooking.
- Pour enough batter onto the heated surface to make a single serving griddle cake, about 6 inches across and ½ inch thick. Repeat for three more servings, as space allows. It’s important not to overcrowd the cooking surface.
- Cook both sides of the griddle cakes on medium-low heat until golden brown, about 5 minutes per side. Use a spatula to carefully flip the okonomiyaki. The cakes should be cooked through and slightly firm to the touch. To check for doneness, insert a toothpick into the center; it should come out clean.
- Move each griddle cake to a serving plate and immediately spread ¼ cup of okonomi sauce over the top of each one. The heat from the cake will help the sauce spread evenly and create a beautiful glaze.
- Top the griddle cakes evenly with the remaining ingredients: sliced mushrooms, Japanese mayonnaise, nori flakes, bonito flakes, and crumbled tempura batter. Arrange them attractively for a delightful presentation.
Expert Tips & Tricks
- Don’t overmix the batter. Overmixing develops the gluten in the flour, resulting in a tough okonomiyaki. A few lumps are perfectly acceptable.
- Use a non-stick surface. This will prevent the okonomiyaki from sticking and make flipping easier. If you don’t have a non-stick surface, make sure to use enough oil.
- Control the heat. Cooking the okonomiyaki on medium-low heat ensures that the inside cooks through without burning the outside. Be patient and allow the flavors to develop slowly.
- Customize your toppings. Okonomiyaki is all about personalization. Feel free to add other vegetables like carrots, bean sprouts, or spinach. You can also add cooked meats like bacon, shrimp, or chicken (though this recipe aims for a vegetarian version).
- Make the batter ahead of time. The batter can be made up to 24 hours in advance and stored in the refrigerator. This allows the flavors to meld and develop.
- For a vegan version, substitute the eggs with a flax egg (1 tablespoon ground flaxseed meal mixed with 3 tablespoons water, let sit for 5 minutes). Ensure the mayonnaise is vegan.
Serving & Storage Suggestions
Serve your okonomiyaki immediately after cooking for the best flavor and texture. The warm cake, savory sauce, and fresh toppings create a delightful experience. If you have leftovers, store them in an airtight container in the refrigerator for up to 3 days. To reheat, you can microwave them for a few minutes, but the texture will be softer. For a crispier result, reheat them in a skillet over medium heat with a little oil. I don’t recommend freezing okonomiyaki as the texture will change significantly.
Nutritional Information
| Nutrient | Amount per Serving | % Daily Value |
|---|---|---|
| Calories | 320 kcal | 16% |
| Total Fat | 18g | 28% |
| Saturated Fat | 3g | 15% |
| Cholesterol | 110mg | 37% |
| Sodium | 350mg | 15% |
| Total Carbohydrate | 35g | 12% |
| Dietary Fiber | 4g | 16% |
| Sugars | 8g | – |
| Protein | 10g | 20% |
Note: Nutritional information is an estimate and may vary based on specific ingredients and portion sizes.
Variations & Substitutions
- Gluten-Free Okonomiyaki: Use a gluten-free flour blend instead of all-purpose flour. Be sure to check that the okonomi sauce is also gluten-free.
- Spicy Okonomiyaki: Add a dash of chili flakes or a drizzle of sriracha to the batter for a kick of heat.
- Kimchi Okonomiyaki: Mix in some chopped kimchi for a tangy and spicy Korean-inspired twist.
- Seasonal Vegetables: Experiment with different seasonal vegetables. In the fall, try adding shredded sweet potato or butternut squash. In the spring, asparagus or fiddleheads would be delicious.
- Dashi Alternative: If you don’t have dashi stock, you can use vegetable broth or even just plain water with a pinch of mushroom powder for added umami.
FAQs (Frequently Asked Questions)
Q: Can I make okonomiyaki without okonomi sauce?
A: While okonomi sauce is a key ingredient, you can substitute it with a mixture of Worcestershire sauce, ketchup, and a touch of soy sauce. It won’t be exactly the same, but it will provide a similar sweet and savory flavor.
Q: How do I prevent the okonomiyaki from sticking to the griddle?
A: Make sure your griddle or skillet is well-seasoned and properly heated before adding the batter. Using a non-stick surface and enough oil will also help prevent sticking.
Q: Can I add meat to this vegetarian recipe?
A: Absolutely! Cooked bacon, shrimp, chicken, or pork belly are all popular additions to okonomiyaki. Just make sure they are cooked before adding them to the batter.
Q: Is it possible to freeze okonomiyaki batter?
A: While it’s possible, freezing the batter is not recommended as it can affect the texture and consistency after thawing. It’s best to use the batter fresh for optimal results.
Q: How do I keep the okonomiyaki warm if I’m making a large batch?
A: You can keep cooked okonomiyaki warm in a preheated oven at a low temperature (around 200°F) until ready to serve. Just be careful not to dry them out.
Final Thoughts
Okonomiyaki is more than just a recipe; it’s an experience. It’s a canvas for your culinary creativity, a celebration of flavors and textures, and a delicious way to bring a taste of Japan into your own kitchen. So, gather your ingredients, fire up your griddle, and get ready to create your own masterpiece. Don’t be afraid to experiment with different toppings and variations, and most importantly, have fun! Once you’ve perfected your okonomiyaki, consider pairing it with a refreshing glass of Japanese beer or a crisp cucumber salad for a complete and satisfying meal. Share your creations and feedback – I’d love to see how you make this recipe your own!