
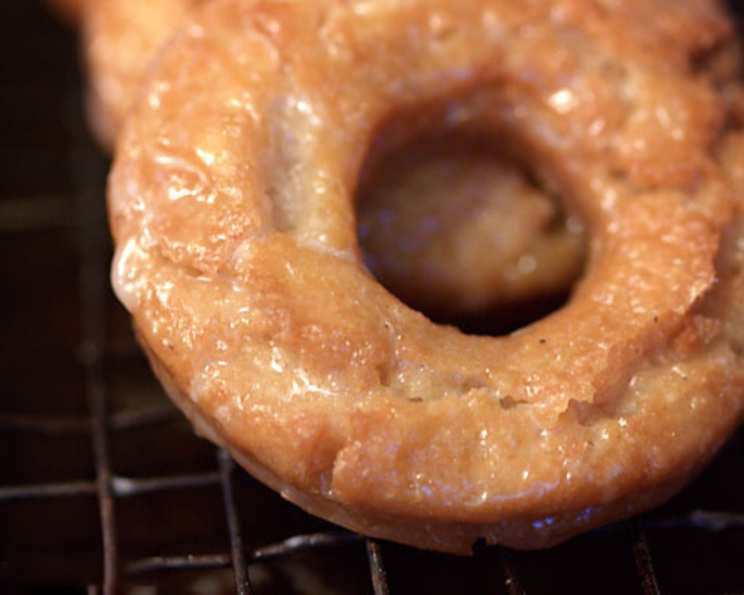
Old Fashioned Sour Cream Donuts: A Taste of Nostalgia
The scent of frying dough mingled with sweet glaze always takes me back to my grandmother’s kitchen. Sunlight streamed through the window, illuminating a flurry of activity as she rolled and cut the dough with practiced ease. These weren’t just any donuts; they were her Old Fashioned Sour Cream Donuts, a family recipe passed down through generations. Each bite was a little piece of love, and I can still taste the melt-in-your-mouth tenderness and the comforting tang of sour cream that made them so special.
Recipe Overview
- Prep Time: 20 minutes
- Cook Time: 10-15 minutes
- Total Time: 1 hour 30 minutes (includes chilling)
- Servings: 6
- Yield: 6 donuts
- Dietary Type: Not Gluten-Free
Ingredients
- 1 1⁄8 cups cake flour
- 3⁄4 teaspoon baking powder
- 1⁄2 teaspoon salt
- 1⁄4 – 1⁄2 teaspoon ground nutmeg (adjust to your preference)
- 1⁄4 cup sugar
- 1 tablespoon shortening or 1 tablespoon vegetable lard, trans-fat-free preferred
- 1 large egg yolk
- 1⁄3 cup sour cream
- Canola oil (for frying)
For the Glaze:
- 1 3⁄4 cups confectioners’ sugar
- 3⁄4 teaspoon light corn syrup
- 1⁄8 teaspoon salt
- 1⁄4 teaspoon vanilla extract
- 3 tablespoons hot water (plus more if needed)
Equipment Needed
- Medium size bowl
- Mixing bowl
- Biscuit cutter or glass
- Smaller cutter or pill bottle (for donut holes)
- Candy thermometer
- Wire rack or paper towels
- Deep pot or fryer
Instructions
-
In a medium-size bowl, sift together the cake flour, baking powder, salt, and nutmeg. This ensures a light and airy texture, preventing lumps in your dough. Set aside this dry ingredient mixture.
-
In another bowl, mix together the sugar, shortening (or vegetable lard), and egg yolk until well combined. The mixture should be light and creamy. This is your wet ingredient base.
-
Now, it’s time to combine the wet and dry ingredients. Add the dry ingredients to the wet ingredients in three additions. After each addition, stir well to incorporate. This gradual incorporation prevents overmixing, which can lead to tough donuts.
-
Once the dough is formed, cover it and refrigerate for at least one hour. This chilling period is crucial as it allows the gluten to relax, making the dough easier to handle and resulting in a more tender donut.
-
After chilling, flour your work surface lightly. Roll the dough out to approximately 1/2 inch thickness. Aim for consistent thickness for even cooking.
-
Using a biscuit cutter or a glass (about 3 inches in diameter), cut out the donuts. Then, use a smaller cutter (or even a clean pill bottle) to cut out the donut holes. Don’t discard the donut holes – they’re delicious little treats when fried and glazed!
-
Pour canola oil into a deep pot or fryer, filling it to a depth of about 2 inches. Heat the oil over low-medium heat until it reaches 325°F (160°C). Use a candy thermometer to monitor the temperature accurately.
-
Warning: Once you start heating the oil, DO NOT LEAVE IT UNATTENDED! Hot oil can be extremely dangerous.
-
Gently place the donuts into the hot oil, being careful not to overcrowd the pot. Fry for about 2-3 minutes per side, or until they are golden brown. The exact time will depend on the oil temperature and the thickness of your donuts.
-
Once browned, remove the donuts from the oil and place them on a wire rack or paper towels to drain excess oil. This step is important to prevent greasy donuts.
-
While the donuts are cooling slightly, prepare the glaze. In a bowl, mix together the confectioners’ sugar, light corn syrup, salt, and vanilla extract.
-
Add the hot water gradually, starting with 3 tablespoons, until you reach your desired glaze consistency. If you prefer a thinner glaze, add more hot water, a teaspoon at a time, until you achieve the perfect consistency.
-
Dip the warm donuts into the glaze, coating them completely. Place the glazed donuts back on the wire rack and allow the glaze to set for a few minutes before serving.
Expert Tips & Tricks
- Cake Flour is Key: Using cake flour is crucial for achieving the light and tender texture characteristic of these donuts. All-purpose flour can be used in a pinch, but the texture will be denser.
- Temperature Control: Maintaining a consistent oil temperature of 325°F is essential for even cooking. If the oil is too hot, the donuts will brown too quickly on the outside while remaining raw inside. If it’s too cool, they will absorb too much oil and become greasy.
- Donut Hole Revival: Don’t throw away your donut holes. Fry them up for a quick and tasty treat!
- Add Zest: For a citrusy twist, add a teaspoon of lemon or orange zest to the dough.
Serving & Storage Suggestions
These Old Fashioned Sour Cream Donuts are best enjoyed warm and fresh, shortly after glazing. They are a delightful treat with a cup of coffee or tea.
Storage:
- Room Temperature: Store leftover donuts in an airtight container at room temperature for up to 2 days.
- Freezer: For longer storage, freeze the unglazed donuts. Wrap them individually in plastic wrap and then place them in a freezer bag. They can be stored in the freezer for up to 2 months. Thaw completely before glazing and serving.
Nutritional Information
(Estimated per donut, without glaze)
| Nutrient | Amount per Serving | % Daily Value |
|---|---|---|
| Calories | 250 kcal | 13% |
| Total Fat | 12g | 18% |
| Saturated Fat | 6g | 30% |
| Cholesterol | 50mg | 17% |
| Sodium | 200mg | 9% |
| Total Carbohydrate | 30g | 10% |
| Dietary Fiber | 1g | 4% |
| Sugars | 5g | |
| Protein | 3g | 6% |
Note: Nutritional information is an estimate and may vary based on specific ingredients and portion sizes.
Variations & Substitutions
- Spiced Donuts: Enhance the flavor by adding a pinch of cinnamon, cardamom, or ginger to the dry ingredients.
- Chocolate Glaze: For a chocolatey treat, replace the vanilla extract in the glaze with chocolate extract, or add 2 tablespoons of cocoa powder to the confectioners’ sugar.
- Maple Glaze: Substitute maple syrup for the corn syrup in the glaze for a rich, maple flavor.
- Dairy-Free Option: Substitute the sour cream with a plant-based sour cream alternative.
FAQs (Frequently Asked Questions)
Q: Why do I need to refrigerate the dough?
A: Refrigerating the dough allows the gluten to relax, resulting in a more tender donut. It also makes the dough easier to handle when rolling and cutting.
Q: Can I bake these donuts instead of frying them?
A: While these donuts are traditionally fried, you can try baking them at 350°F (175°C) for about 15-20 minutes. However, the texture will be different; they will be more cake-like and less crispy than fried donuts.
Q: How do I know when the oil is hot enough?
A: The best way to ensure the oil is at the correct temperature is to use a candy thermometer. Aim for 325°F (160°C). If you don’t have a thermometer, you can test the oil by dropping a small piece of dough into it. If the dough sizzles and turns golden brown in about 1 minute, the oil is ready.
Q: My donuts are greasy. What did I do wrong?
A: Greasy donuts are usually a result of the oil not being hot enough. Ensure the oil is at 325°F (160°C) before frying. Also, avoid overcrowding the pot, as this can lower the oil temperature.
Q: Can I make the dough ahead of time?
A: Yes, you can make the dough a day or two in advance. Store it in the refrigerator, well-covered, until you’re ready to roll and cut the donuts.
Final Thoughts
These Old Fashioned Sour Cream Donuts are more than just a recipe; they’re a piece of history, a taste of nostalgia, and a reminder of simpler times. Don’t be intimidated by the frying process; with a little patience and attention to detail, you’ll be rewarded with melt-in-your-mouth donuts that will impress your friends and family. So, gather your ingredients, put on some music, and get ready to create a batch of these delightful treats. I encourage you to try this recipe and share your feedback! Perhaps pair them with a hot cup of coffee for the perfect comforting indulgence.