
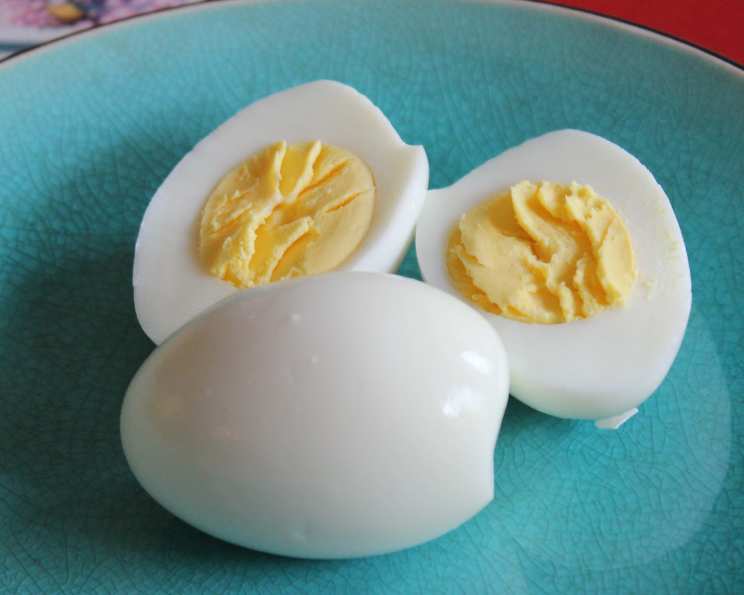
The Foolproof Method for Perfect Hard Boiled Eggs
I’ll never forget my first attempts at making hard boiled eggs. They were either chalky and dry with that dreaded green ring, or tragically undercooked with a runny yolk that made them impossible to peel. I spent years experimenting with different methods, adjusting times, and always ending up with inconsistent results. But then, I stumbled upon a simple technique that changed everything. No more guesswork, no more disappointments – just consistently perfect, creamy-yolked eggs every single time. This is the only method I use now, and I’m so excited to share it with you.
Recipe Overview
- Prep Time: 2 minutes
- Cook Time: 13 minutes
- Total Time: 15 minutes
- Servings: 12
- Yield: 12 eggs
- Dietary Type: Gluten-Free, Dairy-Free
Ingredients
- 12 large eggs
- 1 pinch salt
Equipment Needed
- Large pot
- Lid for pot
- Ice water bath (bowl filled with ice and water)
Instructions
-
Place the eggs in a large pot. Make sure they are arranged in a single layer as much as possible. If you need to stack them slightly, that’s okay, but avoid overcrowding the pot.
-
Cover the eggs with cold water. Ensure there is at least 1 inch of water above the eggs. This ensures even cooking.
-
Add a pinch of salt to the water. Some believe the salt helps prevent cracking and makes the eggs easier to peel, although the science isn’t definitive. It doesn’t hurt!
-
Turn on the heat to medium-high and heat the pot, uncovered, until the water comes to a boil.
-
If you have more than a single layer of eggs, gently stir them occasionally as they heat up. This helps ensure even cooking. Be careful not to crack the eggs!
-
Once the water reaches a rolling boil, start the timer and let it boil for exactly 2 minutes. Don’t be tempted to boil longer!
-
Remove the pot from the heat and immediately cover it with a lid.
-
Let the eggs sit, covered, in the hot water for 11 minutes. This residual cooking gently sets the yolks without overcooking them. For jumbo eggs, add 1-2 minutes to the soaking time.
-
After 11 minutes, carefully drain the hot water from the pot.
-
Immediately transfer the eggs to an ice water bath and let them cool for at least 2 minutes. This stops the cooking process and helps prevent the green ring from forming around the yolk. The ice bath also makes the eggs easier to peel.
Expert Tips & Tricks
-
Egg Freshness Matters: Older eggs tend to peel easier than very fresh eggs. If you’re planning to make deviled eggs, using eggs that are a week or two old will make the peeling process much smoother.
-
Prevent Cracking: Bringing the eggs to room temperature before cooking can help prevent cracking. However, this method is designed to work even with cold eggs straight from the refrigerator. The key is to avoid rapid temperature changes.
-
The Secret to Easy Peeling: The ice bath is crucial for easy peeling. The cold water causes the egg white to contract, separating it from the shell membrane. Gently tap the egg all over to create small cracks, then peel under cold running water.
-
Perfect Yolks: Adjust the soaking time slightly based on your altitude and preferred yolk consistency. If you live at a high altitude, you may need to add a minute or two to the soaking time.
-
Troubleshooting Green Yolks: If you still occasionally get a slight green ring around the yolk, it’s a sign of slight overcooking. Reduce the soaking time by a minute or two in future batches.
Serving & Storage Suggestions
Hard boiled eggs are incredibly versatile! Serve them sliced on salads, mashed into egg salad sandwiches, or deviled for parties. They are also a great protein-packed snack on their own.
-
Room Temperature: Hard boiled eggs should not be left at room temperature for more than 2 hours.
-
Refrigeration: Properly cooked and cooled hard boiled eggs can be stored in the refrigerator for up to one week. It’s best to store them unpeeled to maintain their moisture.
-
Freezing: Freezing hard boiled eggs is not recommended, as the texture of the whites becomes rubbery and unpleasant.
Nutritional Information
| Nutrient | Amount per Serving | % Daily Value |
|---|---|---|
| Calories | 71.5 kcal | N/A |
| Calories from Fat | 42 kcal | N/A |
| Total Fat | 4.8 g | 7% |
| Saturated Fat | 1.6 g | 7% |
| Cholesterol | 186 mg | 62% |
| Sodium | 83.9 mg | 3% |
| Total Carbohydrate | 0.4 g | 0% |
| Dietary Fiber | 0 g | 0% |
| Sugars | 0.2 g | 0% |
| Protein | 6.3 g | 12% |
Variations & Substitutions
-
Deviled Egg Variations: Get creative with your deviled eggs! Add smoked paprika, curry powder, or hot sauce for a flavor kick.
-
Pickled Eggs: Transform hard boiled eggs into pickled eggs by soaking them in a brine of vinegar, sugar, and spices.
-
Egg Salad Sandwich Twists: Add avocado, bacon, or chives to your egg salad for extra flavor and texture.
-
Scotch Eggs: Use hard boiled eggs as the base for Scotch eggs, wrapping them in sausage meat, breading them, and frying them.
FAQs (Frequently Asked Questions)
Q: Why do my hard boiled eggs sometimes have a green ring around the yolk?
A: The green ring is caused by a chemical reaction between sulfur and iron that occurs when eggs are overcooked. This method helps prevent it by carefully controlling the cooking time and using an ice bath.
Q: How can I tell if my hard boiled eggs are cooked properly?
A: With this method, following the times exactly will give you consistently perfect results. If you’re unsure, cut one egg in half to check the yolk. It should be firm but still creamy.
Q: Why do some eggs peel easier than others?
A: The age of the egg plays a role. Older eggs tend to peel easier because the air cell between the shell and the membrane has had time to expand.
Q: Can I use this method for different sizes of eggs?
A: Yes, but you may need to adjust the soaking time. For jumbo eggs, add 1-2 minutes to the soaking time. For smaller eggs, you may need to reduce it by a minute.
Q: What if my eggs crack while cooking?
A: Cracking can happen, but adding salt to the water may help minimize it. If an egg cracks, it’s still safe to eat, but it may not look as pretty.
Final Thoughts
Armed with this foolproof technique, you’ll never struggle with hard boiled eggs again. The creamy yolks, easy peeling, and consistent results will make you a hard boiled egg master! Try this method and share your creations with friends and family. Pair them with a fresh green salad for a light lunch, or whip up a batch of deviled eggs for your next party. Enjoy!