
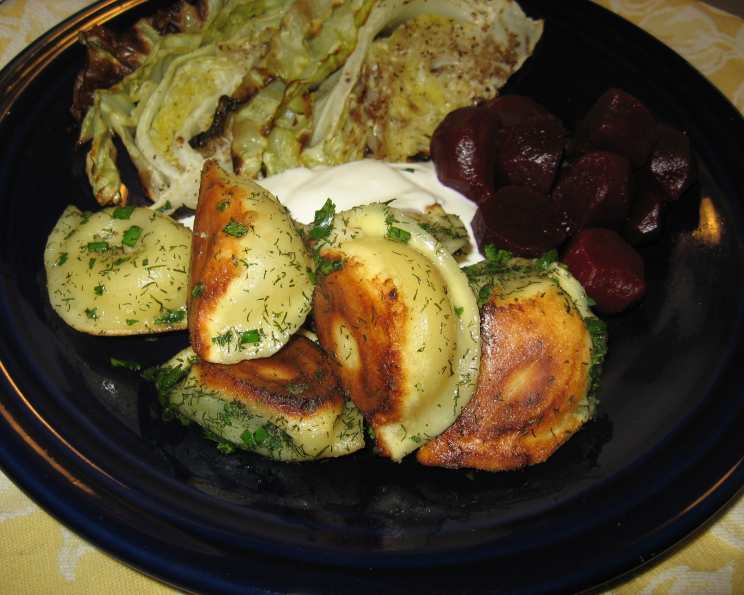
Pierogies Pot Stickers With Herbs and Sour Cream
The scent of browned butter always transports me back to my grandmother’s kitchen. She wasn’t a fancy chef, but she had a knack for making simple things taste extraordinary. I remember her standing over the stove, carefully coaxing frozen pierogies to a golden crisp, the aroma mingling with the dill and chives she’d snipped fresh from her garden. It wasn’t just the taste; it was the love she poured into every bite, a love I try to replicate in my own cooking. This recipe is a delicious nod to those cherished memories.
Recipe Overview
- Prep Time: 5 minutes
- Cook Time: 15 minutes
- Total Time: 20 minutes
- Servings: 4
- Yields: About 12 pierogies
- Dietary Type: Vegetarian (can be made gluten-free with gluten-free pierogies)
Ingredients
- 3 tablespoons butter, softened
- 1 lb frozen potato pierogi, any kind
- 1 cup water
- Salt and pepper to taste
- 2 tablespoons fresh dill, chopped, or 2 teaspoons dried dill leaves
- 2 tablespoons fresh chives, chopped
- 2 tablespoons fresh flat-leaf parsley, chopped
- 1 cup sour cream, for serving
Equipment Needed
- Large skillet with lid
- Knife
- Cutting board
- Measuring cups and spoons
Instructions
- Begin by coating the bottom of your skillet generously with the softened butter. Ensure the entire surface is covered, as this will prevent sticking and promote even browning.
- Arrange the frozen pierogies in the skillet in a single layer. Avoid overcrowding the pan; this will steam the pierogies instead of allowing them to crisp up properly. If necessary, cook in batches.
- Pour 1 cup of water into the skillet.
- Cover the pan with a lid and place it over medium-high heat. The steam from the water will help to cook the pierogies through.
- Cook, covered, for approximately 8 minutes. The pierogies should be heated through and slightly softened.
- Remove the lid from the skillet. At this point, there will likely be some remaining liquid in the pan.
- Continue cooking over medium-high heat, allowing any remaining liquid to evaporate completely. This is crucial for achieving the desired crispy texture.
- As the liquid evaporates, let the pierogies stick to the pan and begin to brown in the butter. This is where the magic happens! The butter will caramelize, creating a delicious, crispy crust on the bottom of each pierogi.
- This browning process usually takes at least 5 minutes, but it can vary depending on your stove and pan. To check if a pierogi is ready, gently nudge it with a spatula. If it doesn’t move easily, it needs more time to brown. Be patient, and don’t rush this step!
- Once the pierogies are beautifully browned and crisp, remove the skillet from the heat.
- Add the chopped fresh dill, chives, and parsley to the skillet.
- Season with salt and pepper to taste.
- Gently turn the pierogies in the pan to coat them evenly with the herbs and seasonings. This will infuse them with a burst of fresh flavor.
- Serve the crispy pierogies immediately with a generous dollop of sour cream on the side for dipping.
Note: If you are using a smaller pan and need to cook the pierogies in multiple batches, it’s best to wipe out the “old” butter from the pan and recoat with fresh butter before starting the second batch. This ensures that each batch has enough butter to brown properly.
Expert Tips & Tricks
- Don’t be afraid to let the pierogies stick to the pan! That’s how you get the crispy, browned texture we’re after. Just keep a close eye on them to prevent burning.
- Use a cast iron skillet for the best results. Cast iron distributes heat evenly, which helps to create a consistent crust on the pierogies.
- Experiment with different herbs. While dill, chives, and parsley are a classic combination, you can also try other herbs like thyme, oregano, or rosemary.
- For extra flavor, add a clove of minced garlic to the butter while it’s melting.
- If you don’t have fresh herbs, dried herbs will work in a pinch. Just use about half the amount.
- To ensure the pierogies cook evenly, make sure they are not touching each other in the pan. If necessary, cook in batches.
Serving & Storage Suggestions
Serve these crispy pierogies immediately while they are still hot and crispy. They make a delicious appetizer, side dish, or even a light meal. The sour cream adds a cool, tangy contrast to the rich, buttery flavor of the pierogies.
Leftover pierogies can be stored in an airtight container in the refrigerator for up to 3 days. To reheat, you can pan-fry them in a little butter until crispy, or microwave them until heated through (although they will lose some of their crispiness).
Freezing is not recommended, as the texture of the pierogies may change.
Nutritional Information
| Nutrient | Amount per Serving | % Daily Value |
|---|---|---|
| Calories | 350 kcal | 18% |
| Total Fat | 20g | 31% |
| Saturated Fat | 13g | 65% |
| Cholesterol | 60mg | 20% |
| Sodium | 300mg | 13% |
| Total Carbohydrate | 30g | 11% |
| Dietary Fiber | 2g | 7% |
| Sugars | 4g | |
| Protein | 7g | 14% |
Nutritional information is an estimate and may vary based on specific ingredients and cooking methods.
Variations & Substitutions
- Gluten-Free: Use gluten-free pierogies to make this recipe gluten-free.
- Vegan: Use vegan butter, vegan sour cream, and vegan pierogies (check the ingredients carefully).
- Spicy: Add a pinch of crushed red pepper flakes to the butter while it’s melting for a touch of heat.
- Cheesy: Sprinkle some grated Parmesan cheese over the pierogies during the last minute of cooking.
- Different Fillings: Experiment with different pierogi fillings, such as cheese, sauerkraut, or meat.
- Sour Cream Alternatives: If you don’t have sour cream, you can use plain Greek yogurt or crème fraîche as a substitute.
- Herb Variations: Use other fresh herbs like thyme, rosemary, or basil for a different flavor profile.
- Garlic lovers: Add 1 minced garlic clove to the butter while it melts.
FAQs (Frequently Asked Questions)
Q: Can I use any kind of frozen pierogies for this recipe?
A: Yes, you can use any kind of frozen pierogies, but potato pierogies are the most common and work best with this recipe.
Q: How do I know when the pierogies are crispy enough?
A: The pierogies should be golden brown and slightly firm to the touch. They should also release easily from the pan when nudged with a spatula.
Q: Can I make this recipe ahead of time?
A: It’s best to serve these pierogies immediately for the best texture. However, you can chop the herbs and have the sour cream ready in advance to save time.
Q: What if my pierogies are burning before they get crispy?
A: Reduce the heat to medium and continue cooking, checking frequently to prevent burning. You can also add a little more butter to the pan if needed.
Q: Can I add onions to this recipe?
A: Absolutely! Sauté some sliced onions in the butter before adding the pierogies for extra flavor.
Final Thoughts
I hope you enjoy this simple yet satisfying recipe for Pierogies Pot Stickers with Herbs and Sour Cream! It’s a fantastic way to elevate frozen pierogies and create a flavorful snack or side dish. Feel free to experiment with different herbs and seasonings to create your own unique twist. Share your creations and feedback – I’d love to hear how they turn out! These pierogies pair perfectly with a crisp salad or a light soup for a complete and comforting meal.