
Pink Polka Dot Cookies (Gift Mix in a Jar)
The scent of vanilla always whisks me back to childhood, perched on a stool in my grandmother’s kitchen. She’d let me “help” her bake, mostly by sneaking spoonfuls of cookie dough and leaving polka dots of flour on everything I touched. These Pink Polka Dot Cookies in a jar are a nostalgic nod to those cherished moments, a way to share the joy of baking and the warmth of homemade treats with friends and family. The best part? They taste even better than the memories!
Recipe Overview
- Prep Time: 15 minutes
- Cook Time: 9-11 minutes
- Total Time: 24-26 minutes
- Yields: 3 dozen cookies
- Serves: 18
- Dietary Type: Vegetarian
Ingredients
JAR Ingredients:
- 2 cups flour
- ½ teaspoon salt
- ½ teaspoon baking soda
- ½ cup sugar
- ½ cup brown sugar, packed
- 1 cup white chocolate chips
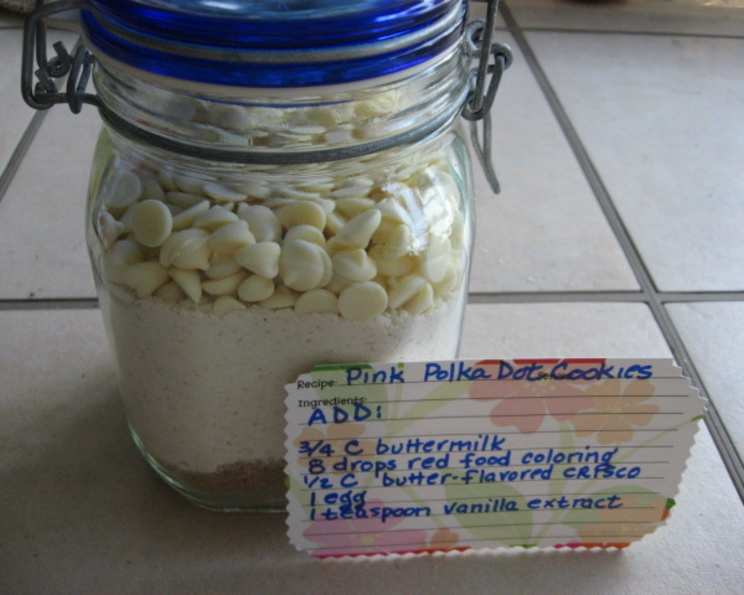
ADDITIONAL INGREDIENTS (to be added by the recipient):
- ¾ cup buttermilk
- 8 drops red food coloring
- ½ cup solid butter flavor shortening (Crisco)
- 1 egg
- 1 teaspoon vanilla extract
Equipment Needed
- 1-quart wide-mouth canning jar
- Flat-bottomed object for packing (measuring cup, etc.)
- Large mixing bowl
- Measuring cups and spoons
- Baking sheet
- Wire rack
Instructions
-
Begin by ensuring your 1-quart wide-mouth canning jar is scrupulously clean and completely dry. Any moisture can compromise the ingredients’ shelf life.
-
Now, the fun begins! We’ll layer the dry ingredients in the jar, creating a visually appealing gift. Start with the flour, followed by the salt, and then the baking soda. Press down firmly with a flat-bottomed object, such as a measuring cup, after each addition. This compacts the layers, preventing settling and ensuring everything fits snugly. Aim for level layers – aesthetics matter!
-
Next, add the sugar, pressing firmly again to maintain distinct layers. Follow with the packed brown sugar. Remember to pack the brown sugar tightly in your measuring cup before adding it to the jar for accurate measurement.
-
Finally, top the jar with the white chocolate chips. Give it one last firm press to ensure everything is compact and secure.
-
Secure the lid tightly on the jar. Now it’s time to decorate it! Get creative with ribbons, fabric scraps, or personalized labels. Don’t forget to attach the instructions (found below) for making the cookies. A handwritten recipe card adds a personal touch.
-
Instructions for the Recipient: These are the instructions that need to be attached to the jar or written on a card for the recipient.
-
Preheat the oven to 400°F (200°C). Ensure your oven is properly preheated for even baking.
-
In a large bowl, first mix the buttermilk with the red food coloring. Stir until the color is uniformly distributed.
-
Then, beat in the solid butter-flavored shortening, egg, and vanilla extract. Mix until well combined and smooth.
-
Gradually add the contents of the jar to the wet ingredients. Stir until just combined. Be careful not to overmix, as this can result in tough cookies.
-
Drop the dough by heaping teaspoonfuls onto an ungreased baking sheet, spacing the cookies about 2 inches apart. This spacing allows the cookies to spread evenly without sticking together.
-
Bake for 9-11 minutes, or until the edges are light brown in color. Keep a close eye on the cookies, as baking times may vary depending on your oven.
-
Allow the cookies to cool for 3 minutes on the baking sheet before transferring them to wire racks to cool completely. This prevents the cookies from breaking apart while still warm.
-
Serve immediately or store in an airtight container for up to 10 days.
Expert Tips & Tricks
- For a festive touch, use different colors of food coloring. Consider using green for Christmas or pastel shades for Easter.
- If you don’t have buttermilk, you can make a quick substitute by adding 1 tablespoon of white vinegar or lemon juice to a liquid measuring cup, then filling it with milk to reach ¾ cup. Let it stand for 5 minutes before using.
- If you prefer a richer flavor, use melted butter instead of shortening. Just be sure to let the melted butter cool slightly before adding it to the wet ingredients to prevent cooking the egg.
- For even more flavor, add a pinch of cinnamon or nutmeg to the dry ingredients in the jar.
- To prevent the cookies from spreading too much, chill the dough for 30 minutes before baking.
- You can also add sprinkles or other decorations to the tops of the cookies before baking for a fun, festive look.
Serving & Storage Suggestions
These Pink Polka Dot Cookies are best enjoyed fresh, but they can be stored in an airtight container at room temperature for up to 10 days. To keep them soft, add a slice of bread to the container. They can also be frozen for up to 2 months. Thaw them at room temperature before serving. Serve the cookies with a glass of cold milk, a cup of hot cocoa, or alongside a scoop of vanilla ice cream for a delightful treat. They make a wonderful addition to any dessert platter or party spread.
Nutritional Information
| Nutrient | Amount per Serving | % Daily Value |
|---|---|---|
| Calories | 205.2 kcal | N/A |
| Calories from Fat | N/A | N/A |
| Total Fat | 9.2 g | 14% |
| Saturated Fat | 3.4 g | 17% |
| Cholesterol | 13.5 mg | 4% |
| Sodium | 125.3 mg | 5% |
| Total Carbohydrate | 28.2 g | 9% |
| Dietary Fiber | 0.4 g | 1% |
| Sugars | 17.6 g | N/A |
| Protein | 2.7 g | 5% |
Note: Nutritional information is an estimate and may vary based on specific ingredients and preparation methods.
Variations & Substitutions
- Gluten-Free: Substitute the all-purpose flour with a gluten-free blend. Be sure to use a blend that contains xanthan gum or add it separately (about 1 teaspoon per cup of flour) to provide structure to the cookies.
- Dairy-Free: Replace the buttermilk with a non-dairy alternative, such as almond milk or soy milk mixed with 1 tablespoon of lemon juice or vinegar. Ensure the white chocolate chips are also dairy-free.
- Vegan: In addition to substituting the buttermilk and white chocolate chips, use a flax egg or other egg substitute in place of the egg.
- Flavor Variations: Add a teaspoon of lemon zest or orange zest to the dry ingredients for a citrusy twist. You can also experiment with different extracts, such as almond or peppermint.
FAQs (Frequently Asked Questions)
Q: How do I ensure the layers in the jar stay separate?
A: The key is to press firmly after each layer with a flat-bottomed object. This compacts the ingredients and prevents them from mixing during transport.
Q: Can I use regular sugar instead of brown sugar?
A: While you can, the brown sugar adds a depth of flavor and a chewy texture that is characteristic of these cookies. If you substitute, the cookies may be slightly crisper.
Q: What if I don’t have solid butter-flavored shortening?
A: You can use regular shortening or melted butter as a substitute. If using melted butter, allow it to cool slightly before adding it to the wet ingredients.
Q: How long will the jarred mix last?
A: If stored in a cool, dry place, the jarred mix should last for up to 6 months.
Q: My cookies are spreading too thin. What can I do?
A: Chill the dough for at least 30 minutes before baking. This will help the cookies hold their shape. Also, make sure your oven is properly preheated.
Final Thoughts
These Pink Polka Dot Cookies in a jar are more than just a recipe; they’re a heartfelt gift that embodies the joy of baking and sharing. Whether you’re gifting it to a friend, family member, or simply indulging in a batch yourself, I hope these cookies bring a smile to your face. Don’t hesitate to get creative with variations and substitutions to make them your own. And most importantly, have fun in the kitchen! I can’t wait to hear about your baking adventures and see your polka-dotted creations. Enjoy!