
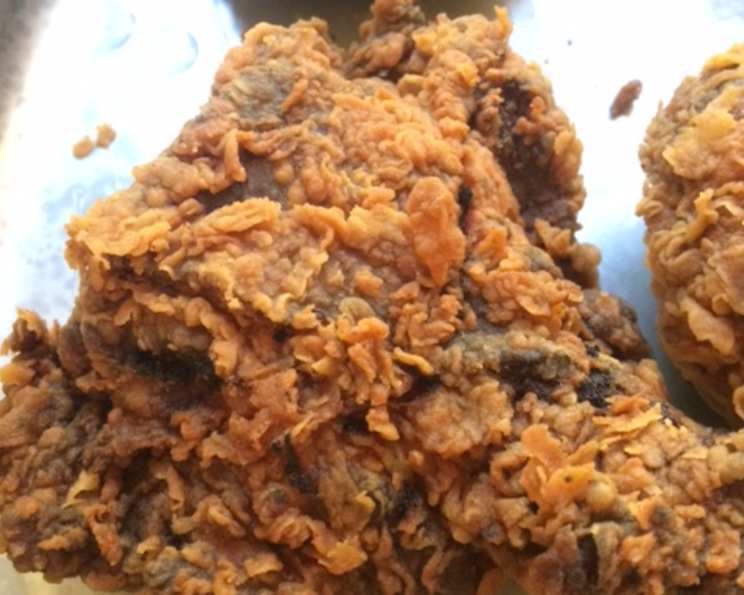
The Quest for Crispy: Recreating Popeye’s Fried Chicken at Home
My earliest memory of fried chicken isn’t from a family picnic, but rather, a post-soccer-game treat. The salty, savory aroma wafting from that paper bag, the satisfying crunch as I bit into the perfectly seasoned skin, and the juicy tenderness of the chicken inside – it was pure bliss. That, my friends, was Popeye’s fried chicken. And while I’ve tasted countless fried chicken variations since, that specific flavor profile has always held a special place in my heart. Today, we’re embarking on a culinary adventure to recreate that iconic crispy, flavorful experience in our own kitchens.
Recipe Overview
- Prep Time: 30 minutes (plus 12 hours marinating)
- Cook Time: 12 minutes per batch
- Total Time: 12 hours 42 minutes
- Servings: 4
- Yield: 8 pieces
- Dietary Type: Not specified
Ingredients
- 6 cups all-purpose flour
- 1 cup cornstarch
- 1/2 cup mustard powder
- 2 tablespoons baking powder
- 1 tablespoon onion powder
- 1 tablespoon paprika
- 1 tablespoon cayenne
- 1 tablespoon salt
- 4 cups chicken stock
- 1 whole chicken, cut into pieces (breast, thighs, legs, wings)
- 4 cups balsamic vinaigrette marinade
- Shortening or other frying oil
Equipment Needed
- Zip-lock bag
- Mixing bowls
- Hand mixer with whisk attachment
- Drying rack
- Medium cast iron Dutch oven or deep fryer
- Tongs
- Thermometer
Instructions
- Begin by breaking down the whole chicken into individual pieces: breasts, thighs, legs, and wings. This ensures even cooking and maximizes that craveable crispy surface area.
- Place the chicken pieces into a large zip-lock bag. Pour in 4 cups of balsamic vinaigrette marinade. Seal the bag, removing as much air as possible, and gently massage the marinade into the chicken.
- Refrigerate the chicken in the balsamic vinaigrette marinade for at least 12 hours. This allows the marinade to penetrate the chicken, adding flavor and helping to tenderize it.
- Prepare the wet batter: In a large mixing bowl, combine 2 cups of all-purpose flour, 1 cup of cornstarch, 1/2 cup of mustard powder, 2 tablespoons of baking powder, 1 tablespoon of paprika, 1 tablespoon of cayenne, 1 tablespoon of onion powder, 1 tablespoon of salt, and 4 cups of chicken stock.
- Using a hand mixer with a whisk attachment, mix the wet batter until it reaches a consistency thinner than pancake batter. Aim for a smooth, slightly runny texture.
- To ensure maximum crispiness, it’s important to keep the batter cold. Add 5 ice cubes to the batter to chill it down. Once the ice cubes melt, give the batter a final whisk.
- Prepare the dry dredge: In a separate bowl, place the remaining 4 cups of all-purpose flour.
- Remove the marinated chicken pieces from the refrigerator and place them on a drying rack. Allow any excess marinade to drain off; this step is crucial for achieving a crispy crust.
- One piece at a time, submerge the drained chicken pieces into the prepared wet batter, ensuring a thorough coating.
- Carefully remove the wet-battered chicken from the bowl and transfer it to the bowl containing the dry flour dredge. Toss the chicken in the flour, pressing gently to ensure a generous and even coating.
- Once the chicken is well-coated in the dry flour, pick up each piece and gently slap it against another piece to remove any loose flour. This step is key to preventing the flour from clumping in the fryer and creating an uneven crust.
- Heat your shortening (or other frying oil) in a medium cast iron Dutch oven to 340 degrees Fahrenheit. Use a thermometer to monitor the temperature.
- Carefully place the battered chicken pieces into the hot oil, ensuring not to overcrowd the Dutch oven. Fry similar-sized pieces together to ensure even cooking.
- Deep fry the chicken for a total of 12 minutes. After 8 minutes, gently roll the chicken pieces over to ensure even browning and crisping on all sides.
- After the full 12 minutes of frying, remove the chicken from the oil using tongs and place it on a wire rack to drain excess oil.
- Repeat the frying process with the remaining chicken pieces, ensuring that the oil temperature remains consistent at around 340 degrees Fahrenheit (a 5-degree variance is acceptable).
Expert Tips & Tricks
- Cold is Key: Remember, both the chicken and the batter should be cold before frying. This helps the crust develop properly and prevents the chicken from becoming greasy.
- Seasoning Adjustments: The great thing about making this at home is you can adjust the seasoning to perfectly match your tastes. Want it spicier? Add more cayenne. Prefer a more savory flavor? Increase the amount of onion powder.
- Oil Temperature is Crucial: Maintaining a consistent oil temperature is vital for achieving that perfect crispy crust without burning the chicken. Invest in a good quality thermometer and monitor the oil closely.
- Double Dredge for Extra Crunch: For an even thicker and crispier crust, repeat the wet batter and dry dredge steps.
- Brining for Added Moisture: Consider brining the chicken overnight before marinating for even more tender and flavorful results. A simple brine of salt, sugar, and water works wonders.
Serving & Storage Suggestions
Serve your freshly fried chicken hot and crispy! It pairs wonderfully with classic sides like mashed potatoes and gravy, coleslaw, corn on the cob, or biscuits.
Leftover fried chicken can be stored in an airtight container in the refrigerator for up to 3-4 days. For longer storage, freeze the chicken for up to 2 months.
To reheat, the best method for maintaining crispiness is to bake the chicken in a preheated oven at 350 degrees Fahrenheit for about 15-20 minutes, or until heated through. You can also use an air fryer for a similar effect. Microwaving is not recommended, as it will make the chicken soggy.
Nutritional Information
(Note: Nutritional information is an estimate and may vary based on specific ingredients and cooking methods.)
| Nutrient | Amount per Serving | % Daily Value |
|---|---|---|
| Calories | 800 kcal | 40% |
| Total Fat | 50g | 77% |
| Saturated Fat | 15g | 75% |
| Cholesterol | 200mg | 67% |
| Sodium | 1500mg | 63% |
| Total Carbohydrate | 50g | 17% |
| Dietary Fiber | 5g | 20% |
| Sugars | 5g | – |
| Protein | 50g | 100% |
Variations & Substitutions
- Gluten-Free Fried Chicken: Substitute the all-purpose flour with a gluten-free all-purpose blend. Consider adding a bit of xanthan gum to the flour mix to help bind the ingredients.
- Spicy Fried Chicken: Increase the amount of cayenne pepper in both the wet batter and the dry dredge. You can also add a pinch of chili powder or a dash of hot sauce.
- Buttermilk Marinade: For a tangier flavor, substitute the balsamic vinaigrette marinade with a buttermilk marinade. Simply soak the chicken in buttermilk seasoned with salt, pepper, and your favorite herbs for at least 4 hours.
- Herb-Infused Chicken: Add fresh herbs like thyme, rosemary, or oregano to the wet batter and dry dredge for a more aromatic flavor.
- Air Fryer Version: While deep-frying provides the most authentic results, you can also cook the chicken in an air fryer. Preheat your air fryer to 375 degrees Fahrenheit and cook the chicken for about 20-25 minutes, flipping halfway through, until golden brown and cooked through.
FAQs (Frequently Asked Questions)
Q: Why is it important to keep the batter cold?
A: Keeping the batter cold helps to prevent the gluten in the flour from overdeveloping, which can lead to a tough crust. Cold batter also adheres better to the chicken and helps it crisp up more effectively in the hot oil.
Q: Can I use a different type of oil for frying?
A: Yes, you can use other high-smoke-point oils such as peanut oil, canola oil, or vegetable oil. Shortening is often preferred for its neutral flavor and ability to produce a crispy crust.
Q: How do I know when the chicken is fully cooked?
A: The internal temperature of the chicken should reach 165 degrees Fahrenheit. Use a meat thermometer to check the temperature of the thickest part of the chicken, avoiding the bone.
Q: What if my chicken is browning too quickly?
A: If the chicken is browning too quickly, lower the heat slightly to maintain a more consistent oil temperature.
Q: Can I prepare the wet batter and dry dredge ahead of time?
A: Yes, you can prepare the wet batter and dry dredge up to a few hours in advance. Store them in separate airtight containers in the refrigerator.
Final Thoughts
Recreating your favorite restaurant dishes at home can be a rewarding experience, and this recipe for Popeye’s-style fried chicken is no exception. While it requires a bit of patience and attention to detail, the end result – crispy, flavorful, and utterly irresistible chicken – is well worth the effort. So, gather your ingredients, fire up that fryer, and prepare to embark on a culinary adventure that will transport you back to those cherished childhood memories. Don’t be afraid to experiment with different seasonings and variations to create your own signature fried chicken recipe. And most importantly, have fun!