
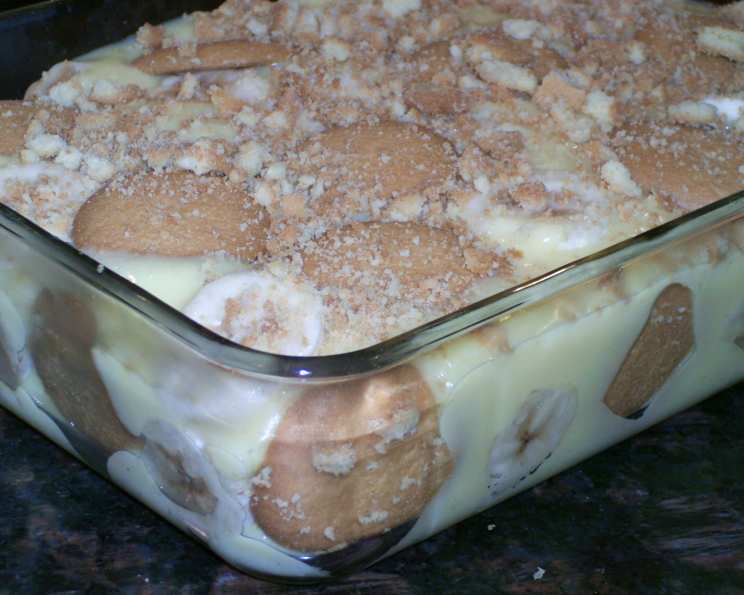
Guilt-Free Indulgence: Quick Banana Pudding (Sugar-Free, Low-Fat)
I remember my grandmother always making banana pudding for family gatherings. It was the dessert, a creamy, comforting classic that everyone devoured. But as much as I loved it, the traditional recipe was always a sugar bomb. This version brings back all those nostalgic flavors without the guilt, allowing you to enjoy a sweet treat that’s lighter and healthier.
Recipe Overview
- Prep Time: 10 minutes
- Cook Time: 0 minutes (plus chilling time)
- Total Time: 40 minutes
- Servings: 6
- Dietary Type: Sugar-Free, Low-Fat
Ingredients
- 1 (1 1/2 ounce) box sugar-free instant vanilla pudding mix
- 3 cups nonfat milk (very cold)
- 3 large bananas, sliced
- 4 ounces sugar-free vanilla wafers (I use Murray)
Equipment Needed
- Glass bowl or casserole dish
Instructions
-
Begin by preparing the sugar-free instant vanilla pudding mix according to the package directions, using the 3 cups of very cold nonfat milk. Whisk thoroughly until the pudding thickens.
-
Select a glass bowl or casserole dish. This will be your serving vessel, so choose one that looks appealing.
-
Line the bottom of the dish with a layer of sugar-free vanilla wafers. You may need to break some wafers to fit snugly.
-
Next, layer the banana slices over the wafers. Try to create an even layer, ensuring each bite will have a taste of banana.
-
Pour half of the prepared sugar-free vanilla pudding over the wafers and banana slices. Spread it gently to cover the layers.
-
Repeat the layering process: Another layer of sugar-free vanilla wafers, followed by a layer of banana slices.
-
Pour the remaining sugar-free vanilla pudding over the second layer of wafers and bananas.
-
Take a few sugar-free vanilla wafers and crumble them into crumbs. Sprinkle these crumbs evenly over the top of the pudding as a final garnish.
-
Cover the dish with plastic wrap and chill in the refrigerator for at least 30 minutes, or longer if desired. This allows the pudding to set completely and the flavors to meld together.
-
Serve chilled and enjoy!
Expert Tips & Tricks
- Use Very Cold Milk: For best results with instant pudding, ensure the nonfat milk is very cold. This helps the pudding set up quickly and creates a smoother texture.
- Banana Ripeness: Use ripe but firm bananas. Overripe bananas will become mushy and can make the pudding too sweet. Slightly underripe bananas offer a better texture and subtle sweetness.
- Wafer Placement: Don’t be afraid to break the vanilla wafers to fill in gaps and create a solid base. A well-layered base prevents the pudding from seeping through and creating a soggy bottom.
- Pudding Consistency: If you prefer a thicker pudding, use slightly less milk than the package directions suggest (about 2 3/4 cups instead of 3).
- Preventing Banana Browning: To prevent banana slices from browning, you can toss them lightly in lemon juice before layering. The lemon juice adds a slight tang that complements the sweetness of the pudding.
- Layering for Success: Create even layers of wafers and bananas to ensure consistent flavor and texture throughout the pudding.
- Make-Ahead Tip: Prepare the pudding a day in advance to allow the flavors to fully develop. This also makes it a convenient dessert for parties or potlucks. Just be sure to add the wafer crumbs right before serving to prevent them from getting soggy.
Serving & Storage Suggestions
Serve the Quick Banana Pudding chilled, straight from the refrigerator. Garnish with extra sugar-free vanilla wafer crumbs or a few fresh banana slices for an attractive presentation. A sprig of mint can also add a touch of freshness.
Leftovers can be stored in an airtight container in the refrigerator for up to 3 days. Note that the bananas may become slightly softer over time, but the flavor will still be delicious. This dessert is best enjoyed cold. While technically safe to keep at room temperature for a short period (e.g., at a potluck), refrigeration is highly recommended to maintain freshness and prevent bacterial growth. Freezing is not recommended, as the texture of the pudding and bananas will change significantly upon thawing.
Nutritional Information
| Nutrient | Amount per Serving | % Daily Value |
|---|---|---|
| Calories | 126.9 kcal | N/A |
| Calories from Fat | 4 g | 4% |
| Total Fat | 0.5 g | 0% |
| Saturated Fat | 0.2 g | 1% |
| Cholesterol | 2.5 mg | 0% |
| Sodium | 358.8 mg | 14% |
| Total Carbohydrate | 27 g | 8% |
| Dietary Fiber | 1.9 g | 7% |
| Sugars | 14.6 g | 58% |
| Protein | 5 g | 9% |
Note: Nutritional information is an estimate and can vary based on specific ingredients and brands used.
Variations & Substitutions
- Gluten-Free: Use gluten-free vanilla wafers to make this dessert suitable for those with gluten sensitivities.
- Dairy-Free: While this recipe uses nonfat milk to keep it low-fat, you can substitute almond milk or soy milk for a completely dairy-free version. The flavor profile will be slightly different, but still delicious.
- Spice it Up: Add a pinch of cinnamon or nutmeg to the pudding mixture for a warm, comforting flavor.
- Chocolate Banana Pudding: Use sugar-free chocolate pudding mix instead of vanilla for a chocolatey twist.
- Tropical Twist: Add a layer of diced mango or pineapple for a tropical flavor.
- Berries: Incorporate fresh berries like strawberries or blueberries between the layers for added flavor and visual appeal.
- High Protein: Add a scoop of vanilla protein powder to the pudding while mixing, for an added boost.
FAQs (Frequently Asked Questions)
Q: Can I use regular vanilla wafers instead of sugar-free?
A: Yes, you can, but it will significantly increase the sugar content of the dessert. The sugar-free wafers are key to keeping this recipe light and healthy.
Q: How long does this banana pudding last in the refrigerator?
A: It’s best enjoyed within 2-3 days. The bananas will soften over time, but the flavor will still be good.
Q: Can I freeze this banana pudding?
A: Freezing is not recommended as it will alter the texture of the pudding and bananas.
Q: Can I make this pudding ahead of time?
A: Absolutely! Preparing it a day in advance allows the flavors to meld together beautifully. Just add the wafer crumbs right before serving to prevent them from becoming soggy.
Q: What can I use instead of nonfat milk?
A: Almond milk, soy milk, or any other non-dairy milk alternative will work. The flavor will be slightly different, but still delicious.
Final Thoughts
This Quick Banana Pudding is a fantastic way to satisfy your sweet cravings without derailing your health goals. It’s simple to make, customizable, and a guaranteed crowd-pleaser. I encourage you to try this recipe and share it with your loved ones. Don’t hesitate to experiment with different variations to find your perfect version. Perhaps pair it with a sugar-free iced tea or coffee for the ultimate guilt-free indulgence. I’d love to hear your feedback and any creative twists you add to make it your own!