
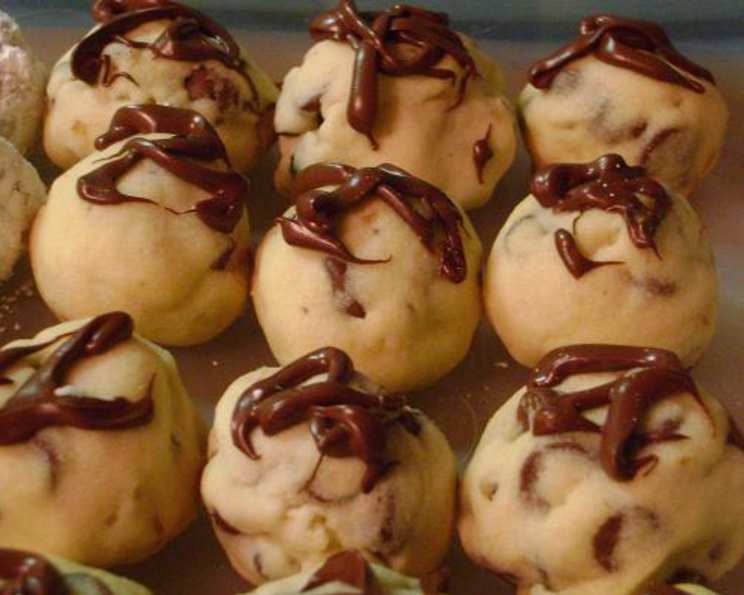
Chocolate Kissed Russian Tea Cakes: A Holiday Baking Staple
The memory is so vivid: a swirling snowstorm outside the window, the scent of pine needles and cinnamon filling the air, and my grandmother’s worn recipe box perched on the kitchen counter. As a child, those winter days were synonymous with baking, and nestled amongst her handwritten index cards was a recipe for Russian Tea Cakes. They always seemed so impossibly delicate, little mounds of powdered sugar concealing a buttery, nutty heart. To this day, the taste transports me straight back to her cozy kitchen, a reminder of warmth and shared moments. This year, I’ve put a chocolate twist on my Grandma’s recipe, and the whole family agrees – these are even better than the originals!
Recipe Overview
- Prep Time: 20 minutes
- Cook Time: 10-12 minutes
- Total Time: 32 minutes
- Yields: 3 dozen
- Dietary Type: Vegetarian
Ingredients
- 1 cup (2 sticks) butter, softened
- 1/2 cup icing sugar, also known as confectioners’ sugar
- 1 teaspoon vanilla extract
- 2/3 cup finely chopped nuts (pecans or walnuts recommended, optional)
- 2 cups all-purpose flour
- 1 1/2 cups chocolate chips (semi-sweet or dark)
- 1/2 cup chocolate chips, melted (for drizzling)
Equipment Needed
- Mixing Bowls
- Electric Mixer (handheld or stand mixer)
- Measuring Cups and Spoons
- Baking Sheets
- Parchment Paper or Silicone Baking Mats (optional)
- Double boiler or microwave-safe bowl (for melting chocolate)
- Fork or Piping Bag (for drizzling)
Instructions
-
Begin by preheating your oven to 350°F (175°C). This step ensures even baking from the start.
-
In a large mixing bowl, cream together the softened butter and icing sugar until light and fluffy. This is best achieved using an electric mixer. The mixture should be pale in color and have a smooth, airy texture. Don’t rush this step; proper creaming is essential for the cookies’ delicate crumb.
-
Add the vanilla extract to the butter and sugar mixture and mix until well combined. The vanilla enhances the overall flavor and adds a touch of warmth.
-
Gradually beat in the flour, mixing until just combined. Be careful not to overmix the dough, as this can develop the gluten and result in tougher cookies. If you are using nuts, incorporate them at this stage, folding them in gently.
-
Stir in the 1 1/2 cups of chocolate chips. Distribute them evenly throughout the dough.
-
Shape the dough into small balls, about 1 inch in diameter. The size is important; if they are too large, they may not bake evenly. Place the balls on ungreased baking sheets, leaving a little space between each cookie. For easy cleanup, line your baking sheets with parchment paper or silicone baking mats.
-
Bake for 10-12 minutes, or until the bottoms of the cookies are golden brown. Keep a close eye on them; they should be pale on top but have a noticeable golden hue underneath.
-
Remove the baking sheets from the oven and let the cookies cool on the baking sheets for a few minutes before transferring them to a wire rack to cool completely.
-
While the cookies are cooling, melt the remaining 1/2 cup of chocolate chips. You can do this in a double boiler over simmering water or in a microwave-safe bowl in 30-second intervals, stirring in between, until smooth. Be careful not to overheat the chocolate, as it can seize and become grainy.
-
Once the cookies are completely cool, drizzle them with the melted chocolate. You can use a fork to create a simple drizzle pattern or transfer the melted chocolate to a piping bag for more precise designs.
-
Let the chocolate set completely before serving or storing the cookies.
Expert Tips & Tricks
- Room Temperature Butter is Key: Ensure your butter is properly softened but not melted. It should be soft enough to easily press a finger into, but still hold its shape.
- Toast Your Nuts: Toasting the nuts before adding them to the dough enhances their flavor and adds a delightful crunch. Spread the nuts on a baking sheet and bake at 350°F (175°C) for 5-7 minutes, or until fragrant. Let them cool completely before chopping and adding them to the dough.
- Don’t Overbake: These cookies should be pale and tender, not deeply browned. Overbaking will result in dry, crumbly cookies.
- Double Dip for Extra Sweetness: For a more traditional Russian Tea Cake, roll the cooled cookies in icing sugar immediately after baking, then again once they are completely cooled.
- Chocolate Tempering: For a professional-looking chocolate drizzle that snaps instead of staying soft, temper your chocolate. This involves carefully heating and cooling the chocolate to stabilize the cocoa butter crystals. There are many tutorials available online to guide you through the process.
- Add a Hint of Spice: A pinch of cinnamon or nutmeg added to the dough can elevate the flavor profile and add warmth.
Serving & Storage Suggestions
These Chocolate Kissed Russian Tea Cakes are best served at room temperature. They make a delightful addition to a holiday dessert platter, a sweet treat with afternoon tea, or a thoughtful homemade gift.
Store the cookies in an airtight container at room temperature for up to 5 days. They can also be frozen for longer storage. To freeze, place the cookies in a single layer on a baking sheet and freeze until solid, then transfer them to a freezer-safe bag or container. They will keep in the freezer for up to 2 months. Thaw at room temperature before serving.
Nutritional Information
| Nutrient | Amount per Serving | % Daily Value |
|---|---|---|
| Calories | 122 kcal | 6% |
| Total Fat | 7.4g | 11% |
| Saturated Fat | 4.5g | 23% |
| Cholesterol | 13.6mg | 5% |
| Sodium | 37.5mg | 2% |
| Total Carbohydrate | 12.9g | 4% |
| Dietary Fiber | 0.7g | 3% |
| Sugars | 6.8g | N/A |
| Protein | 0.9g | 2% |
Note: Nutritional information is an estimate and may vary based on specific ingredients and portion sizes.
Variations & Substitutions
- Nut-Free: Omit the nuts altogether for a nut-free version.
- Gluten-Free: Use a gluten-free all-purpose flour blend. Be sure to add a binder like xanthan gum to improve the texture.
- Different Chocolate: Experiment with different types of chocolate chips, such as white chocolate or peanut butter chips.
- Citrus Zest: Add a teaspoon of lemon or orange zest to the dough for a bright, citrusy flavor.
- Espresso Powder: For a mocha flavor, add a teaspoon of espresso powder to the dough.
FAQs (Frequently Asked Questions)
Q: Why are my cookies spreading too much?
A: This is usually due to the butter being too warm. Make sure your butter is softened but still cool. You can also chill the dough for 30 minutes before baking.
Q: Can I use margarine instead of butter?
A: While you can use margarine, the cookies will not have the same rich, buttery flavor and delicate texture as when made with butter.
Q: How do I prevent the melted chocolate from seizing?
A: The key is to melt the chocolate gently and avoid getting any water or steam into it. Use a double boiler or microwave in short intervals, stirring frequently.
Q: Can I freeze the cookie dough instead of baking them right away?
A: Yes, you can freeze the dough. Shape the dough into balls, place them on a baking sheet, and freeze until solid. Then, transfer them to a freezer-safe bag. Bake directly from frozen, adding a minute or two to the baking time.
Q: What if I don’t have icing sugar?
A: While icing sugar is ideal for its fine texture, you can use granulated sugar. However, the cookies may have a slightly grittier texture. You can also try pulsing granulated sugar in a food processor until it’s finely ground.
Final Thoughts
I hope you enjoy making these Chocolate Kissed Russian Tea Cakes as much as I do. They are a simple yet elegant treat that’s perfect for any occasion. Don’t be afraid to experiment with different variations and make them your own. And most importantly, share them with loved ones and create some sweet memories together! I’d love to hear how they turn out for you, so feel free to leave a comment with your feedback or any variations you tried. Happy baking!