
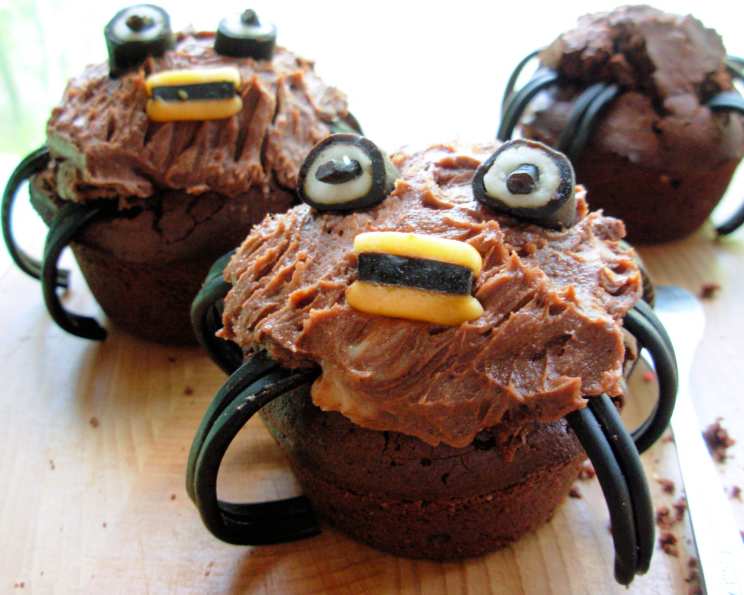
Spooky Spider Cupcakes for a Howling Halloween!
The scent of cocoa and melting chocolate always transports me back to childhood Halloweens. I remember one year, my grandmother, a woman who believed every holiday deserved a homemade touch, crafted spider cupcakes just like these. The eight liquorice legs poking out from under a swirl of chocolate buttercream, the candy eyes staring with a comical intensity – they were almost too cute to eat, but the rich chocolate aroma always won out, leaving behind sticky fingers and sweet smiles. Baking these now brings back that sense of playful spookiness, a perfect way to create lasting memories with family and friends.
Recipe Overview
- Prep Time: 40 minutes
- Cook Time: 25 minutes
- Total Time: 1 hour 5 minutes
- Servings: 12
- Yield: 12 cupcakes
- Dietary Type: Not specified
Ingredients
For the Spider Cakes:
- 200g softened butter (room temperature)
- 200g golden caster sugar
- 200g self-raising flour
- 1 ½ ounces cocoa powder (NOT drinking chocolate)
- 4 eggs, beaten
- ½ teaspoon baking powder
- 1 teaspoon vanilla extract
- 2-4 tablespoons milk
- 4 ounces chocolate chips (drops or chopped chocolate)
- Paper cupcake liners, preferably brown (optional)
For the Buttercream Icing:
- 100g softened butter
- 100g icing sugar
- 1 ounce cocoa powder
- ½ teaspoon vanilla extract
- 1-2 tablespoons milk
For Decoration:
- Liquorice Allsorts sweets (Liquorice Catherine wheels, shoe strings, boot laces etc for the legs.)
- Candy for the eyes and the mouth (Liquorice Catherine wheels, shoe strings, boot laces etc for the legs.)
Equipment Needed
- Large mixing bowl
- Hand mixer
- Spoon
- Muffin tin
- Paper cupcake liners (optional)
- Wire rack
- Fork
- Cocktail stick
- Knife
Instructions
-
Preheat your oven to 180°C/360°F. This is crucial for even baking.
-
Prepare the cake batter: In a large mixing bowl, combine the softened butter and golden caster sugar.
-
Add the self-raising flour, cocoa powder (ensuring it’s not drinking chocolate for the best chocolate flavor), baking powder, beaten eggs, and vanilla extract.
-
Using a hand mixer, start on slow speed, gradually incorporating all the dry ingredients into the butter and eggs. Increase the speed to medium, then to high. Be patient; a smooth batter is key.
-
Stop the mixer and add the milk, one tablespoon at a time, whisking well in between each addition until you achieve a smooth, silky batter without any lumps. The amount of milk can vary depending on the humidity and the moisture content of your ingredients, so add gradually until the consistency is right.
-
Fold in the chocolate chips or chopped chocolate pieces. Ensure they are evenly distributed throughout the batter.
-
Spoon the batter into well-greased muffin tins, or tins lined with muffin cases (brown cases are preferable for a spooky effect). Fill each cup about two-thirds full to allow for rising.
-
Bake in the preheated oven for 20 to 25 minutes, or until the cupcakes are well-risen and spring back to the touch. To test for doneness, insert a wooden cocktail stick into the middle of a cupcake. If it comes out clean, the cakes are ready. If not, bake for a few more minutes and check again.
-
Cooling: Leave the cupcakes to cool in the tin for 5 minutes. Then, gently run a knife around the sides to release them, or simply remove them from the muffin cases. Transfer them to a wire rack and allow them to cool completely before decorating.
-
Prepare the buttercream icing: While the cupcakes are cooling, make the chocolate buttercream. In a mixing bowl, combine the softened butter and icing sugar.
-
Mix thoroughly by hand with a fork until well combined.
-
Add the vanilla extract and mix again.
-
Incorporate the cocoa powder. Mix all the ingredients together until evenly colored.
-
If the mixture is too thick, add the milk, one tablespoon at a time, until you reach a soft and silky consistency that still holds its shape. The buttercream should be easily spreadable but not runny.
-
Decorate the spider cupcakes: Cut the liquorice Catherine wheels into “legs” that dangle over the edge of the cupcake. Aim for about 2 inches in length.
-
For the eyes, take the liquorice allsorts sweets/candy that have a white inside and a liquorice exterior. Gently make a hole in the center of each with a cocktail stick and push in a small sliver of liquorice to create the eyes.
-
Choose a red or orange liquorice allsorts sweet/candy that is layered. Cut each sweet/candy into 4 pieces to make the mouths.
-
Gently push the liquorice legs into the top of each cupcake at even intervals. Remember, each spider needs 8 legs! Don’t worry if they look a little precarious; the icing will help secure them.
-
Spoon some chocolate buttercream icing over the legs, covering the tops of the cupcakes and coming within about ½ inch of the edge. To create a “hairy” effect, use a fork to stipple the icing.
-
Place two liquorice eyes on top of the icing and finish with a liquorice mouth.
-
Repeat the decorating process with all the cupcakes. Arrange the finished spider cupcakes on a plate, scattering some extra sweets/candy around them for a festive presentation.
Expert Tips & Tricks
- Room Temperature Butter: Using truly softened butter is crucial for a smooth and creamy buttercream. If your butter is still a bit firm, try microwaving it for a few seconds at a time, checking frequently to avoid melting.
- Cocoa Powder Sifting: Sifting the cocoa powder for both the cake and the buttercream helps prevent lumps and ensures a smoother texture.
- Even Baking: For cupcakes that bake evenly, ensure your oven rack is in the center position and avoid opening the oven door frequently during baking.
- Freezing for Later: Bake the cupcakes in advance and freeze them undecorated. Thaw completely before decorating. The buttercream can also be made ahead and stored in the refrigerator for a few days. Let it come to room temperature and rewhip before using.
- Chocolate intensity: Use high-quality dark chocolate chips (60-70% cacao) for a more intense chocolate flavor.
Serving & Storage Suggestions
Serve the spooky spider cupcakes immediately for the best flavor and texture. They are a perfect treat for Halloween parties, school bake sales, or a fun family dessert.
Store undecorated cupcakes in an airtight container at room temperature for up to 2 days, or in the refrigerator for up to 5 days. Decorated cupcakes are best stored in the refrigerator due to the buttercream. Bring to room temperature slightly before serving for a softer texture.
Cupcakes can be frozen for up to 2-3 months. Wrap them individually in plastic wrap and then place them in a freezer-safe container. Thaw overnight in the refrigerator.
Nutritional Information
| Nutrient | Amount per Serving | % Daily Value |
|---|---|---|
| Calories | 447.8 kcal | N/A |
| Calories from Fat | 229 g | 51% |
| Total Fat | 25.5 g | 39% |
| Saturated Fat | 15.1 g | 75% |
| Cholesterol | 116 mg | 38% |
| Sodium | 219.9 mg | 9% |
| Total Carbohydrate | 50.9 g | 16% |
| Dietary Fiber | 2.3 g | 9% |
| Sugars | 30.1 g | 120% |
| Protein | 6.2 g | 12% |
Note: Nutritional information is an estimate and may vary based on specific ingredients and portion sizes.
Variations & Substitutions
- Gluten-Free Spiders: Substitute the self-raising flour with a gluten-free all-purpose flour blend and add 1 teaspoon of xanthan gum to the batter for improved texture.
- Dairy-Free Delight: Use a plant-based butter alternative for both the cake and buttercream. Substitute the milk with almond milk, soy milk, or oat milk.
- Peanut-Free Spiders: Ensure all decorations are peanut-free, especially liquorice candies which can sometimes contain traces of nuts.
- Spider Colors: Try using different food colorings in the buttercream for a more vibrant and whimsical look. Green, purple, or orange buttercream can add to the spooky fun.
FAQs (Frequently Asked Questions)
Q: Can I use drinking chocolate instead of cocoa powder?
A: No, drinking chocolate contains added sugar and other ingredients that will alter the cake’s texture and sweetness. Stick with unsweetened cocoa powder for the best results.
Q: Can I make these cupcakes ahead of time?
A: Yes, the cupcakes can be baked a day or two in advance and stored in an airtight container. Decorate them on the day of serving for the freshest look.
Q: My buttercream is too runny. What can I do?
A: Add a tablespoon of icing sugar at a time, mixing well after each addition, until the buttercream reaches the desired consistency.
Q: My cupcakes are sinking in the middle. What did I do wrong?
A: This can happen if the oven temperature is too low or if the cupcakes are underbaked. Ensure your oven is properly preheated and bake until a toothpick inserted into the center comes out clean.
Q: Can I use a different type of candy for the eyes and mouth?
A: Absolutely! Get creative with your decorations. Small jelly beans, chocolate chips, or even edible sugar eyes can be used for the eyes. For the mouth, try red licorice whips or gummy candies.
Final Thoughts
So there you have it! A batch of adorably spooky spider cupcakes, ready to delight your family and friends this Halloween. Don’t be afraid to get creative with the decorations and make them your own. These cupcakes are a guaranteed crowd-pleaser, and the process of baking and decorating them is a fun activity for everyone. Try pairing these cupcakes with a warm glass of spiced apple cider for the ultimate autumnal treat. I hope you enjoy making these as much as I do; please share your photos and feedback, and have a howling good Halloween!