
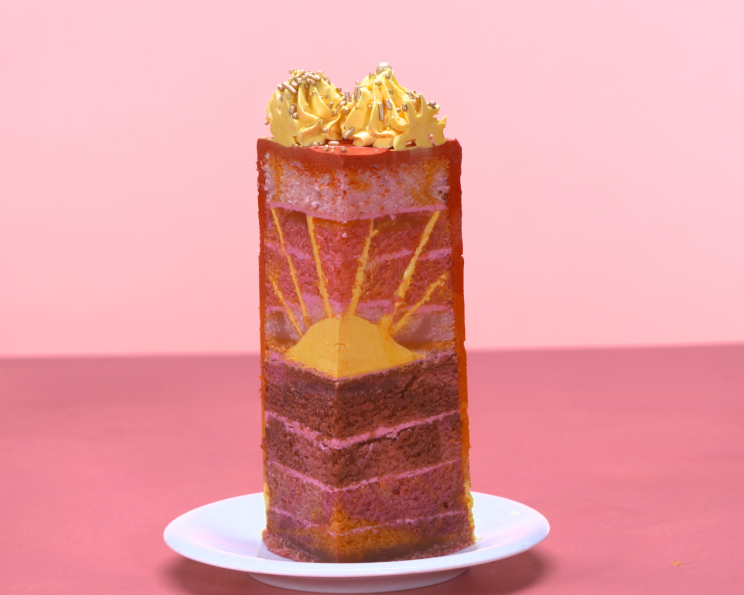
Summer Solstice Sunset Cake
The summer solstice has always been a magical time for me. As a child, my grandmother, a passionate baker, would always create something special to mark the longest day of the year. I remember one year, she crafted a cake with hidden sunbursts inside. Slicing into it was like capturing a piece of the solstice sun itself – vibrant and joyful. The warm colors, the sweet aroma, the sense of anticipation – it’s a memory I cherish, and one that inspires this Summer Solstice Sunset Cake. It’s a labor of love, yes, but the look on people’s faces when they see the surprise inside is worth every minute.
Recipe Overview
- Prep Time: 4 hours
- Cook Time: 30-35 minutes
- Total Time: 4 hours 35 minutes
- Servings: 20
- Yield: 1 Cake
- Dietary Type: Not specified (can be adapted, see Variations)
Ingredients
- 6 large egg whites, at room temperature
- 2 large whole eggs, at room temperature
- 2 cups whole milk, at room temperature, divided
- ½ teaspoon lemon extract
- ½ teaspoon vanilla
- 6 cups cake flour, sifted
- 3 cups granulated sugar
- 2 tablespoons and 2 teaspoons baking powder
- 2 teaspoons fine salt
- 1 ½ cups unsalted butter, at room temperature
- 9 cups Milkmoon Meringue Buttercream (recipe required; see Instructions)
- ½ cup gold candy sprinkles
- Gel food coloring (Americolor gels suggested: Electric Pink, Electric Yellow, Electric Blue, Watermelon Red, Tulip Red, and Orange)
Equipment Needed
- Stand mixer with paddle attachment
- Medium-size mixing bowl
- Whisk
- Four 6-inch-round, 3-inch-deep (6”x3”) cake pans
- Baking paper rounds
- Shortening
- Flour for dusting
- Piping bags
- Large star piping tip (Wilton 2D recommended)
- Bench scraper
- Extra-tall cake scraper (optional)
- Paring knife
- Small offset spatula
- Cake tester or toothpick
- Turntable
Instructions
-
Begin by preheating your oven to 350°F (175°C). Prepare your four 6-inch-round, 3-inch-deep cake pans. Grease them generously with shortening, place a baking paper round on the base of each pan, grease the paper again, and then dust with flour, tapping out any excess. This ensures the cakes release cleanly.
-
In a medium-size bowl, whisk together the egg whites, whole eggs, ½ cup of milk, and vanilla extract until well combined. Set this mixture aside.
-
In the bowl of your stand mixer fitted with the paddle attachment, combine the sifted cake flour, granulated sugar, baking powder, and salt. Mix on low speed for a couple of minutes until everything is evenly distributed. This step is crucial for creating a consistent crumb structure.
-
Add the softened butter to the dry ingredients and continue mixing on low speed. Gradually pour in the remaining 1 ½ cups of milk, adding it half a cup at a time, while still mixing on the lowest speed. Once all the milk is incorporated, increase the speed to medium and beat for about 1 minute.
-
Scrape down the sides and bottom of the bowl with a spatula to ensure all ingredients are fully incorporated. Return the mixer to low speed. Slowly add the egg mixture in three batches, allowing each addition to incorporate completely before adding the next. Scrape the bowl again and mix briefly to ensure everything is homogenous. Avoid overmixing at this stage, as it can lead to a tough cake.
-
Divide the cake batter equally into four separate portions. This is best done using a kitchen scale for accuracy. Now, tint each portion a different shade of pink and orange to mimic a sunset. Use the gel food colorings:
- Portion 1: Deep raspberry color using Watermelon Red and Electric Pink with just a small touch of Electric Blue.
- Portion 2: Sunset orange with Orange, a bit of Watermelon Red, and a bit of Electric Pink.
- Portion 3: Deeper pink with Electric Pink and a touch of Watermelon Red.
- Portion 4: Lighter pink with Electric Pink and a touch of Orange.
-
Spoon the tinted batters into your prepared cake pans. You can swirl up to two colors together in each pan for a more marbled effect, or simply keep each pan a single color. Be creative and have fun with it!
-
Bake the cakes for approximately 30-35 minutes. However, start checking them for doneness around the 25-minute mark. The cakes are done when you gently press down in the center and the cake springs back. You can also insert a cake tester or toothpick into the center; it should come out completely clean.
-
Remove the baked cakes from the oven and let them cool to room temperature on a wire rack. Once cooled, wrap each cake individually in plastic wrap and refrigerate for at least half an hour, or preferably overnight. Chilling the cakes makes them easier to handle and trim.
-
Prepare your Milkmoon Meringue Buttercream. The recipe should be scaled up by 1.5 times the original amount to ensure you have enough for frosting and decorating. This buttercream is essential for its smooth texture and ability to hold its shape.
-
Divide the buttercream into three equal portions. Set one portion aside.
-
Split one of the remaining two portions in half. Color one half a fiery red using Americolor Tulip Red. Color the other half a peachy pink with Electric Pink, Watermelon Red, and the tiniest bit of Electric Blue.
-
Color the entirety of the second half a warm yellow using Electric Yellow and a touch of Tulip Red.
-
Divide the one portion of buttercream you set aside earlier into three smaller portions. Color each of these portions a different shade of orange to create an ombre effect that ranges from your yellow and fiery red. Use Electric Yellow, Tulip Red, and Orange to achieve this gradient.
-
Level each of your four cakes and then torte each cake into two layers, giving you 8 layers total. Take three layers total and stack these first, spreading a thin layer of the pink buttercream between the cake layers. Set in the fridge or freezer for about 10 minutes until the buttercream hardens up.
-
Now, you’re going to create the rays of the sun in this section of the cake. This step requires patience and a steady hand! Take your cake out of the fridge and, using a small, sharp paring knife, cut into the side of the cake, inserting the knife halfway into the cake at about a 25° angle. Without using a sawing motion, pull the knife through the cake as you rotate it on your turntable, creating a cone shape that you’re cutting into your cake.
-
Pop the top of the cake out and set it aside. Spread a thin layer of yellow buttercream onto the exposed insides of the cake, then replace the top portion and gently press it into the buttercream to adhere. Place in the fridge or freezer for another 10 minutes to let it firm up again.
-
Repeat this step twice more, although the second time you’ll move your knife up to just inside the circumference of the top of the cake and hold it at a 45° angle, and the third time you’ll move your knife to a little over halfway along the radius of the top of the cake and hold it at a 65° angle. Make sure to rest the cake in the fridge or freezer between each cut to firm up the yellow buttercream!
-
Finally, flip that section of cake upside down and use that paring knife to carve a shallow dome into the exposed base of the cake. I used a spoon to press the cake down into a smoother dome shape after cutting.
-
Fill the dome completely with yellow buttercream and freeze or refrigerate again until firm.
-
Begin stacking your remaining layers of cake on your cake board or plate, layering a small amount of pink buttercream between every cake layer. Reserve the final layer and set it aside.
-
Grab your cake segment with the sun inside and flip it over onto the layers of cake you’ve been building up so that the sun dome is resting on the layers of cake below. Add a thin layer of pink buttercream on top of this segment and cap it with that final reserved layer of cake. Refrigerate for at least 10 minutes.
-
Place your red and orange buttercreams into piping bags. Scoop about a half cup of your remaining yellow buttercream into a piping bag as well. Cut the tips off the bags to create a hole 1/8th of an inch wide on each.
-
Place the remainder of your yellow buttercream in a piping bag fitted with your large star tip and set aside.
-
Remove your stacked cake from the fridge and trim away the brown sides of the cake. Then, pipe your yellow buttercream in rings rising up the base of the cake until it reaches roughly 1/5th of the way up the sides.
-
Repeat with your ombre of orange buttercream, working your way up the sides of the cake, and finish with your red buttercream, taking it all the way to the top, then covering the top of the cake entirely.
-
Use your bench scraper to gently smooth the sides of the cake, holding it completely still at the base while you spin your turntable. Clean the scraper off, then move it up towards the top and repeat. This will create smooth stripes of color that barely blend into each other.
-
Smooth out the top of the cake with a small offset spatula. If you have one, use your extra-tall cake scraper to smooth the sides one more time to create a perfectly cohesive smooth look. Tidy up the lip of buttercream at the top of the cake with your offset spatula.
-
Pipe frilly poofs of yellow buttercream with your star tip at the top of the cake, then add your gold candy sprinkles.
-
Cut slices from your cake, either one at a time or, for a grand effect, remove an entire half of the cake at once to reveal the full sunset effect!
Expert Tips & Tricks
- Room temperature ingredients are essential for a smooth cake batter and even baking. Take the time to bring your eggs, milk, and butter to the correct temperature.
- Don’t skip sifting the flour! This prevents lumps and creates a lighter, more tender crumb.
- If you find your buttercream is too soft, chill it in the refrigerator for a few minutes before piping.
- Practice your buttercream piping on a piece of parchment paper before decorating the cake to get comfortable with the technique.
- For a smoother finish, dip your bench scraper in hot water and dry it before each pass when smoothing the buttercream.
Serving & Storage Suggestions
Serve the Summer Solstice Sunset Cake chilled or at room temperature. The surprise sunset center is best revealed upon slicing, adding to the dramatic presentation.
Store leftover cake in an airtight container in the refrigerator for up to 3 days. The buttercream can become slightly firm in the fridge, so allow the cake to sit at room temperature for about 30 minutes before serving. For longer storage, you can freeze individual slices wrapped tightly in plastic wrap for up to 2 months. Thaw in the refrigerator overnight before enjoying.
Nutritional Information
(Estimated values per serving)
| Nutrient | Amount per Serving | % Daily Value |
|---|---|---|
| Calories | 850 kcal | 43% |
| Total Fat | 32g | 49% |
| Saturated Fat | 13g | 65% |
| Cholesterol | 58mg | 19% |
| Sodium | 570mg | 24% |
| Total Carbohydrate | 134g | 45% |
| Dietary Fiber | 1g | 4% |
| Sugars | 97g | 388% |
| Protein | 6g | 12% |
Note: Nutritional information is an estimate and may vary based on specific ingredients and portion sizes.
Variations & Substitutions
- Gluten-Free: Substitute the cake flour with a gluten-free blend designed for baking. Ensure the blend contains xanthan gum or add it separately for structure.
- Dairy-Free: Use a plant-based milk alternative like almond milk or oat milk. Replace the butter in the cake with a vegan butter substitute and make the Milkmoon Meringue Buttercream with vegan butter and aquafaba (chickpea brine) instead of egg whites.
- Flavor Variations: Add citrus zest (lemon, orange) to the cake batter for a brighter flavor. Experiment with different extracts like almond or coconut.
- Seasonal Adaptation: In autumn, try a spice cake base with shades of orange and brown buttercream. In winter, consider a peppermint chocolate cake with white and red buttercream.
FAQs (Frequently Asked Questions)
Q: Can I use store-bought buttercream?
A: While you can, the Milkmoon Meringue Buttercream is highly recommended for its stability and smooth texture, which are crucial for the design. Store-bought buttercream tends to be too sweet and may not hold its shape as well.
Q: Is it necessary to chill the cakes between each step?
A: Yes, chilling the cakes is important to firm up the buttercream and prevent the cake from crumbling when carving out the sun rays.
Q: Can I make the cake layers ahead of time?
A: Absolutely! Baking the cake layers 1-2 days in advance and storing them properly wrapped in the refrigerator can save you time on the day of assembly.
Q: What if my buttercream is too runny?
A: If your buttercream is too runny, try chilling it in the refrigerator for 15-20 minutes and then re-whip it. This should help it stiffen up.
Q: How can I prevent the cake from drying out?
A: Ensure the cake layers are well-wrapped while chilling. Avoid overbaking the cakes initially, and brush each layer with a simple syrup (sugar and water) before frosting to add moisture.
Final Thoughts
The Summer Solstice Sunset Cake might seem like a project, but the joy of creating such a unique and beautiful dessert is incredibly rewarding. Don’t be afraid to experiment with the colors and techniques to make it your own. I encourage you to embrace the challenge and bring a little sunshine to your celebration! Pair it with a glass of sparkling lemonade or a light white wine to complete the experience. And please, share your creations and feedback – I can’t wait to see your versions of this sunny masterpiece!