
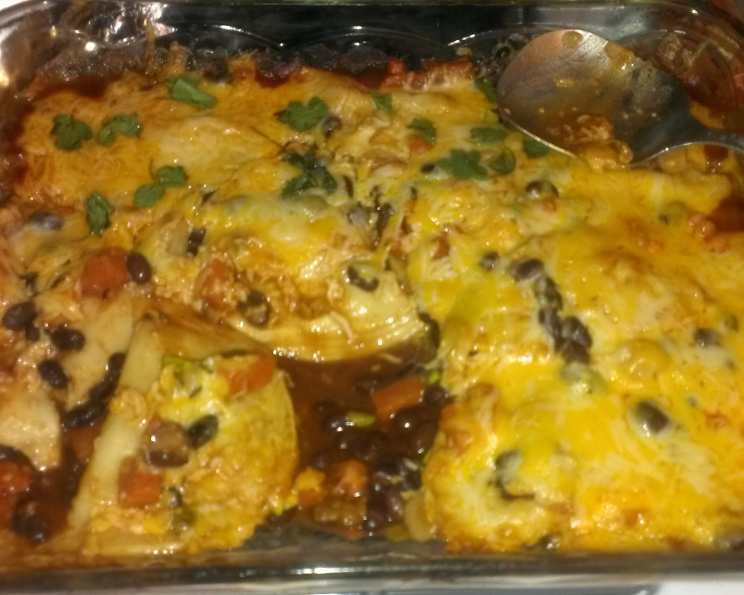
Tex-Mex Baked Pierogies: A Culinary Collision
The aroma of my abuela’s kitchen is forever etched in my memory: simmering spices, warm tortillas, and the comforting promise of a home-cooked meal. One particular evening, however, stands out. I was experimenting, as I often did, and, much to her initial skepticism, combined her treasured black bean salsa with…pierogies. Yes, those Eastern European dumplings. The result? A surprisingly harmonious blend of Tex-Mex zest and comforting potato filling that became a family favorite. This baked pierogi dish is an ode to that unexpected, delicious fusion.
Recipe Overview
- Prep Time: 15 minutes
- Cook Time: 45 minutes
- Total Time: 60 minutes
- Servings: 6
- Yield: 1 baking dish
- Dietary Type: Vegetarian (easily adaptable to vegan)
Ingredients
- 1 (15.5 ounce) can black beans, rinsed and drained
- 1 (10 ounce) can mild enchilada sauce
- 1/2 cup frozen corn, thawed
- 2 scallions, chopped
- 1 (17 ounce) package frozen pierogies (any flavor)
- 1 cup shredded 4-cheese Mexican blend cheese
- 1 tablespoon chopped fresh cilantro
- Sour cream (optional)
Equipment Needed
- 3-quart baking dish
- Can opener
- Mixing bowl
- Measuring cups and spoons
- Aluminum foil
Instructions
-
Begin by preheating your oven to 375°F (190°C). Ensure your oven rack is positioned in the center for even baking.
-
In a mixing bowl, combine the rinsed and drained black beans, enchilada sauce, thawed corn, and chopped scallions. Mix these ingredients thoroughly until they are well combined, creating a vibrant and flavorful Tex-Mex sauce.
-
Spread half of the black bean mixture evenly across the bottom of a 3-quart baking dish. This layer acts as a flavorful base for the pierogies.
-
Arrange the frozen pierogies in a single layer on top of the sauce. There is no need to thaw the pierogies beforehand. Using them frozen helps maintain their shape during baking.
-
Pour the remaining black bean mixture over the pierogies, ensuring they are evenly coated. This layer will keep the pierogies moist and infuse them with the Tex-Mex flavors.
-
Cover the baking dish tightly with aluminum foil. This step is crucial as it traps the steam, allowing the pierogies to cook thoroughly and evenly without drying out.
-
Bake in the preheated oven for 40 minutes. The foil should remain on for the entire 40 minutes to ensure proper cooking.
-
Carefully remove the foil from the baking dish. Sprinkle the shredded 4-cheese Mexican blend cheese evenly over the top of the pierogies.
-
Return the baking dish to the oven, uncovered, and bake for an additional 5 minutes, or until the cheese is melted and bubbly, with a slight golden-brown hue. Keep a close eye on it to prevent burning.
-
Remove from the oven and sprinkle with the chopped fresh cilantro.
-
Allow the dish to cool slightly before serving. This helps the flavors meld together and prevents burning your mouth.
-
If desired, serve with a dollop of sour cream for added richness and tang.
Expert Tips & Tricks
-
Pierogi Prep: While any flavor of pierogi works, potato and cheese, or jalapeno and cheese pierogies are especially delicious in this dish.
-
Spice It Up: If you prefer a spicier dish, use a hot enchilada sauce or add a pinch of cayenne pepper to the black bean mixture. A finely diced jalapeño added to the bean mixture will also give a great kick.
-
Cheese Perfection: For a more even cheese melt, use freshly grated cheese instead of pre-shredded. Freshly grated cheese contains less cellulose, resulting in a smoother, meltier texture. Monterey Jack, cheddar, or even pepper jack cheese can be used instead of the 4-cheese blend.
-
Make-Ahead Magic: The dish can be assembled ahead of time, covered, and refrigerated for up to 24 hours before baking. Add about 10 minutes to the baking time if baking from cold.
-
Prevent Sticking: To prevent the pierogies from sticking to the bottom of the dish, you can lightly grease the baking dish with cooking spray before adding the sauce.
-
Crispy Pierogies: For slightly crispier pierogies, remove the foil during the last 10 minutes of baking before adding the cheese. This will allow the pierogies to brown slightly.
Serving & Storage Suggestions
Serve the Tex-Mex Baked Pierogies warm, straight from the oven. Garnish with extra chopped cilantro and a dollop of sour cream or guacamole. For a complete meal, pair with a side of Mexican rice or a simple green salad.
Leftovers can be stored in an airtight container in the refrigerator for up to 3 days. To reheat, bake in a preheated oven at 350°F (175°C) until heated through, or microwave in short intervals, stirring occasionally, until warmed. For best results, add a splash of water or broth to prevent drying out during reheating. The dish is not ideal for freezing as the texture of the pierogies may change upon thawing.
Nutritional Information
| Nutrient | Amount per Serving | % Daily Value |
|---|---|---|
| Calories | 393 kcal | 20% |
| Total Fat | 14 g | 18% |
| Saturated Fat | 9 g | 45% |
| Cholesterol | 46 mg | 15% |
| Sodium | 1321 mg | 57% |
| Total Carbohydrate | 47 g | 17% |
| Dietary Fiber | 12 g | 48% |
| Sugars | 9 g | N/A |
| Protein | 22 g | 44% |
Note: Nutritional information is an estimate and may vary based on specific ingredients and portion sizes.
Variations & Substitutions
-
Vegan Option: Substitute the 4-cheese Mexican blend with a vegan cheese alternative. Ensure the pierogies themselves are vegan-friendly (many are, but always check the ingredients). Omit the sour cream or substitute with a plant-based sour cream alternative.
-
Gluten-Free: If you require a gluten-free dish, use gluten-free pierogies. Several brands offer gluten-free options.
-
Protein Boost: Add shredded chicken, ground beef, or chorizo to the black bean mixture for a heartier meal. Cook the meat thoroughly before adding it to the mixture.
-
Vegetable Medley: Incorporate other vegetables like diced bell peppers, onions, or zucchini to add more nutrients and flavor.
-
Spicy Kick: Add a can of diced tomatoes with green chilies (Rotel) to the bean mixture for added flavor and heat.
-
Enchilada Sauce Variation: Experiment with different types of enchilada sauce, such as red, green, or mole, to vary the flavor profile.
FAQs (Frequently Asked Questions)
Q: Can I use homemade pierogies for this recipe?
A: Absolutely! Homemade pierogies will work beautifully in this recipe. Just be sure they are cooked according to your recipe before assembling the dish.
Q: Can I use a different kind of bean?
A: Yes, pinto beans or kidney beans would also work well in place of black beans. Adjust the seasoning accordingly to complement the bean you choose.
Q: What can I use if I don’t have Mexican blend cheese?
A: Cheddar, Monterey Jack, or Colby Jack cheese are all excellent substitutes for Mexican blend cheese.
Q: Can I prepare this in a slow cooker?
A: While not ideal, you could potentially adapt this recipe for a slow cooker. Layer the ingredients as directed and cook on low for 3-4 hours, or until the pierogies are heated through. Top with cheese during the last 30 minutes.
Q: How do I know when the pierogies are fully cooked?
A: The pierogies are fully cooked when they are heated through and tender. Piercing one with a fork will help you determine if it’s heated to the center. The internal temperature should reach 165°F (74°C).
Final Thoughts
These Tex-Mex Baked Pierogies are a delightful surprise—a symphony of unexpected flavors that harmonize beautifully. Don’t be afraid to experiment with variations to suit your palate. This is more than just a recipe; it’s an invitation to explore culinary boundaries and create your own unique dish. So, gather your ingredients, preheat your oven, and prepare to embark on a delicious adventure. And if you create a variation you’re particularly proud of, be sure to share it – I’d love to hear what you come up with!