
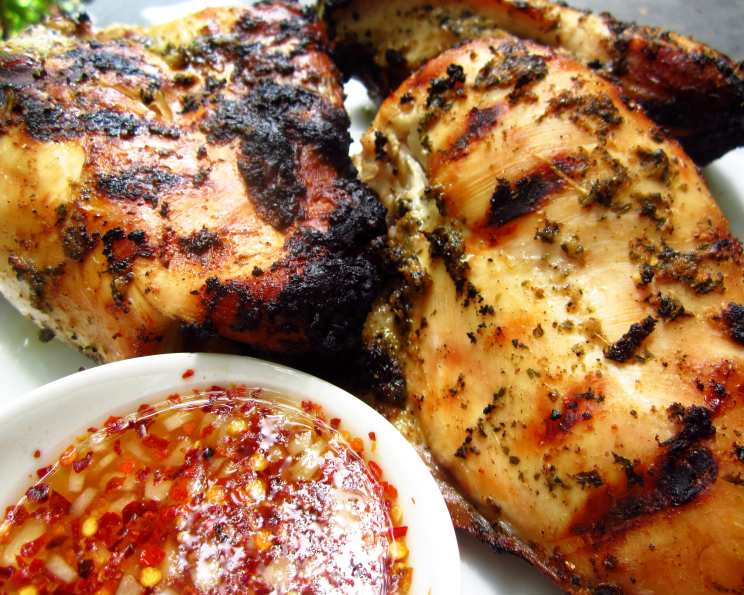
Thai-Style Grilled Chicken with Spicy Sweet and Sour Dipping Sauce
The first time I tasted truly authentic Thai grilled chicken, I was wandering through a bustling night market in Chiang Mai. The air, thick with the scents of lemongrass, chilies, and grilling meats, was intoxicating. I remember the vendor handing me a piece, still sizzling, wrapped in a banana leaf. The flavors – the savory chicken, the bright, spicy-sweet sauce – exploded in my mouth. It was an epiphany, a culinary revelation that I’ve been chasing ever since. This recipe captures the essence of that memory, a perfect balance of flavors that transports me back to that vibrant Thai night.
Recipe Overview
- Prep Time: 25 minutes
- Cook Time: 23-28 minutes
- Total Time: 53-58 minutes (plus brining time)
- Servings: 4
- Dietary Type: Gluten-Free (check fish sauce ingredients)
Ingredients
For the Brine:
- ½ cup granulated sugar
- ½ cup table salt
- 4 (12 ounce) chicken breasts, split bone-in, skin-on, about 12 ounces each
For the Dipping Sauce:
- 1 teaspoon red pepper flakes
- 3 small garlic cloves, minced (1 ½ teaspoons)
- ¼ cup distilled white vinegar
- ¼ cup lime juice, from 2 to 3 limes
- 2 tablespoons fish sauce
- ⅓ cup granulated sugar
For the Rub:
- 12 medium garlic cloves, minced (¼ cup)
- 2 inches fresh ginger, peeled and minced (about 2 inches)
- 2 tablespoons ground black pepper
- 2 tablespoons ground coriander
- ⅔ cup fresh cilantro leaves, chopped
- ¼ cup lime juice, from 2 to 3 limes
- 2 tablespoons vegetable oil, plus more
- Vegetable oil, for grill grate
Equipment Needed
- Large container or bowl
- Small bowl
- Chimney starter
- Grill
- Disposable aluminum roasting pan (optional, but recommended)
- Instant-read thermometer
- Long-handled grill tongs
- Paper towels
- Medium bowl
- Plastic wrap
Instructions
- Brine the Chicken: In a large container or bowl, dissolve the granulated sugar and table salt in 2 quarts of cold water. Submerge the chicken breasts in the brine and refrigerate for at least 30 minutes, but no longer than 1 hour. This step is crucial for juicy, flavorful chicken. The salt tenderizes the meat, while the sugar adds a subtle sweetness that complements the other flavors.
- Rinse and Dry: After brining, rinse the chicken under cool running water to remove excess salt. Pat it thoroughly dry with paper towels. This ensures that the skin will crisp up nicely on the grill.
- Prepare the Dipping Sauce: In a small bowl, whisk together the red pepper flakes, minced garlic, distilled white vinegar, lime juice, fish sauce, and granulated sugar. Stir until the sugar dissolves completely. Let the sauce stand at room temperature for 1 hour to allow the flavors to meld. This waiting period is essential; the sauce becomes more complex and balanced as it sits.
- Make the Rub: In another small bowl, combine the minced garlic, minced ginger, ground black pepper, ground coriander, chopped cilantro, and lime juice. Add 2 tablespoons of vegetable oil. Work the mixture with your fingers to thoroughly combine. The warmth of your hands helps release the essential oils from the spices, creating a more aromatic and flavorful rub.
- Apply the Rub: Gently slide your fingers between the skin and the meat of each chicken breast to loosen the skin, taking care not to detach it completely. This creates a pocket for the rub to penetrate and flavor the meat directly. Rub about 2 tablespoons of the rub mixture under the skin of each chicken breast. Then, thoroughly rub an even layer of the mixture onto all exterior surfaces of the chicken, including the bottom and sides. Repeat with the remaining chicken pieces.
- Refrigerate: Place the rubbed chicken in a medium bowl, cover it tightly with plastic wrap, and refrigerate while you prepare the grill. This allows the flavors of the rub to fully permeate the chicken.
- Prepare the Grill: Using a chimney starter, ignite about 6 quarts (1 large chimney, or 2 ½ pounds) of charcoal briquettes. Burn until the briquettes are covered with a thin coating of light gray ash, about 15 minutes.
- Create a Two-Level Fire: Empty the coals into the grill. Build a two-level fire by arranging all the coals in an even layer on one half of the grill. This allows you to control the cooking process, providing both direct and indirect heat.
- Heat the Grill: Position the grill grate over the coals, cover the grill, and heat until the grate is hot, about 5 minutes. The grill should be medium-hot; you should be able to hold your hand 5 inches above the grill grate for about 4 seconds.
- Clean and Oil the Grate: Scrape the grill grate clean with a grill brush. Using long-handled grill tongs, dip a wad of paper towels in vegetable oil and wipe the grill grate. This prevents the chicken from sticking.
- Grill the Chicken: Place the chicken, skin-side down, on the hotter side of the grill. Cook until browned, about 3 minutes. Using tongs, flip the chicken breasts and cook until browned on the second side, about 3 minutes longer.
- Indirect Heat Cooking: Move the chicken, skin-side up, to the cooler side of the grill and cover it with a disposable aluminum roasting pan. This creates an oven-like environment, allowing the chicken to cook through evenly without burning the skin. Continue to cook until an instant-read thermometer inserted into the thickest part of the breast (not touching bone) registers 160 degrees Fahrenheit, 10 to 15 minutes longer.
- Rest and Serve: Transfer the chicken to a platter and let it rest for 10 minutes before serving. This allows the juices to redistribute throughout the meat, resulting in a more tender and flavorful final product. Serve hot, passing the dipping sauce separately.
Expert Tips & Tricks
- Brining is Key: Don’t skip the brining step! It makes a huge difference in the juiciness and flavor of the chicken.
- Ginger Prep: To easily peel fresh ginger, use the edge of a spoon to scrape away the skin.
- Charcoal Placement: If you don’t have a chimney starter, you can arrange the charcoal in a pyramid shape and light it from the bottom.
- Flare-Ups: If flare-ups occur while grilling, move the chicken to a cooler part of the grill or use a spray bottle filled with water to extinguish the flames.
- Dipping Sauce Adjustment: Adjust the amount of red pepper flakes in the dipping sauce to your preferred level of spiciness.
- Indoor Grilling Alternative: If grilling outdoors isn’t possible, use a grill pan on the stovetop.
Serving & Storage Suggestions
Serve the Thai-style grilled chicken immediately after resting, accompanied by the spicy sweet and sour dipping sauce. It pairs wonderfully with sticky rice and a fresh cucumber salad.
Leftover chicken can be stored in an airtight container in the refrigerator for up to 3 days. Reheat gently in a preheated oven at 350 degrees Fahrenheit until warmed through. You can also reheat it in the microwave, but be careful not to overcook it, as it can become dry.
The dipping sauce can be stored in an airtight container in the refrigerator for up to 1 week.
Nutritional Information
| Nutrient | Amount per Serving | % Daily Value |
|---|---|---|
| Calories | 855.4 kcal | N/A |
| Calories from Fat | 351 g | 41% |
| Total Fat | 39 g | 60% |
| Saturated Fat | 10 g | 50% |
| Cholesterol | 217.7 mg | 72% |
| Sodium | 15089.3 mg | 628% |
| Total Carbohydrate | 52.3 g | 17% |
| Dietary Fiber | 2.5 g | 10% |
| Sugars | 42.6 g | N/A |
| Protein | 73 g | 146% |
Note: The % Daily Value (DV) is based on a 2,000 calorie diet. Daily values may be higher or lower depending on your calorie needs.
Note: Sodium values are very high as written in original recipe; please adjust brine or sauce accordingly to meet dietary needs.
Variations & Substitutions
- Chicken Thighs: Substitute bone-in, skin-on chicken thighs for the breasts. Adjust cooking time accordingly, ensuring the internal temperature reaches 175 degrees Fahrenheit.
- Spicier Sauce: For an extra kick, add a finely chopped Thai chili pepper to the dipping sauce.
- Herb Variations: Experiment with different herbs in the rub, such as basil or mint, for a unique flavor profile.
- Sweetener Options: Use honey or maple syrup instead of granulated sugar in the dipping sauce for a different kind of sweetness.
- Vegetarian Option: Use extra-firm tofu, pressed and marinated in the rub, then grilled for a delicious vegetarian alternative.
FAQs (Frequently Asked Questions)
Q: Can I use boneless, skinless chicken breasts?
A: While you can, bone-in, skin-on chicken breasts are highly recommended for maximum flavor and juiciness. The bone and skin help to keep the chicken moist during grilling.
Q: Can I make the rub ahead of time?
A: Yes, the rub can be made up to 2 days in advance and stored in an airtight container in the refrigerator.
Q: What if I don’t have fish sauce?
A: Fish sauce is essential for the authentic Thai flavor, but if you must substitute, use soy sauce. Use it sparingly, as soy sauce is saltier than fish sauce.
Q: How do I know when the chicken is done?
A: The best way to ensure the chicken is cooked through is to use an instant-read thermometer. Insert it into the thickest part of the breast, avoiding the bone. The chicken is done when it reaches an internal temperature of 160 degrees Fahrenheit.
Q: Can I freeze the leftover grilled chicken?
A: Yes, you can freeze the leftover chicken. Wrap it tightly in plastic wrap and then in foil or place it in a freezer-safe container. It can be stored in the freezer for up to 2 months. Thaw it overnight in the refrigerator before reheating.
Final Thoughts
This Thai-style grilled chicken is more than just a recipe; it’s a journey to the vibrant streets of Thailand. The combination of the flavorful rub, the juicy, brined chicken, and the explosive sweet and sour dipping sauce is simply irresistible. Don’t be intimidated by the list of ingredients – the process is straightforward, and the result is well worth the effort. Gather your ingredients, fire up the grill (or preheat your oven!), and prepare to be transported. I encourage you to try this recipe and share your feedback. Pair it with a refreshing Thai iced tea for a truly authentic experience!