
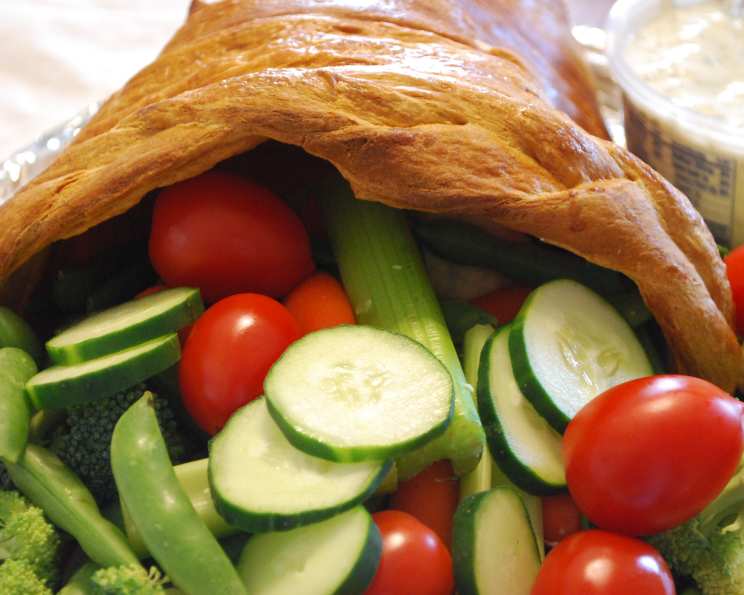
Thanksgiving Cornucopia: A Festive Bread Centerpiece
I’ll never forget the Thanksgiving when my Aunt Carol decided to get really creative with the holiday decorations. We walked into her dining room, and amidst the perfectly arranged gourds and fall foliage, sat this incredible edible cornucopia overflowing with fresh vegetables. It was a showstopper! The kids (myself included) were mesmerized, and even the adults couldn’t resist nibbling on the crunchy, colorful bounty. It wasn’t just a decoration; it was an invitation to celebrate the harvest and enjoy the season’s freshest flavors. That memory sparked my love for creating edible centerpieces, and this Thanksgiving Cornucopia recipe is my homage to Aunt Carol’s inventive spirit.
Recipe Overview
- Prep Time: 30 minutes
- Cook Time: 45 minutes
- Total Time: 1 hour 15 minutes
- Servings: Variable, depending on the amount of vegetables used
- Yield: 1 Large Cornucopia
- Dietary Type: Vegetarian (can be made vegan with plant-based breadstick dough and glaze)
Ingredients
- 3 containers refrigerated breadstick dough
- 1 large egg, beaten with 1 tablespoon water (for glaze – can substitute with plant-based milk for a vegan option)
Assorted Raw Vegetables (choose your favorites and adjust quantities based on the size of your cornucopia):
- Sugar snap peas
- Cherry tomatoes
- Yellow cherry tomatoes
- Baby carrots
- Baby squash
- Cauliflower florets
- Broccoli florets
Equipment Needed
- Cookie sheet (at least 17″x 14″)
- Heavy duty aluminum foil
- Clear tape
- Non-stick cooking spray
- Wire rack
Instructions
- Preheat your oven to 350 degrees F (175 degrees C).
- Lightly spray a cookie sheet (at least 17″x 14″) with non-stick cooking spray. This will prevent the breadstick cornucopia from sticking while baking.
- Tear off a 30″x 18″ sheet of heavy duty aluminum foil. The heavy duty foil is important to provide a sturdy base for the cone.
- Fold the foil in half to approximately 18″x 15″. This doubles the strength of the foil, further supporting the structure.
- Roll the folded foil diagonally to form a hollow cone, about 18″ long with a diameter of 5″ at the widest end (the cornucopia opening). This shape is crucial for achieving the classic cornucopia form.
- Fasten the end of the foil cone securely with clear tape. Make sure the tape is applied firmly to prevent the cone from unraveling during the baking process.
- Stuff the cone with crumpled regular foil until the form is rigid. This crumpled foil will provide internal support and prevent the cornucopia from collapsing in the oven. Pack it in tightly!
- Bend the tail (pointed end) of the cone up then down at the end to create a slight curve, mimicking the traditional cornucopia shape.
- Spray the outside of the foil cone generously with non-stick cooking spray. This will prevent the breadstick dough from sticking to the foil while baking, making it easier to remove later.
- Place the prepared foil cone onto the sprayed cookie sheet.
- Open and unroll the first can of breadstick dough on a clean work surface.
- Separate the breadsticks.
- Begin wrapping one breadstick around the tip of the cone. Press gently to adhere the dough to the foil.
- Brush the end of the next breadstick with the egg wash glaze (beaten egg and water) and press it to attach it to the end of the first breadstick. The egg wash acts as a glue, ensuring a secure bond between the dough pieces.
- Continue spiral-wrapping the cone, slightly overlapping the dough, until there are only 3 breadsticks left. Overlapping helps create a more solid and visually appealing structure.
- Pinch one end of the remaining 3 breadsticks together, then braid them to create a decorative element around the opening of the cornucopia.
- Brush the bread around the opening of the cornucopia with the egg wash glaze.
- Gently press the braided dough onto the glazed area. This ensures it adheres securely and looks neat.
- Brush the entire cornucopia (including the braid) with the egg wash glaze. This glaze will give the baked bread a beautiful, golden-brown color.
- Bake for 45 minutes in the preheated oven, or until the bread is a rich brown color. The baking time may vary depending on your oven, so keep a close eye on it.
- If parts of the cornucopia start to darken too much during baking, cover them loosely with pieces of foil to prevent burning.
- Remove the cornucopia from the oven and let it cool completely on the cookie sheet on a wire rack. Allowing it to cool completely will help it firm up and prevent breakage during removal.
- Once cooled, carefully remove the foil from the inside of the bread cornucopia. Be gentle to avoid damaging the bread structure.
- If you plan to freeze the cornucopia for later use, leave the foil inside for extra support during freezing and thawing. Remove the foil once the cornucopia is thawed.
- Just before serving, fill the cornucopia with the assorted raw vegetables directly on the table, allowing them to spill out of the opening for a bountiful and visually appealing display.
Important Note: To prevent the centerpiece from absorbing atmospheric moisture and becoming soggy, the baked cornucopia cone can be sprayed with shellac or clear enamel. However, if treated in this manner, the cornucopia will be inedible but can be preserved and reused for future holidays.
Expert Tips & Tricks
- For a richer flavor, brush the cornucopia with melted butter or olive oil instead of the egg wash glaze.
- To prevent the cornucopia from browning too quickly, tent it with foil halfway through the baking time.
- If you’re short on time, use pre-made bread dough from the bakery instead of breadsticks. Just roll it out and cut into strips to wrap around the cone.
- Get creative with the vegetables! Use a variety of colors, shapes, and textures to create a visually stunning display.
- Add herbs and spices to the bread dough for extra flavor. Garlic powder, Italian seasoning, or even a pinch of red pepper flakes can add a delicious twist.
- To make the cornucopia extra sturdy, bake it a day ahead and let it dry out completely.
- If you’re concerned about the vegetables staying fresh, keep them chilled until just before serving.
Serving & Storage Suggestions
Serve the Thanksgiving Cornucopia immediately after filling it with the vegetables. Arrange the vegetables artfully, allowing them to cascade out of the opening for a dramatic effect.
If you’ve sprayed the cornucopia with shellac or clear enamel, it is inedible and should be discarded after use or stored for future display.
If the cornucopia is not treated with shellac, it is edible. Leftover bread can be stored at room temperature in an airtight container for up to 2 days. The vegetables should be refrigerated separately. The bread will become stale after a couple of days, but it can be refreshed by briefly warming it in the oven.
The unadorned bread cornucopia (without shellac) can be frozen for up to 2 months. Wrap it tightly in plastic wrap and then foil to prevent freezer burn. Thaw completely at room temperature before filling with vegetables.
Nutritional Information
(Estimated values, will vary based on specific ingredients and quantities used)
| Nutrient | Amount per Serving | % Daily Value |
|---|---|---|
| Calories | 250 kcal | 13% |
| Total Fat | 8g | 10% |
| Saturated Fat | 2g | 10% |
| Cholesterol | 30mg | 10% |
| Sodium | 400mg | 17% |
| Total Carbohydrate | 40g | 15% |
| Dietary Fiber | 2g | 7% |
| Sugars | 5g | – |
| Protein | 5g | 10% |
Variations & Substitutions
- Gluten-Free Cornucopia: Use gluten-free breadstick dough or a homemade gluten-free dough recipe.
- Vegan Cornucopia: Use plant-based breadstick dough and substitute the egg wash with plant-based milk or a mixture of maple syrup and water.
- Savory Cornucopia: Incorporate herbs and spices into the bread dough, such as rosemary, thyme, or garlic powder. Fill with a variety of cheeses, cured meats, and olives instead of vegetables.
- Sweet Cornucopia: Use sweet bread dough and fill with fruits, berries, and chocolate. Drizzle with icing or melted chocolate.
- Regional Variations: Use ingredients that are local and in season to your area. For example, use squash, pumpkin, or cranberries for a fall-themed cornucopia.
- Mini Cornucopias: Make individual cornucopias using smaller pieces of dough and smaller vegetables. These are perfect for individual place settings.
FAQs (Frequently Asked Questions)
Q: Can I make the cornucopia ahead of time?
A: Yes! The bread cornucopia can be baked 1-2 days in advance and stored at room temperature in an airtight container. You can also freeze it for longer storage. Fill with vegetables just before serving.
Q: How do I prevent the vegetables from drying out?
A: Choose vegetables that hold their moisture well, such as cherry tomatoes, baby carrots, and broccoli florets. You can also lightly mist the vegetables with water before arranging them in the cornucopia.
Q: Can I use a different type of dough?
A: Yes, you can use pizza dough, crescent roll dough, or even homemade bread dough. Just be sure to adjust the baking time accordingly.
Q: My cornucopia is browning too quickly. What should I do?
A: Tent the cornucopia with foil to prevent it from browning further. You can also lower the oven temperature slightly.
Q: How do I remove the foil from the inside of the cornucopia without breaking it?
A: Let the cornucopia cool completely before removing the foil. Gently peel the foil away from the bread, working slowly and carefully.
Final Thoughts
This Thanksgiving Cornucopia is more than just a recipe; it’s a celebration of abundance, creativity, and shared moments. Don’t be intimidated by the process – it’s a fun and rewarding project that will impress your guests and add a touch of whimsy to your holiday table. Gather your ingredients, get creative with your vegetable selection, and let your imagination run wild. And don’t forget to share your creations and feedback! Perhaps pair this beautiful centerpiece with a butternut squash soup or a classic roasted turkey. Happy Thanksgiving!