
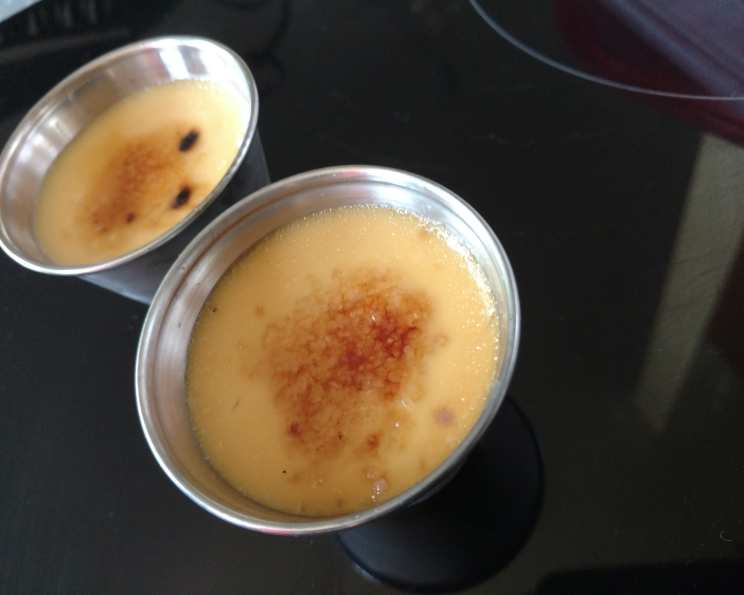
The Roof Restaurant’s Classic Crème brûlée
The clinking of silverware against china, hushed conversations, and the soft glow of the Salt Lake City skyline – these are the memories that flood back with every spoonful of perfectly caramelized crème brûlée. During a summer internship, I had the distinct pleasure of experiencing The Roof restaurant. The elegant buffet was a wonderland of culinary delights, but it was the simple, elegant crème brûlée that truly stole the show. The cool, velvety custard, contrasted by the satisfying crack of the brittle sugar crust, was a symphony of textures and flavors I’ve never forgotten. And now, I’m excited to share the original recipe, so you can bring a taste of The Roof’s magic into your own kitchen.
Recipe Overview
- Prep Time: 20 minutes
- Cook Time: 30-40 minutes
- Total Time: 1 hour 10 minutes (includes chilling)
- Servings: 10
- Yield: 10 crème brûlées
- Dietary Type: Gluten-Free
Ingredients
- 3 cups heavy cream
- 6 egg yolks
- 1 cup sugar, divided
- 1 teaspoon vanilla
- Fresh berries, for garnish (optional)
Equipment Needed
- Medium saucepan
- Medium bowl
- Small saucepan
- Whisk
- Ten 2-ounce ramekins
- 9 x 13-inch baking pan
- Blow torch
Instructions
- Preheat your oven to 300 degrees F (150 degrees C). Accurate temperature is key to a creamy custard!
- In a sturdy medium saucepan, gently heat the heavy cream until it just begins to simmer, showing small bubbles around the edges. Be careful not to scald the cream, as this can affect the final texture.
- While the cream is heating, in a medium bowl, combine the egg yolks, ¼ cup of sugar, and vanilla. Whisk them together until the mixture is pale and slightly thickened. This step helps to create a smooth and even custard.
- Slowly and gradually whisk the warm cream into the egg yolk mixture. It is crucial to temper the eggs by adding the hot cream in a thin stream while continuously whisking. This prevents the eggs from scrambling and ensures a silky custard.
- In a small saucepan, melt ½ cup of sugar over medium heat. Cook it until it turns into a light caramel color. Watch it very carefully, as it can burn quickly. Burnt caramel is bitter, and you want a sweet, nutty flavor.
- Immediately and gradually whisk the caramelized sugar into the cream and egg mixture until it’s thoroughly blended. The caramel will harden as it cools, so work quickly and continuously whisk to incorporate it evenly.
- Arrange ten 2-ounce ramekins in a 9 x 13-inch baking pan. This provides a stable base for baking the delicate custards.
- Carefully divide the cream mixture evenly among the ramekins. Avoid overfilling the ramekins, as the custard will expand slightly during baking.
- Place the baking pan into the preheated oven. Gently pour hot water into the baking pan until it reaches about ¼ inch deep. This creates a water bath, also known as a bain-marie, which helps to cook the custards evenly and prevents them from curdling.
- Bake for 30 – 40 minutes. The crème brûlées are done when the centers appear set but still have a slight wobble when gently shaken. Overbaking will result in a rubbery texture, so keep a close eye on them.
- Carefully remove the ramekins from the water bath and allow them to cool to room temperature.
- Once cooled, cover the ramekins with plastic wrap and chill them in the refrigerator for at least 2 hours, or preferably overnight. This allows the custards to set completely and develop their rich flavor.
- Just before serving, sprinkle the remaining ¼ cup of sugar evenly over the top of each custard. Use a fine, even layer of sugar for the best caramelization.
- Using a blow torch, caramelize the sugar until it is a deep golden brown. Keep the flame moving and avoid holding it in one spot for too long, as this can burn the sugar.
- Garnish with fresh berries, if desired. The acidity of the berries provides a delightful contrast to the sweetness of the crème brûlée.
Expert Tips & Tricks
- Tempering is Key: Don’t rush the process of tempering the eggs. Adding the hot cream slowly and gradually is essential to prevent curdling.
- Water Bath Temperature: Make sure the water in the water bath is hot, but not boiling. Boiling water can cause the custards to cook too quickly and unevenly.
- Caramelization Technique: When torching the sugar, hold the flame a few inches away from the surface and move it in a circular motion. This will help to create a smooth, even layer of caramel.
- Make-Ahead Option: The custards can be made up to 2 days in advance and stored in the refrigerator. However, wait to caramelize the sugar until just before serving, as the caramelized sugar will soften over time.
- Flavor Infusions: You can infuse the heavy cream with different flavors by adding ingredients like citrus zest, coffee beans, or spices to the cream while it’s heating. Just be sure to strain the cream before adding it to the egg yolks.
Serving & Storage Suggestions
Serve your crème brûlée immediately after caramelizing the sugar for the best texture and flavor. The contrast between the cold custard and the warm, brittle sugar is what makes this dessert so special. Leftover crème brûlée (before the sugar crust is added) can be stored in the refrigerator for up to 3 days. However, once the sugar is caramelized, it’s best to consume it immediately. Caramelized sugar will soften and become sticky if stored in the refrigerator. It is not recommended to freeze crème brûlée, as the texture of the custard will be negatively affected.
Nutritional Information
Please note that these values are estimates and can vary based on specific ingredients and portion sizes.
| Nutrient | Amount per Serving | % Daily Value |
|---|---|---|
| Calories | 354.5 kcal | N/A |
| Calories from Fat | 259 kcal | N/A |
| Total Fat | 28.9 g | 44% |
| Saturated Fat | 17.3 g | 86% |
| Cholesterol | 197.4 mg | 65% |
| Sodium | 31.8 mg | 1% |
| Total Carbohydrate | 22.4 g | 7% |
| Dietary Fiber | 0 g | 0% |
| Sugars | 20.1 g | N/A |
| Protein | 2.9 g | 5% |
Variations & Substitutions
- Dairy-Free Crème Brûlée: For a dairy-free version, substitute the heavy cream with full-fat coconut milk. Keep in mind that the flavor will be slightly different.
- Flavor Variations: Experiment with different flavor extracts, such as almond, peppermint, or hazelnut.
- Citrus Zest: Add a teaspoon of orange, lemon, or lime zest to the cream mixture for a bright and refreshing twist.
- Espresso Crème Brûlée: Add a tablespoon of instant espresso powder to the cream mixture for a coffee-flavored treat.
- Spiced Crème Brûlée: Infuse the cream with cinnamon, nutmeg, or cardamom for a warm and comforting flavor.
FAQs (Frequently Asked Questions)
Q: Can I make crème brûlée without a blow torch?
A: Yes, you can broil the sugar in the oven. Place the ramekins on a baking sheet and broil for 1-2 minutes, watching very carefully to prevent burning. However, a blow torch offers more control and even caramelization.
Q: Why did my crème brûlée curdle?
A: Overbaking or not using a water bath can cause the custard to curdle. Be sure to bake the crème brûlée at a low temperature and use a water bath to ensure even cooking.
Q: Can I use a different type of sugar for the caramelized topping?
A: Granulated sugar works best for caramelizing, as it melts evenly and creates a crisp crust. Other types of sugar may not caramelize as well.
Q: How do I know when the crème brûlée is done?
A: The crème brûlée is done when the edges are set, but the center still has a slight wobble when gently shaken.
Q: Why is my caramelized sugar soft instead of crisp?
A: The sugar may not have been caramelized long enough, or it may have absorbed moisture from the air. Ensure the sugar is caramelized to a deep golden brown and serve immediately after torching.
Final Thoughts
Now that you have The Roof restaurant’s coveted crème brûlée recipe, I encourage you to give it a try! The combination of creamy custard and crackly caramelized sugar is truly irresistible. Feel free to experiment with different flavor variations to create your own signature dessert. Share your creations with friends and family, and don’t hesitate to let me know how it turns out! Perhaps serve it after a delicious steak dinner for the perfect fine-dining experience at home. Happy baking!