
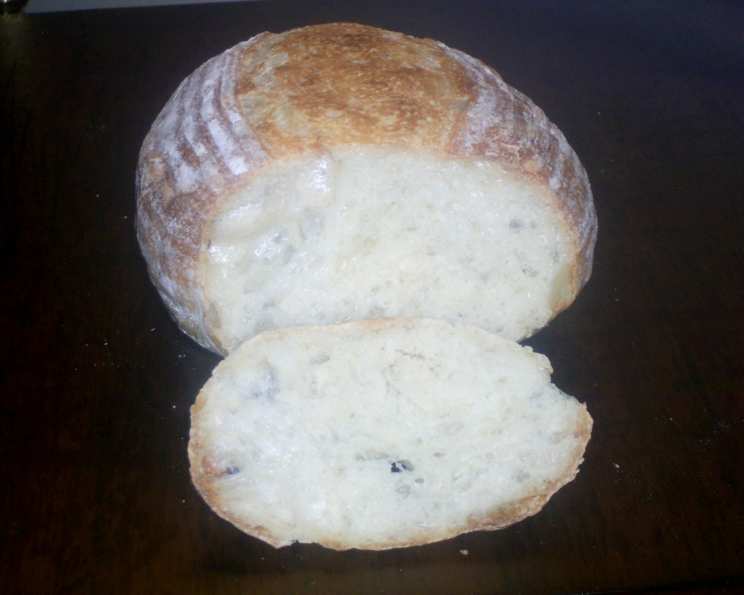
The Quest for the Perfect Holey Artisan Loaf: A Baker’s Journey
I’ll never forget the first time I saw it: a loaf of bread, seemingly defying gravity with its open, airy crumb. It was at a small bakery in San Francisco, the kind that smelled of sourdough and dreams. I was immediately captivated. This wasn’t just bread; it was a work of art, a testament to the baker’s skill and patience. From that moment on, I was determined to master the art of creating my own perfectly holey artisan bread. What followed was a long road of experimentation, countless failed attempts, and eventually, triumph. And today, I’m excited to share that journey with you.
Recipe Overview
- Prep Time: 30 minutes
- Cook Time: 20 minutes
- Rest Time: 3 hours
- Servings: 18
- Yield: 2 one pound loaves
- Dietary Type: Vegetarian
Ingredients
- 2 cups bread flour (250 g, unbleached)
- 2 cups all-purpose flour (250 g, unbleached)
- 1 3/4 cups water (390 g)
- 1 3/4 teaspoons salt (10 g, table salt)
- 1 teaspoon instant yeast (3 g)
Equipment Needed
- Mixing bowl
- Dough scraper or wet hands
- Oiled bowl or straight-sided container
- Bannetons or floured bowls
- Parchment paper
- Double-edged razor blade or lame
- Cast iron skillet
- Pizza stone or baking sheet
- Cooling rack
Instructions
-
In a large mixing bowl, combine the bread flour, all-purpose flour, water, salt, and instant yeast. Mix all ingredients just until combined. The dough will be shaggy and wet – this is perfectly normal.
-
Cover the bowl and let the dough rest for 30 minutes. This process, called autolysing, allows the flour to fully hydrate and the gluten to begin developing. You can use wet hands if desired.
-
After the rest, it’s time to build strength through stretch and folds. With wet hands or a dough scraper, gently stretch one side of the dough up and fold it over onto itself, as if folding a letter. Rotate the bowl 90 degrees and repeat the stretch and fold. Continue this process for all four sides of the dough. Be gentle and avoid tearing the dough.
-
Place the dough in a lightly oiled bowl or a straight-sided container. Cover the bowl or container tightly.
-
Perform the stretch and fold again in 30 minutes, and return to the bowl. The dough should be stronger, smoother, and shinier. If the dough still feels weak or lacks structure, perform another stretch and fold in 20 to 30 minutes.
-
Allow the dough to rise at room temperature until it has approximately doubled in volume, or slightly more than doubled. This process should take 2 to 3 hours, depending on the temperature of your kitchen.
-
Once the dough has risen sufficiently, gently turn it out onto a lightly floured surface. Divide the dough into two equal parts.
-
Gently shape each piece of dough into a ball, using flour on the counter and your hands to prevent sticking. Avoid overworking the dough; the goal is to maintain the air bubbles that have formed during fermentation.
-
Place each ball of dough into a well-floured banneton basket or a floured bowl lined with a clean kitchen towel. Cover the bannetons or bowls and let the dough rise for another 40 to 50 minutes. This is the final proofing stage.
-
Meanwhile, preheat your oven to 500°F (260°C). Place a cast iron skillet on the floor of the oven (or on a lower rack) to preheat as well. The skillet will be used to create steam, which is essential for a crispy crust and open crumb. If you have a pizza stone, place it on the middle rack to preheat too.
-
When the dough has increased in volume by approximately 1.5 times, it’s ready to be baked. Carefully turn one of the dough balls out onto a piece of parchment paper.
-
Using a double-edged razor blade or a lame, score the top of the loaf with a sharp, clean cut. Scoring allows the bread to expand properly in the oven and creates an attractive appearance. Be careful not to cut yourself.
-
Carefully transfer the parchment paper with the scored loaf onto the preheated pizza stone or baking sheet. Reduce the oven temperature to 425°F (220°C).
-
Carefully pour 1 cup of boiling water into the preheated cast iron skillet. This will create steam in the oven. Be extremely cautious when adding water to the hot skillet, as it will splatter. Avoid getting water on the oven door glass.
-
Bake the loaf for 12 minutes. After 12 minutes, rotate the loaves for even cooking and carefully remove the steaming pan. Bake for another 8 minutes, or until the internal temperature of the loaf reaches 205°F (96°C).
-
Remove the baked loaf from the oven and place it on a cooling rack. Repeat the process with the second loaf.
-
Allow the loaves to cool completely for at least 45 minutes before slicing and serving. This is crucial for achieving the best texture and flavor.
Expert Tips & Tricks
- The Poolish Boost: For enhanced flavor and browning, try using a poolish. Mix one-third of the flour with one-third of the water and add 1/4 teaspoon of instant yeast. Cover and leave on the counter for 4 hours until bubbly and risen to double. Then add the remaining ingredients and proceed as written.
- Wet Dough is Key: Don’t be afraid of the wet dough! It’s what creates the open crumb structure. Resist the urge to add more flour.
- Steam is Essential: The steam created by the hot water in the cast iron skillet is vital for a crispy crust and proper oven spring.
- Don’t Over-Proof: Over-proofed dough will collapse in the oven. Look for a slightly puffed dough that springs back slowly when gently poked.
- Scoring Matters: A well-placed score allows the loaf to expand properly. Experiment with different scoring patterns.
Serving & Storage Suggestions
Serve your holey artisan bread warm, sliced, and with your favorite toppings. It’s delicious with butter, olive oil, jam, or cheese. This bread is also perfect for sandwiches, toast, or dipping in soup.
Store leftover bread in a paper bag at room temperature for up to 2 days. For longer storage, wrap the bread tightly in plastic wrap and freeze it for up to 2 months. To reheat frozen bread, thaw it completely and then bake it in a preheated oven at 350°F (175°C) for 5-10 minutes, or until warmed through.
Nutritional Information
| Nutrient | Amount per Serving | % Daily Value |
|---|---|---|
| Calories | 101.8 kcal | N/A |
| Calories from Fat | 2 g | 3% |
| Total Fat | 0.3 g | 0% |
| Saturated Fat | 0.1 g | 0% |
| Cholesterol | 0 mg | 0% |
| Sodium | 227.4 mg | 9% |
| Total Carbohydrate | 21.3 g | 7% |
| Dietary Fiber | 0.8 g | 3% |
| Sugars | 0.1 g | 0% |
| Protein | 3 g | 5% |
Variations & Substitutions
- Whole Wheat Variation: Substitute up to 50% of the bread flour with whole wheat flour for a nuttier flavor and denser texture.
- Herb Infusion: Add 1-2 tablespoons of chopped fresh herbs, such as rosemary, thyme, or oregano, to the dough during the initial mixing.
- Olive Bread: Add 1/2 cup of pitted and chopped olives to the dough during the initial mixing.
- Seed Sprinkle: Before baking, sprinkle the scored loaf with sesame seeds, poppy seeds, or sunflower seeds for added flavor and texture.
FAQs (Frequently Asked Questions)
Q: Why is my dough so sticky?
A: This recipe uses a high hydration dough, which means it will be sticky. Resist the urge to add more flour, as this will result in a denser loaf. Wet hands or a dough scraper are your friends!
Q: My bread is flat and dense. What went wrong?
A: Several factors can contribute to a flat and dense loaf, including over-proofing, under-proofing, using old yeast, or not creating enough steam in the oven.
Q: How do I know when the dough is properly proofed?
A: The dough should have almost doubled in size and feel light and airy. Gently poke the dough; if it springs back slowly, it’s ready to bake.
Q: Can I make this recipe without a cast iron skillet?
A: While a cast iron skillet is ideal for creating steam, you can also use a baking sheet filled with hot water. Place the baking sheet on the bottom rack of the oven while baking.
Q: Can I use a stand mixer to make this dough?
A: Yes, you can use a stand mixer with a dough hook attachment. Mix the ingredients on low speed until just combined, then increase the speed to medium and knead for 5-7 minutes, or until the dough is smooth and elastic.
Final Thoughts
Making holey artisan bread may seem daunting at first, but with a little patience and practice, you’ll be rewarded with a beautiful and delicious loaf. Don’t be discouraged by initial setbacks – every baker experiences them. Embrace the process, experiment with different techniques, and most importantly, have fun. I encourage you to try this recipe and share your results with friends and family. There’s nothing quite like the satisfaction of slicing into a loaf of bread you’ve made with your own hands. And why not serve this beautiful bread alongside a hearty bowl of homemade soup? Bon appétit!