
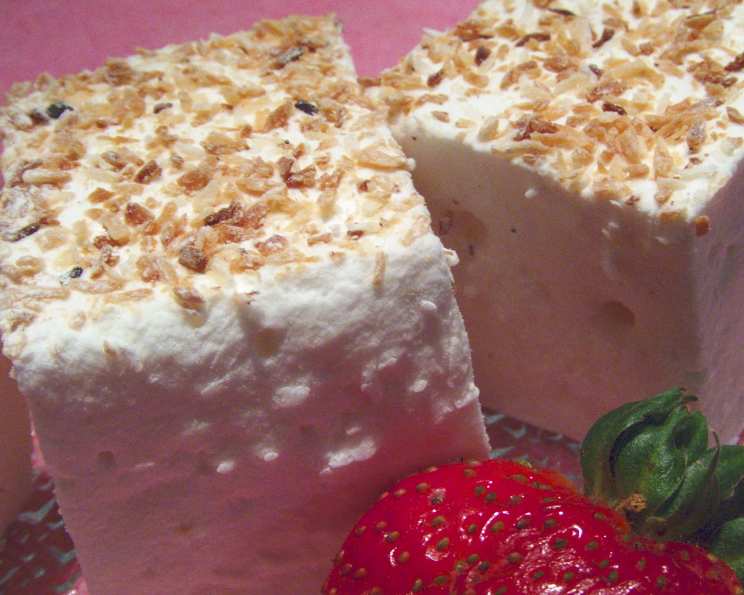
Toasted Coconut Marshmallow Squares: A Cloud of Tropical Delight
The scent of toasted coconut always transports me back to my childhood summers spent at my grandmother’s house. She always had a jar of toasted coconut on hand, ready to sprinkle on everything from ice cream to her famous ambrosia salad. While she never made these exact marshmallow squares, the aroma instantly reminds me of her warm kitchen and the feeling of pure, unadulterated happiness. These squares are like a grown-up version of that feeling—soft, pillowy, and bursting with coconut flavor.
Recipe Overview
- Prep Time: 30 minutes
- Cook Time: 10 minutes
- Total Time: 3 hours 15 minutes
- Servings: 48
- Yield: Approximately 4 dozen squares
- Dietary Type: Not specified (see variations for modifications)
Ingredients
- 2 cups unsweetened dried shredded coconut
- 3 (1/4 ounce) envelopes unflavored gelatin
- 1 cup water, divided
- 1 1/2 cups sugar
- 1 cup light corn syrup
- 1/4 teaspoon salt
- 2 teaspoons pure vanilla extract
- 1/2 teaspoon coconut extract
Equipment Needed
- 9-inch square metal baking pan
- Stand mixer fitted with a whisk attachment
- Candy thermometer
- Small heavy saucepan
- Shallow baking pan
- Pastry brush
Instructions
-
Preheat your oven to 350 degrees F (175 degrees C), positioning a rack in the center.
-
Spread the unsweetened dried shredded coconut in a shallow baking pan. Toast it in the preheated oven, stirring occasionally, until it turns a beautiful golden color. This should take about 7 to 10 minutes. Watch carefully to prevent burning! Set aside to cool slightly.
-
Lightly oil the 9-inch square metal baking pan. Sprinkle the bottom of the pan evenly with 1/2 cup of the toasted coconut. This creates a delightful, textural base for the marshmallows.
-
In the bowl of your stand mixer (fitted with the whisk attachment), sprinkle the unflavored gelatin over 1/2 cup of the water. Allow the gelatin to soften while you prepare the syrup; this process is called blooming and is crucial for achieving the right marshmallow texture.
-
In a small, heavy saucepan, combine the sugar, light corn syrup, salt, and the remaining 1/2 cup of water. Heat over low heat, stirring constantly until the sugar is completely dissolved. You don’t want any gritty bits!
-
Once the sugar is dissolved, increase the heat to medium and bring the mixture to a boil. At this stage, it’s important not to stir. Instead, use a pastry brush dipped in cold water to wash down any sugar crystals that form on the sides of the pan. This prevents crystallization and ensures a smooth syrup.
-
Insert the candy thermometer into the syrup and continue boiling, without stirring, until the thermometer registers 240 degrees F (116 degrees C), which is the soft ball stage. This stage is essential for achieving the right consistency in your marshmallows.
-
Remove the saucepan from the heat and let it stand for a moment until the bubbles dissipate. This allows the syrup to stabilize slightly before incorporating it into the gelatin.
-
With the mixer on low speed, carefully pour the hot syrup into the gelatin mixture in a thin, steady stream down the side of the bowl. This helps to prevent splattering and ensures even incorporation.
-
Once all the syrup is added, increase the mixer speed to high and beat until the mixture becomes very thick and glossy. This process typically takes about 15 minutes. Be patient; this is where the magic happens! The mixture will transform from a thin syrup to a voluminous, marshmallow-like consistency.
-
Add the vanilla extract and coconut extract and beat for one minute more, ensuring they are fully incorporated. These extracts provide the quintessential marshmallow flavor.
-
Using a spoon, gently spoon the marshmallow mixture over the toasted coconut in the prepared baking pan. Use dampened fingertips to press the marshmallow evenly into the pan, smoothing the top. Be careful; it will be sticky!
-
Evenly sprinkle the remaining 1/2 cup of toasted coconut over the top of the marshmallow. This creates a beautiful and flavorful topping.
-
Let the marshmallow stand, uncovered, at room temperature until it is firm enough to cut. This usually takes about 2 hours. Avoid the temptation to refrigerate it, as this can make the marshmallows too sticky.
-
Once the marshmallow is firm, run a sharp knife around the edge of the pan to loosen it. Invert the marshmallow slab onto a cutting board.
-
Cut the marshmallow into 3/4-inch wide strips, then cut each strip into 3/4-inch squares. The size is customizable to your preference!
-
Place the remaining toasted coconut in a small bowl. Dredge each marshmallow square in the toasted coconut, ensuring it is completely coated. This final step adds even more coconut flavor and prevents the marshmallows from sticking together.
Expert Tips & Tricks
- Toast the coconut evenly: Keep a close eye on the coconut while toasting to prevent burning. Stir it frequently for even browning.
- Use a heavy-bottomed saucepan: This helps to distribute heat evenly and prevents the syrup from scorching.
- Accuracy with the thermometer: Ensure your candy thermometer is accurate for the best results.
- Dampen your fingertips: Makes pressing the marshmallow into the pan much easier.
- Make it a double coconut delight: Use coconut oil in place of butter to grease the pan for an extra layer of coconut flavour.
- To avoid stickiness, try to make on a dry day. Humidity can make the marshmallows extra sticky.
- For cleaner cuts, lightly grease your knife or pizza cutter with coconut oil.
Serving & Storage Suggestions
Serve these Toasted Coconut Marshmallow Squares as a delightful treat on their own, or alongside a cup of hot chocolate or coffee. They make a wonderful addition to dessert platters or as a sweet ending to any meal.
Store the marshmallow squares in an airtight container between sheets of parchment paper in a cool, dry place for up to 1 month. Avoid storing them in the refrigerator, as this can make them sticky. They are best enjoyed at room temperature.
Nutritional Information
| Nutrient | Amount per Serving | % Daily Value |
|---|---|---|
| Calories | 70 kcal | 3% |
| Total Fat | 2.3g | 3% |
| Saturated Fat | 2g | 10% |
| Cholesterol | 0mg | 0% |
| Sodium | 18.8mg | 0% |
| Total Carbohydrate | 12.6g | 4% |
| Dietary Fiber | 0.6g | 2% |
| Sugars | 8.4g | 33% |
| Protein | 0.6g | 1% |
Variations & Substitutions
- Vegan Marshmallows: Substitute the gelatin with agar-agar powder for a vegan version. You’ll need to adjust the quantity and blooming time according to the agar-agar package instructions.
- Different Extracts: Experiment with other extracts, such as almond or peppermint, for a unique flavor twist.
- Chocolate Drizzle: Drizzle melted dark or white chocolate over the finished marshmallows for an extra touch of indulgence.
- Nutty Marshmallows: Add chopped nuts, such as almonds or pecans, to the toasted coconut for added texture and flavor.
FAQs (Frequently Asked Questions)
Q: Why is it important not to stir the sugar syrup after it comes to a boil?
A: Stirring can cause sugar crystals to form, resulting in a grainy rather than smooth marshmallow. Washing down the sides of the pan with a wet pastry brush prevents crystallization.
Q: Can I use a different type of sweetener instead of corn syrup?
A: Corn syrup helps prevent sugar crystallization and adds a particular texture. Substituting it may affect the final texture of the marshmallows, making them either too firm or too soft.
Q: How do I know if my marshmallow mixture is thick enough?
A: The mixture should be very thick, glossy, and hold its shape when dropped from the whisk. It will have significantly increased in volume.
Q: Can I make these marshmallows ahead of time?
A: Yes, these marshmallows can be made up to 1 month in advance. Store them properly in an airtight container between layers of parchment paper to prevent sticking.
Q: What if my marshmallows are too sticky?
A: Humidity can cause stickiness. Try making them on a drier day or adding a bit more toasted coconut to the coating.
Final Thoughts
These Toasted Coconut Marshmallow Squares are more than just a sweet treat; they’re a little piece of sunshine in every bite. The soft, pillowy texture combined with the irresistible flavor of toasted coconut makes them utterly addictive. I encourage you to give this recipe a try and experience the simple joy of homemade marshmallows. Don’t hesitate to experiment with different extracts or toppings to create your own signature version. Share your creations and feedback – I’d love to hear how they turn out!