
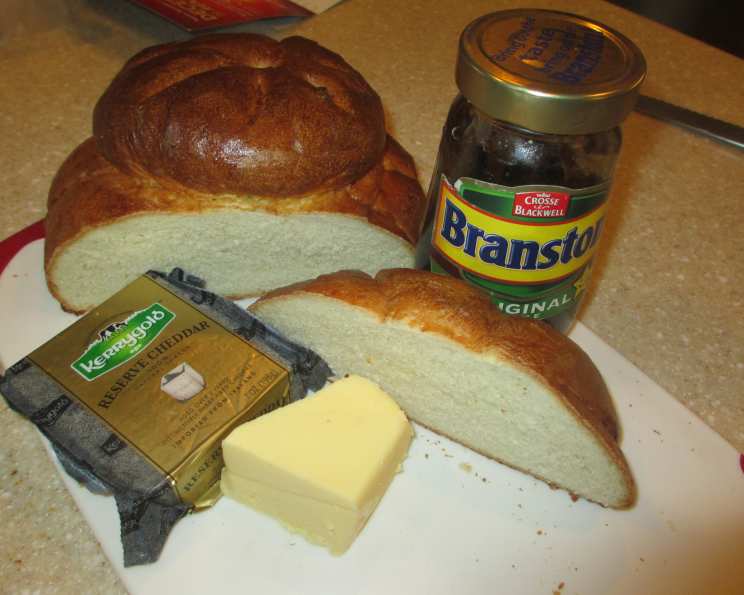
Traditional Cottage Loaf: Old Fashioned Rustic English Bread
The scent of baking bread always takes me back to my childhood summers spent in the English countryside. My grandmother, a woman with flour perpetually dusting her apron, would let me “help” her knead dough in her cozy kitchen. While she baked all sorts of breads, the cottage loaf was a particular favorite. Its charming shape, like two stacked pillows, always seemed to whisper of simple pleasures and hearty meals shared around a warm table. I can almost feel the warmth of the Aga stove on my face as I recreate this loaf today.
Recipe Overview
- Prep Time: 1 hour 30 minutes
- Cook Time: 35-45 minutes
- Total Time: 2 hours 15 minutes
- Servings: 6-8
- Yield: 1 Large Cottage Loaf
- Dietary Type: Vegetarian
Ingredients
- 500 g strong white bread flour
- 2 teaspoons salt
- 1 teaspoon caster sugar
- 2 teaspoons fast-rising active dry yeast OR 1 ounce fresh yeast
- 325 ml tepid milk and water mixed
- 1 egg
- Salt, for glaze
Equipment Needed
- Large mixing bowl
- Clean, oiled bowl
- Cling film (plastic wrap)
- Lightly floured surface
- Baking tray
- Wooden spoon (or fingers)
- Sharp knife
- Pastry brush
Instructions
- Begin by sifting the flour and salt into a large mixing bowl. Then, stir in the sugar and yeast. If using fresh yeast, dissolve it in a small jug with a portion of the lukewarm milk and water mixture until it becomes frothy. Thoroughly mix this into the flour.
- Make a well in the center of the dry ingredients. Gradually add the lukewarm milk and water mixture, stirring to form a dough.
- Turn the dough out onto a lightly floured surface. Knead for 10 to 15 minutes until the dough becomes smooth and elastic. This step is crucial for developing the gluten and achieving a good texture.
- Place the kneaded dough into a large, clean bowl that has been lightly oiled. Cover the bowl with oiled clingfilm (plastic wrap) and place it in a warm spot to rise. Allow the dough to double in size; this process can take anywhere from 1 to 2 hours, depending on the warmth of the environment.
- Once the dough has doubled, gently punch it down to release the air. Knead the dough for about 1 minute.
- Divide the dough into two portions: one approximately two-thirds of the total dough and the other one-third. Shape each portion into a round. Cover the rounds and let them rest for 5 minutes.
- Carefully place the smaller round on top of the larger one. Now comes the signature step: using a floured wooden spoon handle (or your fingers), press down firmly through the center of both rounds to join them together. This creates the distinctive cottage loaf shape.
- Take a very sharp knife and make deep cuts all around the top round and the bottom round. These cuts allow the loaf to expand beautifully during baking and give it its characteristic rustic appearance. Aim for about 6-8 cuts on each tier.
- Transfer the shaped cottage loaf to a lightly floured baking tray. Cover it loosely and let it prove (rise) for approximately 45 minutes, or until it has doubled in size again.
- While the loaf is proving, preheat your oven to 220°C/440°F/Gas Mark 7. It’s important to have the oven fully preheated before baking.
- In a small bowl, beat the egg with a tablespoon of water and a pinch of salt. This mixture will serve as your egg wash.
- Once the loaf has fully proved, gently brush the entire surface with the egg wash. This will give the loaf a beautiful, glossy, golden-brown crust.
- Bake the cottage loaf for about 35 to 45 minutes, or until it is dark golden brown and sounds hollow when tapped on the bottom. Keep a close eye on it during the last 15 minutes to prevent burning. If it starts to brown too quickly, you can loosely tent it with foil.
- Once baked, transfer the cottage loaf to a wire rack to cool completely before slicing and serving.
Expert Tips & Tricks
- Overnight Proving: For an even more complex flavor, consider leaving the dough to prove in a cool place (but not the refrigerator) overnight. This slow fermentation develops deeper flavors.
- Steam: To get a crispier crust, you can add steam to the oven during the first 10 minutes of baking. You can do this by placing a tray of hot water on the bottom rack of the oven.
- Doneness Check: If you’re unsure if the loaf is fully baked, use a thermometer. The internal temperature should reach around 93-95°C (200-205°F).
- Shaping: Don’t be afraid to experiment with the shape of your cottage loaf. You can make it taller or wider, depending on your preference.
- Wooden Spoon Trick: Using a wooden spoon handle dipped in flour helps to make a clean indentation between the two portions of dough.
Serving & Storage Suggestions
The traditional cottage loaf is best served fresh, sliced into wedges, and accompanied by a generous slathering of butter. It’s fantastic with a ploughman’s lunch – a hunk of mature Cheddar cheese, pickled onions, and perhaps some cold cuts. It also makes excellent sandwiches, even if the shape is a little unconventional.
Store any leftover cottage loaf in an airtight container at room temperature for up to 2 days. For longer storage, you can wrap it tightly in plastic wrap and freeze it for up to 2 months. To refresh frozen bread, thaw it completely and then warm it in a low oven (around 150°C/300°F) for about 10-15 minutes.
Nutritional Information
| Nutrient | Amount per Serving | % Daily Value |
|---|---|---|
| Calories | 356.1 kcal | N/A |
| Calories from Fat | 32 g | 9% |
| Total Fat | 3.6 g | 5% |
| Saturated Fat | 1.6 g | 8% |
| Cholesterol | 42.6 mg | 14% |
| Sodium | 815.1 mg | 33% |
| Total Carbohydrate | 67.3 g | 22% |
| Dietary Fiber | 2.5 g | 10% |
| Sugars | 1 g | 3% |
| Protein | 11.9 g | 23% |
Variations & Substitutions
- Whole Wheat Cottage Loaf: Substitute up to half of the strong white bread flour with whole wheat flour for a nuttier flavor and a denser texture.
- Seeded Cottage Loaf: Add a mix of seeds (such as sunflower, pumpkin, and sesame seeds) to the dough for added texture and nutrition.
- Herbaceous Cottage Loaf: Incorporate chopped fresh herbs, such as rosemary, thyme, or oregano, into the dough for a savory twist.
- Dairy-Free Option: Substitute the milk with a plant-based milk alternative, such as almond or soy milk. Ensure it’s tepid before adding to the dough.
FAQs (Frequently Asked Questions)
Q: Why is my cottage loaf flat and dense?
A: This could be due to several factors, including using old yeast, not kneading the dough enough, or not allowing it to prove for long enough. Make sure your yeast is fresh, knead the dough until it’s smooth and elastic, and give it sufficient time to double in size during each proving stage.
Q: How do I get a really crispy crust on my cottage loaf?
A: Adding steam to the oven during the initial baking period is key to a crispy crust. You can achieve this by placing a tray of hot water on the bottom rack of the oven.
Q: Can I use bread flour instead of strong white bread flour?
A: While you can use regular bread flour, strong white bread flour is recommended for cottage loaf as it has a higher gluten content, which helps to create a better structure and rise.
Q: Why do I need to make cuts on the loaf before baking?
A: The cuts allow the loaf to expand properly during baking and prevent it from cracking in unpredictable places. They also contribute to the characteristic appearance of the cottage loaf.
Q: How can I tell if my cottage loaf is fully baked?
A: The best way to check for doneness is to tap the bottom of the loaf. If it sounds hollow, it’s likely done. You can also use a thermometer to check the internal temperature, which should be around 93-95°C (200-205°F).
Final Thoughts
Baking a traditional cottage loaf is a labor of love, but the reward is a beautifully rustic loaf that’s bursting with flavor and character. Don’t be intimidated by the shaping – with a little practice, you’ll be creating picture-perfect cottage loaves in no time. This bread is more than just a recipe; it’s a connection to a culinary heritage. Give it a try, share it with loved ones, and let the aroma of freshly baked bread fill your home with warmth and nostalgia. I’d love to hear about your baking experience and any adaptations you make to this classic recipe!